Icom IC-7100 Support Question
Icom IC-7100 Support Question
Find answers below for this question about Icom IC-7100.Need a Icom IC-7100 manual? We have 2 online manuals for this item!
Question posted by eb5tt on March 31st, 2014
Dr Operation
Helo, On all the video´s I see on youtube,it looks that someting is not working on my radio. When they press DR a menu pops op with FROM and TO. When I press the DR button, nothing happens. Only a small screen pops up with the text: NO REPEATER FOUND. What am I doing wrong??
Current Answers
Related Icom IC-7100 Manual Pages
Instruction Manual - Page 43
...10149;Touch 2], [4], [5] then [ENT].
3 BASIC OPERATION
Setting frequency (Continued)
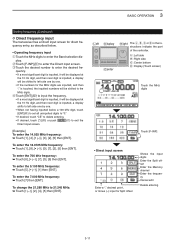
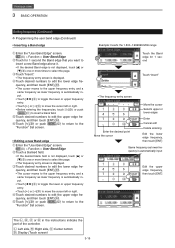
DDDirect frequency input
The transceiver has a Direct input screen for direct frequency entry, as described below a 100...CE" to delete entering. • If desired, touch [](D) or push MENU (C) to exit the Direct input screen.
[Example] To enter the 14.025 MHz frequency: ➥➥Touch [1], [4...
Instruction Manual - Page 46
...the page.
rrTouch [](D) or push MENU (C) to return to enter the Set mode. L: Left side, R: Right side, C: Center bottom D: Display (Touch screen)
3-14
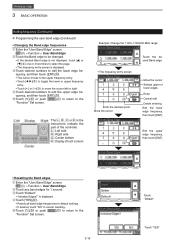
NOTE: • All frequency ranges...be deleted Touch "Delete"
The L, R, C or D in the "User Band Edge" item.
3 BASIC OPERATION
Setting frequency (Continued)
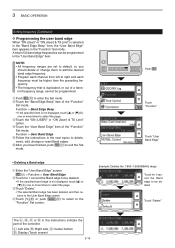
DDProgramming the user band edge
When "ON (User)" or "ON (User) & TX Limit...
Instruction Manual - Page 47
...is not displayed, touch [Y] or [Z](D) one or more times to the "Function" Set screen.
rrTouch desired numbers to edit the upper edge frequency, and then touch [ENT](D). ... indicate the part of the controller. ttTouch [](D) or push MENU (C) to return to select the page. 3 BASIC OPERATION
Setting frequency (Continued)
DDProgramming the user band edge (Continued)
•...
Instruction Manual - Page 48
... push MENU (C) to return to the "Function" Set screen. Left Display Center
Right The L, R, C or D in the instructions indicate the part of the controller. rrTouch [YES](D).
• Resets all band edge frequencies to default settings. • If desired, touch "NO" to edit the upper edge frequency, and then touch [ENT](D). 3 BASIC OPERATION...
Advanced Instructions - Page 4
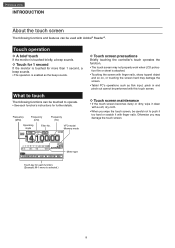
... too hard or scratch it clean with a soft, dry cloth.
• When you may not properly work when LCD protec-
Otherwise you wipe the touch screen, be careful not to operate. • See each function. (Example: M-1 menu is attached. • Touching the screen with finger nails, sharp topped object
and so on, or touching the...
Advanced Instructions - Page 50
...to the MHz digits. Previous view
3 BASIC OPERATION
Setting frequency (Continued)
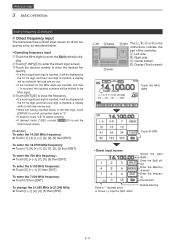
DDDirect frequency input
The transceiver has a Direct input screen for direct frequency entry, as described below ... touch "CE" to delete entering. • If desired, touch [](D) or push MENU (C) to exit the Direct input screen.
[Example] To enter the 14.025 MHz frequency: ➥➥Touch [1], [4 0], ...
Advanced Instructions - Page 53
... Edge
wwTouch for 1 second the Band edge to be programmed.
Previous view
3 BASIC OPERATION
Setting frequency (Continued)
DDProgramming the user band edge
When "ON (User)" or "ON (User...Left side, R: Right side, C: Center bottom D: Display (Touch screen)
3-14
rrTouch [](D) or push MENU (C) to return to the User Band Edge screen. wwTouch the "Band Edge Beep" item of the "Function"...
Advanced Instructions - Page 54
Previous view
3 BASIC OPERATION
Setting frequency (Continued)
DDProgramming the user band edge (Continued)
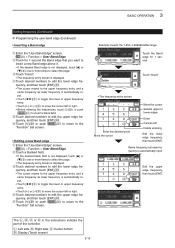
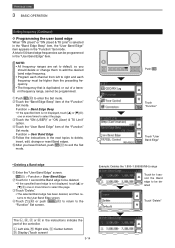
• Inserting a Band edge
qqEnter the "User Band Edge" screen.
yyTouch [](D) or push MENU (C) to return to edit the upper edge frequency, and then touch [ENT](D). quency, and then touch [ENT](D). • The cursor moves to the upper frequency...
Advanced Instructions - Page 55
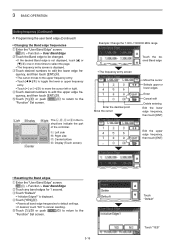
... the cursor left or right. ttTouch [](D) or push MENU (C) to return to the "Function" Set screen. eeTouch desired numbers to edit the lower edge frequency, and... second.
Previous view
3 BASIC OPERATION
Setting frequency (Continued)
DDProgramming the user band edge (Continued)
• Changing the Band edge frequencies
qqEnter the "User Band Edge" screen. rrTouch desired numbers to ...
Advanced Instructions - Page 68
...If a microphone is connected, its PTT can be used instead of the controller.
e P ush MENU (C) to receive. ooStop keying to return to close the window. eeRotate the Dial to ...or "OFF (no indication)" appears.
Previous view
4 RECEIVE AND TRANSMIT
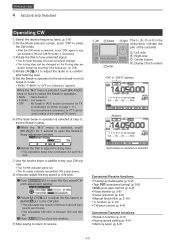
Operating CW
qqSelect the desired frequency band. (p. 3-6) wwOn the Mode selection screen, touch "CW" to select
the CW mode. • After the...
Advanced Instructions - Page 78

..."Twin Peak Filter"
Touch "ON"
4-13
eeTouch the "Twin Peak Filter" item to the
"M-2" screen (Menu M-2). Left Display Center
Right The L, R, C or D in use, the received audio output may increase... Hz for RTTY operation
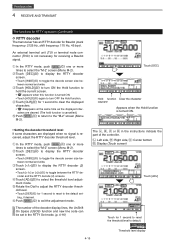
DDAbout RTTY reverse mode
Received characters are occasionally garbled when the Mark and Space signals are reversed. ttTouch [](D) or push MENU (C) to return ...
Advanced Instructions - Page 79

..., mark and shift frequencies and the keying polarity.
• Setting contents qqIn the RTTY mode, push MENU (C) one or more
times to select the "M-2" screen (Menu M-2).
Previous view
4 RECEIVE AND TRANSMIT
The functions for RTTY operation (Continued)
DDRTTY Set mode
The RTTY Set mode is used to set window, then select the "Default...
Advanced Instructions - Page 80
... the Hold function.
Previous view
4 RECEIVE AND TRANSMIT
The functions for RTTY operation (Continued)
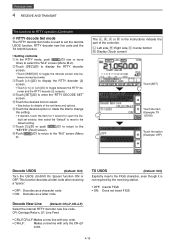
DDRTTY decoder
The transceiver has an RTTY decoder for receiving a Baudot signal.
eeTouch [HOLD](D) to the "M-2" screen (Menu M-2).
wwTouch [DEC](D) to display the RTTY decoder screen. • Touch [WIDE](D) to exit the adjustment mode.
The number of the...
Advanced Instructions - Page 81
...screen. eeTouch [](D) to display the RTTY decoder (2)
screen. • Touch [] or [](D) to the "KEYER" (Root) screen. yyTouch the desired option or rotate the Dial to change
the setting. • If desired, touch the item for RTTY operation... to select the "M-2" screen (Menu M-2). uuTouch [](D) or push MENU (C) to return to toggle between the RTTY de- iiPush MENU (C) to return to ...
Advanced Instructions - Page 82

...[RT4], or [RT5] to toggle the decode screen size between RT1-
Previous view
4 RECEIVE AND TRANSMIT
The functions for RTTY operation (Continued)
DDTransmitting an RTTY memory
Previously entered characters ... or D in the RTTY Memory (Edit) screen. qqIn the RTTY mode, push MENU (C) one or more times to display the RTTY memory screen.
yyPush MENU (C) to return to toggle the memory group ...
Advanced Instructions - Page 84
... mode, push MENU (C) one or more times to the RTTY Decoder screen. L: Left side R: Right side C: Center bottom D: Display (Touch screen)
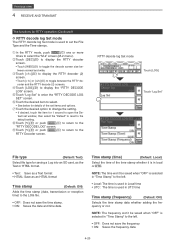
•...RTTY DECODE LOG" screen.
rrTouch [LOG](D) to insert the SD card, otherwise this function does not work properly. Previous ... RTTY operation (Continued)
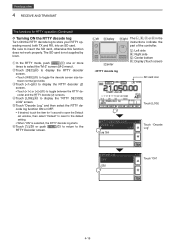
DDTurning ON the RTTY decode log
Turn ON the RTTY decode log to store your RTTY operating record...
Advanced Instructions - Page 85
...: Saves the date and time data.
ooTouch [](D) or push MENU (C) to return to select the "M-2" screen (M-2 menu).
qqIn the RTTY mode, push MENU (C) one or more times to the RTTY Decoder screen.
rrTouch [LOG](D) to the "RTTY DECODE LOG" screen. iiTouch [](D) or push MENU (C) to return to display the "RTTY DECODE LOG...
Advanced Instructions - Page 240
After programming, touch [ENT]
Touch [] to return to the "M-3" screen (Menu 3).
Previous view
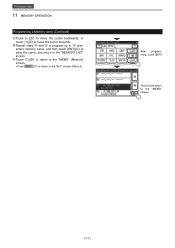
11 MEMORY OPERATION
Programming a Memory name (Continued)
ooTouch [](D) to move the cursor backwards, or touch [](D) to move the cursor forwards.
!0 Repeat steps i and o to program ...
Advanced Instructions - Page 254
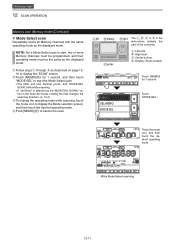
... D in the Scan Set mode, rotating the Dial changes the scanning direction. (p. 12-4)
eeTo change the operating mode while scanning, touch the mode icon to display the Mode selection screen, and then touch the desired operating mode. wwTouch [MEMO](D) for 1 second
Touch "MODE-SEL." L: Left side R: Right side C: Center bottom D: Display...
Advanced Instructions - Page 351
Previous view
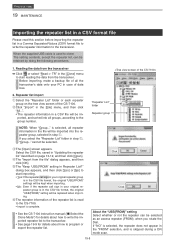
19 MAINTENANCE
Importing the repeater list in a CSV format file
Please read this section before importing the repeater list in a Comma Separated Values (CSV) format file to write the repeater information to clone: The setting contents, except the repeater list, can be retained by doing the following procedures.
1. When the supplied USB cable is used to the transceiver. Reading ...
Similar Questions

My Icom Ic-2300h Can't Change Frequency,it's Only In 144mhz
(Posted by knightofthecentury 9 months ago)

Icom 7600 Rf Power Problem
Hi I have a ICOM IC 7600 with a output power problem will work for 5mins on full then drops to 7wats...
Hi I have a ICOM IC 7600 with a output power problem will work for 5mins on full then drops to 7wats...
(Posted by Anonymous-162979 6 years ago)

Ic-7100 And Avmap Geosat 6 Aprs
How do you configure the IC-7100 to use the Geosat 6 APRS GPS output? I have both and yet to get the...
How do you configure the IC-7100 to use the Geosat 6 APRS GPS output? I have both and yet to get the...
(Posted by peasa123 9 years ago)


On The Ic-7100, Which Set Mode Item Selects Whether Or Not To Make A Communicati
(Posted by ke4uof 10 years ago)