Hitachi c15fb Support Question
Hitachi c15fb Support Question
Find answers below for this question about Hitachi c15fb - 15 Amp Miter Saw No Bevel.Need a Hitachi c15fb manual? We have 1 online manual for this item!
Question posted by edmahoney on June 3rd, 2011
Hitachi C15fb Miter Saw
How do I remove the hinge shaft to replpace the springe?
It looks like it can be forced out.
Current Answers
Related Hitachi c15fb Manual Pages
User Manual - Page 1
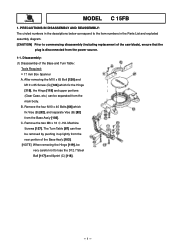
Disassembly: (1) Disassembly of the Base Ass'y [103].
[NOTE] When removing the Hinge [119], be very careful not to commencing disassembly (including replacement of the saw blade), ensure that the
plug is disconnected from the rear portion of the Base and Turn Table:
Tools Required:
• 17 mm Box Spanner
A.
The Turn Table [87] can be...
User Manual - Page 2
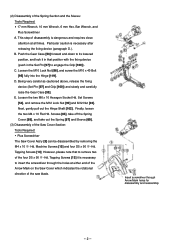
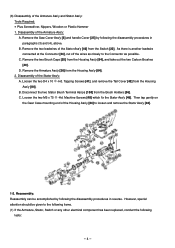
... Hd. Screws [65], take off the Spring Cover [68], and take out the Spring [67] and Sleeve [69]. (3) Disassembly of the Spring Section and the Sleeve: Tools Required:
• 17 mm Wrench, 10...15] and four D5 x 90 -Hd. E. Next, gently pull out the Hinge Shaft [102]. Tapping Screws [13] However, please note that position with the fixing device (push in the Set Pin [97] to remove two of the saw...
User Manual - Page 3
... Pin [52] and Gauge Spring [38] can then be disassembled, first loosen the two M5 x 20 -Hd. Machine Screws [18] and M5 x 16 -Hd.
When only the Switch [22] must be removed from the Handle [20].
(5) Disassembly of the Switch and Handle Section: Tools Required:
• Plus Screwdriver
A. Remove the Saw Cover Ass'y [3] by following...
User Manual - Page 4
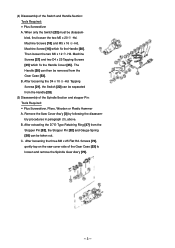
... or any other electrical component has been replaced, conduct the following
tests:
--- 4 --- D. Remove the Armature Ass'y [36] from the Housing Ass'y [84], and take out the two ...Connector as possible. Remove the Saw Cover Ass'y [3] and handle Cover [25] by following the disassembly procedures in reverse. B. Disassembly of the Armature Ass'y and Stator Ass'y: Tools Required:
• ...
User Manual - Page 5
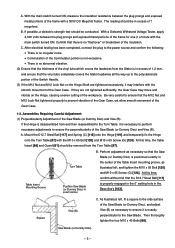
...removed from the Turn Table [87]. Confirm that there is properly engaged in the 0˚ setting hole in the Base Ass'y [103]. If they are not tightened sufficiently, the Gear Case may move and vibrate on the Hinge Shaft...the Saw Blade. B.
Saw Blade (or Dummy Disc)
--- 5 --- A.
Mount the D12.7 Steel Ball [117] and Spring (C) [118] onto the Hinge [119], and temporarily fix the Hinge
onto...
User Manual - Page 6
...
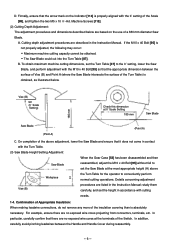
Workpiece
H
the Turn Table for the operator to the 0˚ setting, lower the Saw Blade, and perform adjustment with the 0˚ setting of a 380 mm diameter Saw Blade. Confirmation of Appropriate Insulation: When making leadwire connections, do not remove any more of the insulation covering than is obtained, as illustrated below are no...
User Manual - Page 9
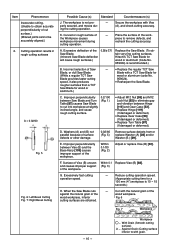
... after next cutting.
80 Within 0.1
Within 0.1 Fig. 3
E.
Excessive pressure is 10 ---
15 seconds.
• Use a Tungsten Carbide Tipped
Saw Blade for material (chips, dust,
cessive tightening of the Hinge
connection between Vise (B) [82] and the Base Ass'y [103] causes inclined bevel cutting, resulting in inaccurate angles. Excessive looseness or ex-
----
• Check for wood...
User Manual - Page 10
..., inferior
Fig. 6
cutting surfaces are obtained.
Against Grain (Cutting surface inferior to with a TCT Saw Blade for a
100 mm (4") workpiece is 10 --- 15
seconds.)
H. ing the cutting operation.
Excessively fast cutting operation speed.
---- piece to remove defects, and
recheck the cutting accuracy. Reduce cutting operation speed.
(Appropriate cutting time for...
User Manual - Page 11
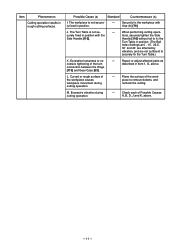
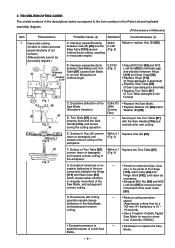
...Possible Causes A, B, D, J and K, above . Check each of the turn connection between the Hinge [119] and Gear Case [53].
---- The Turn Table is not secure-
---- Repair or adjust...in position. (The Ball
Index Settings at 0˚, 15˚, 22.5˚,
30˚ and 45˚ are affected by
vibration, and are not sufficient to remove defects, and recheck the cutting. M. Plane the surface ...
Similar Questions

Wiring Diagram For Hitachi Miter Saw
I bought a switch for Hitachi c10 fc2 & need a wiring diagram to hook it upThank You Dave
I bought a switch for Hitachi c10 fc2 & need a wiring diagram to hook it upThank You Dave
(Posted by delliott49 7 years ago)

How To Square A Hitachi Miter Saw
(Posted by prisibr 10 years ago)

Need Additional Specs For The Hitachi 15' C15fb
Will it cut 6-5/8" schedule 40 black plastic pipe? What is the measurement from the bottom of the b...
Will it cut 6-5/8" schedule 40 black plastic pipe? What is the measurement from the bottom of the b...
(Posted by toolgirl 12 years ago)

I Have A New Switch For My Hitachi C15fb I Need A Diagram To Rewire It
(Posted by luicha 12 years ago)

Where Can I Get A Free Manual On The Hitachi C12rsh 12' Slide Compound Miter Saw
(Posted by kathy86883 14 years ago)