Hitachi 57F510 Support Question
Hitachi 57F510 Support Question
Find answers below for this question about Hitachi 57F510.Need a Hitachi 57F510 manual? We have 1 online manual for this item!
Question posted by shelllowe0829 on April 8th, 2021
How Do I Properly Connect Antenna To Pick Up Channels
The person who posted this question about this Hitachi product did not include a detailed explanation. Please use the "Request More Information" button to the right if more details would help you to answer this question.
Current Answers
Answer #1: Posted by hzplj9 on April 9th, 2021 12:30 PM
hzplj9

Member since:
June 25th, 2012 Points: 4,873,510

Member since:
June 25th, 2012 Points: 4,873,510
Refer to page 6 of the PDF downloadable here:
https://www.manualslib.com/manual/68063/Hitachi-51f510.html#product-57F510
It explains the necessary connections to the rear of the TV.
Hope that helps.
Related Hitachi 57F510 Manual Pages
Owners Guide - Page 2

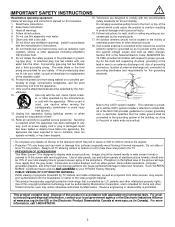
... an equilateral triangle, is also foremost in our minds in the design of electric shock to the proper operation of the FCC rules.
Safety is intended to alert the user to this television.
NEVER CONNECT THE TELEVISION TO 50Hz, DIRECT CURRENT, OR ANYTHING OTHER THAN THE SPECIFIED VOLTAGE. To help you operate these units...
Owners Guide - Page 3
...antenna system is
used, use caution when moving pictures. Use of side panels, top and bottom panels of antenna-discharge unit, connection... attention to retrieve the objects.
• Projection TV's are NOT COVERED by your HITACHI ...proper grounding and, in the vicinity of overhead power lines or other apparatus (including amplifiers)
that is intended for replacement
of the television...
Owners Guide - Page 5

... USE
HOW TO SET UP YOUR NEW HITACHI PROJECTION TV
ANTENNA
Unless your TV is connected to a cable TV system or to a centralized antenna system, a good outdoor TV antenna is seen by placing the speakers equidistant from each side of the receiver cabinet and as close to the television.
BEST
VERTICAL VIEWING
20
ANGLE
3'
0'
5'
10'
15...
Owners Guide - Page 6
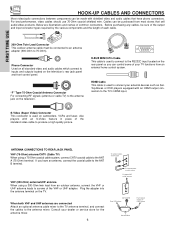
... should use 75-Ohm coaxial shielded wire.
VHF (300-Ohm) antenna/UHF antenna When using a 75-Ohm coaxial cable system, connect CATV coaxial cable to the RS232C input located on the television's rear jack panel and front control panel.
Plug the adapter into the antenna terminal on camcorders, VCRs and laser- Before purchasing any cables...
Owners Guide - Page 10
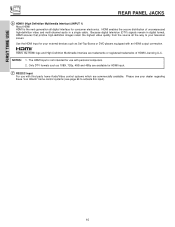
... HDMI Licensing LLC. Use the HDMI input for your television screen. Because digital television (DTV) signals remain in a single cable. The HDMI...input.
ቨ RS232C Input
For use with an HDMI output connection. FIRST TIME USE
REAR PANEL JACKS
ቧ HDMI1 (High ... trademarks of uncompressed high-definition video and multi-channel audio in digital format, HDMI assures that pristine...
Owners Guide - Page 14

... cable from the VIDEO INPUT JACK on the back panel of video and audio inputs and outputs. Select Antenna from the VCR or the laserdisc player. Then press the SELECT button to the previous channel. Connect the cable from coaxial shielded wire. Press the INPUTS button, then select INPUT 1 from the INPUTS menu...
Owners Guide - Page 15

... played back will be used for more information on the TV set
below.
2. Connect the cable from the INPUTS menu to rear panel jacks. Select Antenna from the AUDIO OUT L of the VCR or the laserdisc player to the previous channel. The picture and sound that a VCR cannot record its own video or...
Owners Guide - Page 16

... and sound that is loose.
2. FIRST TIME USE
CONNECTING EXTERNAL VIDEO SOURCES
CONNECTING AN S-VIDEO SOURCE TO INPUT 3, 4 AND 5 1. The VIDEO OSD label disappears automatically after approximately four seconds.
5. Select Antenna from the AUDIO OUT L of the VCR or the laserdisc player to the previous channel. Connect the cable from the AUDIO OUT R of the...
Owners Guide - Page 17

... AUDIO OUT (R/L) of device user settings determines final video appearance.
17 The connected digital output device controls the HDMI interface so proper set top box or DVD player. The VIDEO OSD label disappears automatically after approximately four seconds.
3. Select Antenna from the output of uncompressed video to view the program from the INPUTS...
Owners Guide - Page 18

... or HDTV set below.
2. Select Antenna from the AUDIO OUT L of the laserdisc/DVD player or HDTV set top box to the INPUT (PB) jack.
3. Connect the cable from the INPUTS menu to return to rear panel jacks. Completely insert the connection cord plugs when connecting to the previous channel. Press the the INPUTS button...
Owners Guide - Page 25

... with a 1080i component input. Main Picture
Sub Picture
NOTES: 1. Sub-picture channel availability depends on both the main picture and the sub-picture simultaneously.
PIP MODE...connection to view antenna inputs on the channel list.
25 POP MODE PICTURE-IN-PICTURE POP Mode PIP displays the sub-picture outside of the video inputs. PICTURE-IN-PICTURE (PIP)
Your HITACHI Projection...
Owners Guide - Page 35
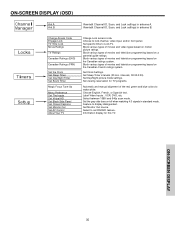
... Monitor Out source. Block various types of movies and television programming based on /off when watching 4:3 signals in standard mode. ON-SCREEN DISPLAY (OSD)
Channel
Ant A
Manager
Ant B
View/edit Channel ID, Scan, and Lock settings in antenna B. View/edit Channel ID, Scan, and Lock settings in antenna A. Set specific time to set RS232C feature.
Set...
Owners Guide - Page 39

... DVI input (Ex. 480p, 720p, 1080i), Auto Movie Mode will activate the circuitry for television viewing, the disparity between the two frame rates must be available (grayed out).
2. The ... Color Temperature settings.
Press down to select from the VIDEO menu, your Hitachi Projection Television will not be reconciled. Auto Color
The AUTO COLOR function automatically monitors and adjusts ...
Owners Guide - Page 40

...is selected you are trademarks of the Projection TV internal speakers.
The ear can be selected and adjusted in your HITACHI
television is natural and
crisp from two speakers...TREBLE is incorporated under USP4638258, 5510752 and 5736897.
The BBE technology produces sound that is connected to an external audio system, BBE will also enhance a complete multi-speaker surround sound ...
Owners Guide - Page 44
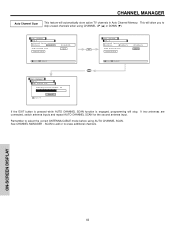
...to erase additional channels. A
Channel Source
Antenna
Cable(1)
Auto Channel Scan Channel List
Cable(2) Start
Move SEL Select
Chan. Manager
Ant. ON-SCREEN DISPLAY
44 Manager
Ant. If two antennas are connected, switch antenna inputs and repeat AUTO CHANNEL SCAN for the second antenna input. Chan. A
Channel Source
Antenna
Cable(1)
Auto Channel Scan Channel List
Cable(2) Start...
Owners Guide - Page 54

...is pressed, the Event Timer Icon will automatically operate the Projection TV viewing reservation of the MONTH. If the clock ...when away from home.
54
ON-SCREEN DISPLAY
If no channel selection was
made after the On Timer has been activated... Timer for more than three hours if you can not use your television with the remote control.
AM
--:-- AM Jan 1, 2004
Ant A...
Owners Guide - Page 56

...the picture, you may want to self-adjust. Your HITACHI Projection TV has three color projection tubes: one for red, one for green, one for... and blue tubes can be optimum (do not move your television for at least 20 minutes before using this MAGIC FOCUS button... 20 second self-adjust period, picture quality will occur.
When properly aligned, the outputs of the three color tubes. If you ...
Owners Guide - Page 67

... is weak, your picture may be marred by the television signal following two paths. When the signal is reflected from the TV set can generate sound distortion in external devices such as unshielded leads or connecting several sets to the same antenna without using multiple antenna couplers.
• SNOW: If your receiver is located...
Owners Guide - Page 68

... in picture
© ©©© ©
Poor reception on some channels
© ©©© ©
Picture rolls vertically
©
©
No color ©
© ©©©
©
Poor color ©
© ©©©
©©
HITACHI Projection Television incorporates advanced power surge protection technology designed to protect against component...
Owners Guide - Page 72

...Antennas (Connecting 5,6 Aspect Ratio 21, 42 Audio
SRS 40 BBE 40 Audio Settings 40-41 Audio Source 41 Auto Noise Cancel 41
B
Balance 40 Bass 40 Black Enhancement 37 Brightness 39
C
Channel Manager 43-46 Auto Channel Scan 44 Channel List 45 Channel... Button 22
L
Language Menu Language 59
Locks Change Access Code 47 Channel Lock 47 Input Lock 47 Front Panel Lock 47
TV Time Lock ...
Similar Questions


Model 57f510
I am trying to dis-assemble the top and bottom halves of the rear projection TV to make it easier to...
I am trying to dis-assemble the top and bottom halves of the rear projection TV to make it easier to...
(Posted by jgill5581 6 years ago)

Hitachi Rear Lcd Projection Television The Pictureis Blurry
(Posted by Anonymous-87478 11 years ago)
Projection Television Screen Won't Project
Once the Projection television turned on the redlight comes on but nothing comes on screen. Is it th...
Once the Projection television turned on the redlight comes on but nothing comes on screen. Is it th...
(Posted by Charpentiernicholas 11 years ago)
Having Trouble Hooking Up My Hitachi 57f510 To An Outside Antenna.
How do I hook up my Hitachi 57F510 projection TV to an outside antenna? Do I need a converter box? I...
How do I hook up my Hitachi 57F510 projection TV to an outside antenna? Do I need a converter box? I...
(Posted by vawalt57 11 years ago)