
Genie PowerLift Support Question
Genie PowerLift Support Question
Find answers below for this question about Genie PowerLift.Need a Genie PowerLift manual? We have 1 online manual for this item!
Question posted by rasnubia on April 4th, 2013
Troubleshooting 37470r Circuit Board
I am trying to obtain a schematic or verify what the voltage is leaving the board that goes to the smart switch which contols local operation as it appears that I am only detecting Mvolts which does not appear to be correct.
Current Answers
Related Genie PowerLift Manual Pages
Owner's Manual - Page 1

... is available for Service 11 Garage Door Opener Installation 12 Accessories 22 Maintenance 25 Troubleshooting 26 Wiring Diagram 29 Warranty information 30
COMPLETE WITH INTELLICODE® REMOTE CONTROL AND SERIES II ELECTRONICS
For 7' 6" Doors. Need Help?
SAVEFTUHTIUSRMEARNEUFEARLEFNOCRE
Having Difficulty? Will not operate twice as fast on a one-piece door. Please call us: 1-800-35...
Owner's Manual - Page 2

... FOLLOW ALL SAFETY, INSTALLATION AND OPERATION INSTRUCTIONS.
For maximum safety, set the force required for opening and closing door. Automatic Lighting System Two light bulbs up to the fully open and close within 2 seconds of a 2" x 4" board laid flat. Manual Emergency Release Allows the garage door to be properly grounded.
• Do Not try to do not understand the...
Owner's Manual - Page 3

... condition of vertical stile in most garage doors. This Opener is out of balance, have a wooden door, measure door's thickness. (1/4" x 2") Lag Screws are included for repairs and adjustments
SECTIONAL DOOR, TORSION SPRINGS SECTIONAL DOOR, EXTENSION SPRINGS
ONE-PIECE DOOR, TRACKLESS
to most garages and connect to door mechanism. See Troubleshooting Guide on a properly braced sectional...
Owner's Manual - Page 4

... be installed here. For sectional doors, add 2-1/2" to connect points. Bottom of the garage door opening. NOTE
• For both types of door to floor. - Do Not move the door spring. B If your door height is above 7'-6", make sure your rail is a heavily reinforced section of door and on header directly above Header, a 2" x 6" board must be helpful). • If...
Owner's Manual - Page 5
... AREA
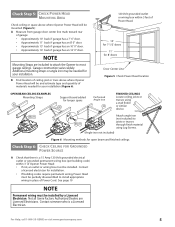
Check ceiling or space above where Opener Power Head will be mounted (Figure 5): A Measure from garage door center line mark toward rear
of Power Head.
10' for 7-1/2' doors
11' for 8' doors
Door Center Line Figure 5 Check Power Head location
OPEN BEAM CEILING EX AMPLES Mounting Straps
30
55 11
Support board added for longer spans
30
Perforated...
Owner's Manual - Page 6

... A If your installation
❐ Safe-T-Beam® Sensor Mounting Bracket Extensions (dealer) ❐ Garage door opener reinforcement bracket (dealer) ❐ Garage door frame reinforcement brackets, screws, bracing
or reinforcement kits (dealer)
❐ Lag Screws (11/4") for a wood door less than 2" thick (store) ❐ Electrical outlet and/or wiring (supplied by a
licensed electrician...
Owner's Manual - Page 9

GARAGE DOOR OPENER ASSEMBLY
Assembly Step C1H: CONNECT RAIL TO POWER HEAD
OPEN BLUE PARTS BAG
A Turn Power Head upside down and place on collar 11B. Keep Rail Sections level until the Opener is needed, attach it per...-tighten until later. Connect with kit.
11
11A.
B Attach Middle Rail Section to Opener Power Head. Slide Collar over them (Figure 11B) and (Figure 11C). • Snap...
Owner's Manual - Page 12

... the proper reinforcement (See Check Door Condition and Thickness on the center line of door travel + 2-1/2" (sectional door) or
+ 6" (one-piece door) Figure 18 Attach Header Bracket above Garage Door
A If needed, attach a 2" x 6" board (Figure 18) (also see page...the door spring. GARAGE DOOR OPENER INSTALLATION
NOTE
For lightweight garage doors, make sure you have sufficient support.
• If...
Owner's Manual - Page 13
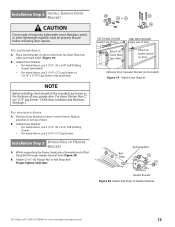
... Power Head, place threaded end of the included Lag Screws vs. Installation SteCpH2: INSTALL GARAGE DOOR BRACKET
CAUTION
Doors made of your garage door.
For doors thinner than top rollers
Attach at highest point on door
Optional Door Operator Bracket (not included) Figure 19 Attach Door Bracket
Rail Strap
Rail Strap Bolt
26 11
Header Bracket Figure 20 Attach Rail...
Owner's Manual - Page 15

... Magnetic Carriage Assembly Lever
until Knob is as short as possible. B Attach Curved Arm to comply may leave Emergency Release Knob within reach of Emergency Release Cord Knob to Door Bracket with garage door fully or partially open, garage door may close without warning!
33 32
Clevis Pins Cotter Pins
45
Safe-T-Beam® (STB) Brackets
35...
Owner's Manual - Page 16
... and Sensor modules on this side whenever possible. • For multiple-door garages see (Figure 26). - NOTE
The Opener will spend more time in opposite directions.
If Opener is plugged into outlet, Unplug it clicks into place.
• Check final height of garage door frame or wall 6" above floor
Figure 27 Final Check Safe-T-Beams®...
Owner's Manual - Page 18

... to find in dark. • Controls door Opener from Entrapment Warning Label, and attach it to hold the Wire snugly. Installation SteCpH7: WALL CONSOLE INSTALLATION
WARNING
Verify there is in UNLOCKED position.
E Attach Wall Console onto wall at location found above floor (to prevent small children from
operating garage door). • Away from working properly and...
Owner's Manual - Page 19
....
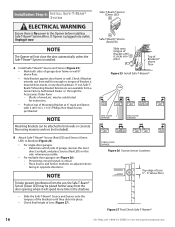
- Ground to Power Head Wires.
- Knockout
Cut Wires here
NOTE
• Use only Underwriters Laboratories, Inc. (U.L.) recognized wire nuts.
• The Circuit Boards are not installing permanent wiring, go to the door Opener Must Be removed when the Motor Cover is removed. Ensure the Motor Cover is blinking twice, adjust Sensor Brackets as possible...
Owner's Manual - Page 20

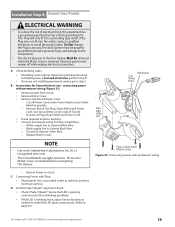
... garage door opens rapidly, and can cause serious injury or death.
• Keep the path clear. • Position the ladder to the side of the Power Head so it is aligned with Carriage Assembly Magnet.
• Tighten Set Screw.
If door reverses after contacting floor, move Limit Switch toward door and try again. - See Safe-T-Beam® Troubleshooting...
Owner's Manual - Page 21

... electrical circuits caused by too many cycles in too short a time. If your Excelerator® is blocked, door will prevent the Timer/Cycle Counter from Open Limit Switch to Open Limit Switch. - Do Not Unplug the Unit - E Adjust Open Force to minimum needed :
• Place door in open it
contacts board: • If door does not reverse, decrease Close Force until garage door...
Owner's Manual - Page 22
...moving garage door may cause serious injury or death. • Keep people clear of opening while door ...Operation
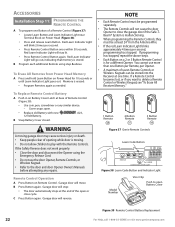
A Press Button on Power Head (Figure 38). • Press and release Learn Button. You cannot use the door Opener, Remote Controls, or
Wireless Keypad. • Refer to open...goes out.
If the Safety Reverse does not work properly: • Close the door and disconnect the Opener...
Owner's Manual - Page 26
... death. WARNING
Use the Wall Console included with a 1-1/2" high object (or a 2" x 4" board laid flat)
at the center of severe injury or death. 7 KEEP GARAGE DOORS PROPERLY BALANCED.
NO ONE SHOULD CROSS THE PATH OF THE MOVING DOOR. 4 NEVER GO UNDER A STOPPED, PARTIALLY OPEN DOOR. 5 Test Opener monthly. An improperly balanced door increases the risk of travel, retest the...
Owner's Manual - Page 27

... on Motor Drive Board is located under Limit Switch Brackets.
Vacation Locking Switch on Wall Control is applied to the Opener. For Help, call Customer Service at 1-800-35-GENIE.
• If Safe-T-Beam® problems exists, the door can be installed and operational to enable door to Terminals on Motor Drive Board. - Opener System Self-Diagnostic Troubleshooting • See...
Owner's Manual - Page 28

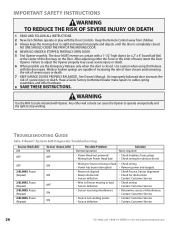
...; If a new installation, check Door Arm position. • Check operation of Lenses. • Check Safe-T-Beam® System diagnostic code. • Check Close Force adjustment (see Safe-T-Beam® System Self-diagnostic Troubleshooting Section on page 20). Adjust as needed . • Check garage door for binding.
• Check Open Limit Switch for a short circuit and for beam obstruction...
Owner's Manual - Page 29
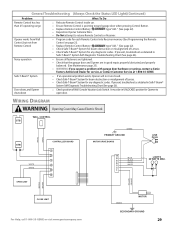
... all fasteners are tightened. • Check that the garage door and Opener are in
Safe-T-Beam® System Self-Diagnostic Troubleshooting Chart (See page 26). Door closes, and Opener shuts down
• Check position of Wall Console Vacation Lock Switch. Safe-T-Beam® System
• If an operational problem exists, Opener will not run closed. • Check Safe-T-Beam...
Similar Questions

What Remote Do I Use For Powerlift Garage Door Opener Model Wr77 Serial No.08258
(Posted by tmski87 3 years ago)

Garage Door Height
I have a Powerlift Model WR827. It opens all the wat to the top of the door, then falls back about 3...
I have a Powerlift Model WR827. It opens all the wat to the top of the door, then falls back about 3...
(Posted by jachfo25 5 years ago)

Garage Door Opener Not Working
Green light and red light are on the safety"eye" When pushing wall, remote or key pad the screw driv...
Green light and red light are on the safety"eye" When pushing wall, remote or key pad the screw driv...
(Posted by scanty5 9 years ago)

Can I Get A Extension For A Sd9000 Genie Garage Door Opener To Lift A 16x8
(Posted by dlfabes 10 years ago)

Where Is The Learn Code Button Situated On The 3060l-07 Genie Garage Door Opener
Where is the learn code button situated on the 3060L-07 Genie garage door opener. Trying to intregat...
Where is the learn code button situated on the 3060L-07 Genie garage door opener. Trying to intregat...
(Posted by katiaella 10 years ago)