
Genie PowerLift Support Question
Genie PowerLift Support Question
Find answers below for this question about Genie PowerLift.Need a Genie PowerLift manual? We have 1 online manual for this item!
Question posted by tonycj45 on June 18th, 2020
Powerfilt Wr 77
Can I still get a trolley for a Powerfilt WR 77
Current Answers
Answer #1: Posted by Troubleshooter101 on June 18th, 2020 9:48 PM
Troubleshooter101

Member since:
September 30th, 2015 Points: 2,927,030

Member since:
September 30th, 2015 Points: 2,927,030
No you will not get trolley with powerfilt Wr 77 now.
Thanks
Please respond to my effort to provide you with the best possible solution by using the "Acceptable Solution" and/or the "Helpful" buttons when the answer has proven to be helpful. Please feel free to submit further info for your question, if a solution was not provided. I appreciate the opportunity to serve you!
Troublshooter101
Related Genie PowerLift Manual Pages
Owner's Manual - Page 1

3531835447
TABLE OF CONTENTS
Safety Information 2 Important Installation Instructions 2 Safety Features 2 Pre-installation Checklist 3 Garage Door Opener Assembly 9 Record Data (for 8' Doors
Included Wall Control MUST be Properly Set to Operation of this Garage Door Operator. Safe-T-Beam® Safety Reverse System Must be Installed and the Force Controls MUST be installed prior to ...
Owner's Manual - Page 2

... cover. • When replacing cover, make sure wires are not pinched or near
moving objects, springs under high tension and electric opening , that has a broken spring.
Manual Emergency Release Allows the garage door to be made by a trained service person using proper tools and instructions.
3 Remove all ropes, and disable all moving . •...
Owner's Manual - Page 3

...Torsion Springs
Center Stile
Extension Springs
Header Area
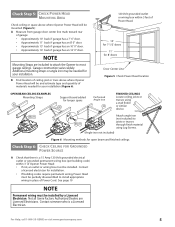
door (Figure 2). Slight movement is "lightweight" (made with an automatic Garage Door Balance Detection System. C Check door type. B If door is acceptable. not solid), door
(including door frame) must be needed to connect garage door to Opener's Door Bracket. Door springs, cables, pulleys, brackets and associated hardware are...
Owner's Manual - Page 4

... above the top of the garage door opening. Check Step 4: CHECK DOOR HEADER AREA
NOTE
The header is any question contact your mark to new mounting board. Draw a center line to "H".
B Find Header Bracket mounting height (Figure 4): (Do not attach Header Bracket). • Raise door, watching top edge of door and stop door when its edge reaches...
Owner's Manual - Page 5
...or space above where Opener Power Head will be mounted (Figure 5): A Measure from garage door center line mark toward rear
of garage: • Approximately 10' back if garage has a 7' 6" door. • Approximately 11' back if garage has an 8' 0" door. • Approximately 13' back if garage has an 10' 0" door. • Approximately 14' back if garage has an 12' 0" door. Additional mounting...
Owner's Manual - Page 6

... tools
needed for your installation
❐ Safe-T-Beam® Sensor Mounting Bracket Extensions (dealer) ❐ Garage door opener reinforcement bracket (dealer) ❐ Garage door frame reinforcement brackets, screws, bracing
or reinforcement kits (dealer)
❐ Lag Screws (11/4") for a wood door less than 2" thick (store) ❐ Electrical outlet and/or wiring (supplied by a
licensed...
Owner's Manual - Page 9

... the same on collar 11B. Finger-tighten until later. D Connect first Rail Section to Opener Power Head.
Slip on both ends. Engage Hooks
Retaining Clips
14
Middle Rail Section 4B
Arrows... slide Collar over Hooks
Collar
9 Rail Clamps
13
11D.
GARAGE DOOR OPENER ASSEMBLY
Assembly Step C1H: CONNECT RAIL TO POWER HEAD
OPEN BLUE PARTS BAG
A Turn Power Head upside down and place...
Owner's Manual - Page 12

...
30
1/4" x 2" Lag Screws
55
5/16-18 x 3/4" Hex Head Bolts
11
5/16-18 x 3/4" Hex Serrated Flange Nuts
28
Door Bracket
56
1/4"-20 x 3/4" Self-Drilling Screws
Hardware (orange bag)
12
For Help, call 1-800-35-GENIE or visit www.geniecompany.com GARAGE DOOR OPENER INSTALLATION
NOTE
For lightweight garage doors, make sure you have sufficient support.
• If...
Owner's Manual - Page 13
... wood, fiberglass, metal, or other lightweight materials must be properly braced before mounting door Opener.
See page 3. Installation SteCpH3: ATTACH RAIL TO HEADER BRACKET
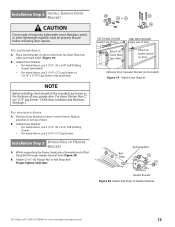
A While supporting the Power Head, place threaded end of door. For one-piece doors:
A Position Door Bracket on door's center line, as high as possible or on top of Rail Strap Bolt...
Owner's Manual - Page 15

... Knob to 6' above floor: • Pull Cord through Magnetic Carriage Assembly Lever
until Knob is pulled with garage door fully or partially open, garage door may leave Emergency Release Knob within reach of Emergency Release Cord Knob to Door Bracket with Clevis Pin and Cotter Pin (Figure 23). C Attach both Arms together with 2 (3/8" x 7/8") Hex Head
Bolts...
Owner's Manual - Page 16
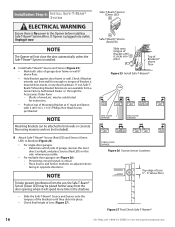
... the Brackets until it clicks into outlet, Unplug it will not close the door automatically unless the Safe-T-Beam® System is beyond door, tracks, or any door hardware. NOTE
The Opener will spend more time in opposite directions. Blocks of garage door frame or wall 6" above floor
Figure 27 Final Check Safe-T-Beams®
16...
Owner's Manual - Page 18

... UNLOCKED position.
B Find a convenient mounting location:
• Within direct sight of any moving garage door or Opener parts (you
should not be sure to only tap them in dark. • Controls door Opener from Entrapment Warning Label, and attach it to the Opener before installing Wall Console Wires. Makes Console easy to find in as far...
Owner's Manual - Page 20

... is engaged and is between fully counter clockwise and fully clockwise (Figure 35). Setting Force Controls and Final Adjustment of Limit Switches
WARNING
• The garage door opens rapidly, and can cause serious injury or death.
• Keep the path clear. • Position the ladder to the side of the Power Head so...
Owner's Manual - Page 21

... reverse function (Figure 36). C Close door using Wall Console.
D Test Door Opener:
• Run door up and down a few times using Wall Console and observe door travel.
• Repeat steps above until garage door runs smoothly from resetting. If not, adjust Close Force Control slightly clockwise, open garage door, and close garage door, and open position using Wall Console.
•...
Owner's Manual - Page 22
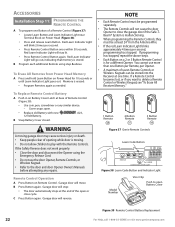
... Power Head Memory
A Press and hold Learn Button on Remote Control. Garage door will not cause the door Opener to close cycle.
You cannot use the door Opener, Remote Controls, or
Wireless Keypad. • Refer to open .
• Replace old Battery with the Remote Controls. Garage door will go out, indicating that memory is for 10 seconds or until...
Owner's Manual - Page 23

... your PIN (3 to 8 characters).
• Press
.
-
NOTE
• If the door does not move the garage door:
- Start over.
Red LED blinks - once per second. • Enter your PIN and try again.
• Any keypad button will control the door for Multiple Door openers: All door openers will turn off . once per second and turns off .
Learn Code...
Owner's Manual - Page 26
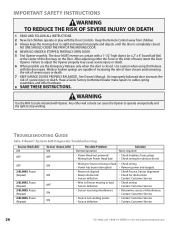
.... After adjusting either the Force or the Limit of severe injury or death. 7 KEEP GARAGE DOORS PROPERLY BALANCED. Weak or broken springs are capable of increasing the rate of door closure and increasing the risk of travel, retest the Door Opener. Have a Genie Factory Authorized Dealer make repairs to Sensor missing or bad • Sensor...
Owner's Manual - Page 27

...assistance. Contact Customer service for further assistance. See Door Safety Guide
1. See door
Safety Guide
1.
See page 20. 2. Opener System Self-Diagnostic Troubleshooting • See Status ...;
Check door condition. Check Force Settings. Check for shorts, tight Staples, or pinched Wires.
Ribbon Cable on Motor Drive Board is equipped with an automatic garage door balance detection...
Owner's Manual - Page 28

... it is "Closed" (not tripped). • If still no Buttons are turning when Motor runs. Door starts up
Door will not turn off
• Check Safe-T-Beam® System as needed . • Check garage door for binding.
• Check Open Limit Switch for a short circuit and for beam obstruction or misalignment of Contact Reverse function...
Owner's Manual - Page 29
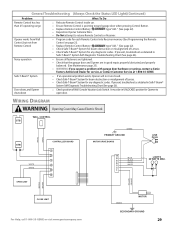
...® System for service, or contact Customer Service at 1-800-35-GENIE.
Noisy operation
• Ensure all fasteners are tightened. • Check that the garage door and Opener are in
Safe-T-Beam® System Self-Diagnostic Troubleshooting Chart (See page 26). General Troubleshooting (Always Check the Status LED Light)(Continued)
Problem
What To...
Similar Questions

What Remote Do I Use For Powerlift Garage Door Opener Model Wr77 Serial No.08258
(Posted by tmski87 3 years ago)

Garage Door Height
I have a Powerlift Model WR827. It opens all the wat to the top of the door, then falls back about 3...
I have a Powerlift Model WR827. It opens all the wat to the top of the door, then falls back about 3...
(Posted by jachfo25 5 years ago)

Garage Door Opener Not Working
Green light and red light are on the safety"eye" When pushing wall, remote or key pad the screw driv...
Green light and red light are on the safety"eye" When pushing wall, remote or key pad the screw driv...
(Posted by scanty5 9 years ago)

Can I Get A Extension For A Sd9000 Genie Garage Door Opener To Lift A 16x8
(Posted by dlfabes 10 years ago)

Where Is The Learn Code Button Situated On The 3060l-07 Genie Garage Door Opener
Where is the learn code button situated on the 3060L-07 Genie garage door opener. Trying to intregat...
Where is the learn code button situated on the 3060L-07 Genie garage door opener. Trying to intregat...
(Posted by katiaella 10 years ago)