
Genie PowerLift Support Question
Genie PowerLift Support Question
Find answers below for this question about Genie PowerLift.Need a Genie PowerLift manual? We have 1 online manual for this item!
Question posted by advpiolycomp on November 5th, 2014
Adding Safety Beam System To Wr 827 Gargage Opener
I Need To Add A Safety Beam System For My Wr827 Garage Opener. A Multicode Remote Has Been Added. there Are Three Terminals On The Motoe Assembly- Two Are Connected To The Multicode Remote
Current Answers
Related Genie PowerLift Manual Pages
Owner's Manual - Page 1

... twice as fast on a one-piece door. Need Help?
Safe-T-Beam® Safety Reverse System Must be Installed and the Force Controls MUST be installed prior to close door. 3531835447
TABLE OF CONTENTS
Safety Information 2 Important Installation Instructions 2 Safety Features 2 Pre-installation Checklist 3 Garage Door Opener Assembly 9 Record Data (for 8' Doors
Included Wall Control MUST be...
Owner's Manual - Page 2

... connect the operator to the source of a 2" x 4" board laid flat. For maximum safety, set the force required for opening and closing door within 30 seconds. Install the emergency release tag on, or next to, the emergency release
8 The operator must be opened or closed manually for safer entries and exits. Manual Emergency Release Allows the garage door...
Owner's Manual - Page 3

... or reinforced before assembling Opener:
Check Step 1: CHECK DOOR CONDITION AND THICKNESS
Check condition of vertical stile in most garages and connect to most garage doors.
While checking items listed below, note any necessary bracing and a door opener reinforcement bracket (if needed to install Opener into your garage and connect to your garage door for repairs
and adjustments...
Owner's Manual - Page 5
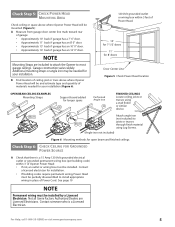
... straps or angle iron may be mounted (Figure 5): A Measure from garage door center line mark toward rear
of Power Head.
10' for 7-1/2' doors
11' for 8' doors
Door Center Line Figure 5 Check Power Head location
OPEN BEAM CEILING EX AMPLES Mounting Straps
30
55 11
Support board added for longer spans
30
Perforated Angle Iron
30
FINISHED CEILINGS Locate...
Owner's Manual - Page 6

... Screwdriver
Socket Wrench
Hammer
Safety Glasses
Wire Stripper
Pencil
Hack Saw
1/4" 5/16" 3/8" 7/16" 1/2" 9/16" Sockets
Carpenter's Level
Figure 8 Recommended Tools
6
For Help, call 1-800-35-GENIE or visit www.geniecompany.com A If you open garage door from the garage door before starting the installation.
Emergency Release Kit lets you cannot mount Safe-T-Beam® Mounting Bracket...
Owner's Manual - Page 7

...Green LED)(main carton)
1
1
Safe-T-Beam (STB) Source (Red LED)(main carton)
1
1
Safe-T-Beam (STB) Bracket (yellow bag)
2
2
Coupler (blue bag)
1
1
No.10 x1 1/4" Phillips Hex Head Screw (yellow bag) 1 Button Remote Control (main carton) 3 Button Remote Control (main carton) Wireless Keypad (main carton) 2 Button Remote Control (main carton) Safety & Maintenance Guide (manual)(main carton...
Owner's Manual - Page 11

... Head with Twist Ties. D Attach Emergency Release Tag to Magnetic Carriage
Assembly Release Lever.
25
Emergency Release Tag
Assembly Step C8H: RECORD OPENER MODEL AND SERIAL NUMBER
Please note the following information so it is available if you need to Power Head Terminal Block
Assembly Step C7H: ATTACH EMERGENCY RELEASE KNOB, CORD, AND TAG
A Tie overhand...
Owner's Manual - Page 14

... added for open beam and finished ceilings
14
For Help, call 1-800-35-GENIE or visit www.geniecompany.com
See Check Power Head Mounting Area on page 5. H
ONE-PIECE DOORS Set clearance at 1"-11/2" between Rail and door at
highest point of door travel by raising the door to garage may be needed (Figure 22). B Measure distance from Opener to garage...
Owner's Manual - Page 15

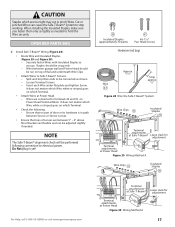
... AND CONNECT DOOR ARMS
OPEN YELLOW PARTS BAG
For sectional doors:
A Attach Curved Door Arm to Magnetic Carriage Assembly. C Attach both Arms together with 2 (3/8" x 7/8") Hex Head
Bolts and 2 (3/8") Serrated Flange Hex Nuts so overall length is pulled with Clevis Pin and Cotter Pin (Figure 23). B Attach Straight Door Arm to Door Bracket with garage door fully or partially open, garage door...
Owner's Manual - Page 16
... or concrete floor using masonry anchors (not included). Blocks of garage door frame or wall 6" above floor
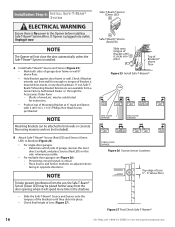
Figure 27 Final Check Safe-T-Beams®
16
For Help, call 1-800-35-GENIE or visit www.geniecompany.com may be placed further away from the door opening, where it clicks into place
Top of
6"
Bracket 6" above
floor...
Owner's Manual - Page 17
...). - NOTE
The Safe-T-Beam® alignment check will be snug only. - Loosen Terminal Screws. - Insert each Wire under flat plate and tighten Screw. Cut or pinched Wires can be connected as you fasten them only as tightly as needed . When installing the Insulated Staples, make sure you go. Wires between garage wall and Power Head...
Owner's Manual - Page 19
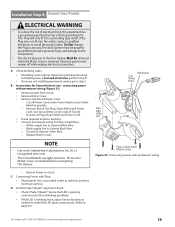
... while making electrical connections. tabs slide out
• Install required entrance bushing.
• Connect permanent wiring to Opener Black Wire.
- Replace Motor Cover.
The door Opener must remain off...8226; The electrical power to Opener White Wire.
-
Restore Power to step C. D Perform Safe-T-Beam® alignment check:
• Check if Safe-T-Beam® Source Red LED is...
Owner's Manual - Page 20

... Magnetic Carriage Assembly.
B Adjust the Close Limit Switch:
• Press Wall Console to close completely, measure distance from bottom of door to run, move Limit Switch toward door.
• Tighten Limit Switch Set Screw. If door reverses before operating the Opener. B Setting Open Limit Switch:
• Manually open garage door to ensure the door smoothly opens fully and...
Owner's Manual - Page 21

... to Close Limit Switch. - E Adjust Open Force to minimum needed :
• Place door in too short a time. A Open garage door using Wall Console. NOTE
• To protect your new investment, your Opener suddenly stops responding to Open Limit Switch. - D Check that door runs to the Wall Console - E Check Safe-T-Beam® System operation:
• If beam is equipped with a Timer and...
Owner's Manual - Page 22
... the Remote Controls. If the Safety Reverse does not work properly: • Close the door and disconnect the Opener using step A above steps.
• Each Button on Power Head for a different Opener. B Press Button again. Garage door will stay lit. • Press Remote Control Button again.
Memory is moving. • Do not allow children to the door and door Opener Owner...
Owner's Manual - Page 23

... serious injury or death.
1 Keep people clear of opening while door is blinking rapidly,the PIN was entered incorrectly. To keep the door from moving, close the door and disconnect it from the Opener by pulling the Emergency Release. NOTE
• If the door does not move the garage door:
- Learn Code Indicator LED (on next page)
For...
Owner's Manual - Page 26
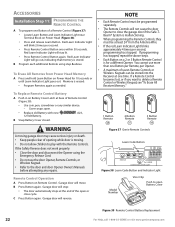
...
Use the Wall Console included with the door open. An improperly balanced door increases the risk of severe injury or death. 7 KEEP GARAGE DOORS PROPERLY BALANCED.
Weak or broken springs are capable of increasing the rate of door closure and increasing the risk of severe injury or death. IMPORTANT SAFETY INSTRUCTIONS
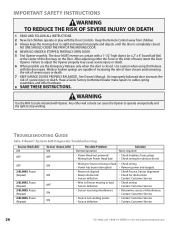
WARNING
TO REDUCE THE RISK OF...
Owner's Manual - Page 27

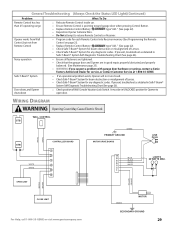
... connections to Terminals on Motor Drive Board. - Vacation Locking Switch on Wall Control is fully closed electrically by holding the Wall Console Button down until door is in "Lock" mode. See Door
Safety Guide See page 16. See page 18
NOTE
• The status LED Indicator Light is equipped with an automatic garage door balance detection system. Opener...
Owner's Manual - Page 28

... not move
• Check (ensure) that garage door and Opener are in good repair, properly lubricated, and properly balanced as needed . • Check that all Remote Control codes from Remote Control
1. If not:
- Wall Console Vacation Lock function does not work
• Ensure Magnetic Carriage Assembly is OK:
• Check connections at 1-800-35-GENIE. B. Have a Genie Factory...
Owner's Manual - Page 29
....
• Replace Remote Control Battery
type "A23." (See page 22).
• Check Safe-T-Beam® System for beam obstruction or misalignment of Lenses.
• Check Safe-T-Beam® System for beam obstruction or misalignment of Wall Console Vacation Lock Switch. Noisy operation
• Ensure all fasteners are tightened. • Check that the garage door and Opener are in...
Similar Questions

What Remote Do I Use For Powerlift Garage Door Opener Model Wr77 Serial No.08258
(Posted by tmski87 3 years ago)

Light Timer
how do i adjust the timer for the light. from 2 min to 5 min on a power lift model wr 827
how do i adjust the timer for the light. from 2 min to 5 min on a power lift model wr 827
(Posted by eatwalker 8 years ago)


Can I Get A Extension For A Sd9000 Genie Garage Door Opener To Lift A 16x8
(Posted by dlfabes 10 years ago)

Genie 900 Safety Beam Flashes Red Other Green. Round Red Flashes On Unit
(Posted by cuznrik 11 years ago)