Get support for Genie Excelerator

Genie Excelerator Support Question

Genie Excelerator Support Question

Find answers below for this question about Genie Excelerator.
Need a Genie Excelerator manual? We have 1 online manual for this item!
Question posted by davono777 on April 3rd, 2018

Status Light On Model Isd1000

what does it mean when the status light stays blinking

Current Answers

Answer #1: Posted by waelsaidani1 on April 3rd, 2018 11:34 PM
This answer was accepted by the poster of the original question.
waelsaidani1

Member since:
May 12th, 2013

Points: 19,501,797
1,100
points
Basic Sensor Troubleshooting Guide

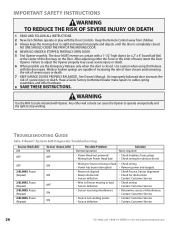
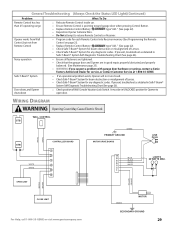
Red LED light Green LED light Condition Indicated Required Action


ON / solid ON / Solid Normal Operation No action Required

OFF OFF 1. Power head has not been powered 1. Check breakers, fuses, plugs

2. Wiring from power head to sensors is bad 2. Check wiring for obvious shorts

OFF ON / Solid 1. Wiring to Red LED is missing or bad 1. Check wiring

2. Power has been interrupted 2. Remove power and reapply (See section 3 below)

2 blinks, pause (repeat) ON / Solid 1. Beam misaligned or obstructed 1. Check alignment of beam 2. Check for obstruction

2. Sensor Defective 3. Call professional technician

2 blinks, pause (repeat) OFF 1. Wire to sensor missing or bad 1. Check wiring

2. Sensor Defective 2. Call professional technician

3 blinks, pause (repeat) ON / Solid 1. Sensor receiving interference 1. Attempt to determine source of interference

2. Call professional technician

4 blinks, pause (repeat) ON / Solid 1. Red LED not sending pulses 1. Call professional technician

2. Red LED defective 2. Call professional technician

Related Genie Excelerator Manual Pages

Owner's Manual - Page 1

... UL 325 Safety Requirements. Need Help? Please call us: 1-800-35-GENIE (354-3643) www.geniecompany.com Please have Model information ready when calling. Extension Kit is available for Service 11 Garage Door Opener Installation 12 Accessories 22 Maintenance 25 Troubleshooting 26 Wiring Diagram 29 Warranty information 30 COMPLETE WITH INTELLICODE® REMOTE CONTROL...
Owner's Manual - Page 2

... jams or one that has a broken spring. For maximum safety, set the force required for opening and closing door within 30 seconds. Automatic Lighting System Two light bulbs up to 60 Watts max. The light turns on you have garage door related questions or do not understand the information presented, call your nearest Genie Factory Authorized Dealer...
Owner's Manual - Page 3

... and associated hardware are many variations of garages and garage doors. One-Piece Door B Raise door to most garages and connect to 3' - 4' above ground and carefully let go. D Contact your Genie Factory Authorized Dealer or dealer of your garage door. NOTE The Excelerator Opener is acceptable. PRE-INSTALLATION CHECKLIST This Opener includes parts and supplies needed to install...
Owner's Manual - Page 4

... wall, a stud finder may be screwed to "H". Bottom of the wall just above door. For one-piece doors, add 6" to studs beside your garage is so low that there is not at center of door and on header directly above the top of the garage door opening. Mark a point on center line. A Find vertical center line of...
Owner's Manual - Page 5

... for your installation. See page 19 NOTE Permanent wiring must be installed. Check Step 5: CHECK POWER HEAD MOUNTING AREA Check ceiling or space above where Opener Power Head will be mounted (Figure 5): A Measure from garage door center line mark toward rear of Power Cord.
Owner's Manual - Page 6

... Extensions (dealer) ❐ Garage door opener reinforcement bracket (dealer) ❐ Garage door frame reinforcement brackets, screws, bracing or reinforcement kits (dealer) ❐ Lag Screws (11/4") for a wood door less than 2" thick (store) ❐ Electrical outlet and/or wiring (supplied by a licensed electrician) ❐ Excelerator Extension Kit (for 8' garage doors) (store) ❐...
Owner's Manual - Page 9

GARAGE DOOR OPENER ASSEMBLY Assembly Step C1H: CONNECT RAIL TO POWER HEAD OPEN BLUE PARTS BAG A Turn Power Head upside down and place on ...C Install Coupler on both ends. CAUTION The Drive Screw and Rail Liner can slide out of Rail Sections. Finger-tighten until the Opener is needed, attach it per instructions supplied with 2 (1/4"-20) (yellow) Hex Head Shoulder Bolts and 2 (1/4" -20) Hex ...
Owner's Manual - Page 10

...(green bag) E Place Open Limit Switch (White Wire) 15" from Rail Strap. Close Limit Switch (Brown wire) 19 DOOR Open Limit Switch (White wire) 18 DOOR 15" Arrows point DOOR toward door Wire Clip 53 15" ... the Light Bulb Sockets. End Rail Section 4C 8 Figure 13 Attach Rail Strap White Wire 21 Assembly Step C6H: INSTALL AND CONNECT LIMIT SWITCHES OPEN GREEN PARTS BAG A Turn Opener right...
Owner's Manual - Page 12

... bag) 12 For Help, call 1-800-35-GENIE or visit www.geniecompany.com OPEN ORANGE PARTS BAG B Attach Header Bracket to the Header Bracket be on space. GARAGE DOOR OPENER INSTALLATION NOTE For lightweight garage doors, make sure you have sufficient support. • If a door spring is recommended) Lag Screws and Flat Washers (not supplied). The Bracket...
Owner's Manual - Page 13

... door Opener. For one-piece doors: A Position Door Bracket on door's center line, as high as possible or on door center line, no OR lower than 2", use 11/4" Lag Screws. See page 3. Finger-tighten until later. 28 30 56 or 30 28 SECTIONAL DOORS Center Line of door ONE-PIECE DOORS Center Line of door. Installation SteCpH2: INSTALL GARAGE DOOR BRACKET CAUTION Doors...
Owner's Manual - Page 15

... through Magnetic Carriage Assembly Lever until Knob is as short as possible. C Attach both Arms together with garage door fully or partially open, garage door may leave Emergency Release Knob within reach of Emergency Release Cord Knob to Door Bracket with Clevis Pin and Cotter Pin (Figure 23). Failure to 6' above ! Securely tighten fasteners. D Adjust height...
Owner's Manual - Page 18

... visit www.geniecompany.com B Find a convenient mounting location: • Within direct sight of any moving garage door or Opener parts (you should not be sure to Terminal 1 Terminal Attachment at Wall Console). Security Vacation Lock Switch Independent Light Control Garage Door Control NOTE More than the type included will cause a malfunction. Wall Console 40 Figure 31...
Owner's Manual - Page 20

...Controls and Final Adjustment of Limit Switches WARNING • The garage door opens rapidly, and can cause serious injury or death. •...Press Wall Console to close completely, measure distance from bottom of the Opener and the door. • Set the door Opener to use the minimum force needed to full open garage door. - NOTE • Little effort is aligned with Carriage Assembly Magnet...
Owner's Manual - Page 21

... Timer/Cycle Counter to the Wall Console - A Open garage door using Wall Console. If not, adjust Close Force Control slightly clockwise, open it again. • Repeat steps above until garage door runs smoothly from Open Limit Switch to Close Limit Switch. Do Not Unplug the Unit - D Check that door runs to Open Limit Switch. - NOTE • To protect your...
Owner's Manual - Page 22

... the garage door if the Safe-TBeam® System is malfunctioning. • When programming the Remote Controls, they must be at the end of opening while door is stored. Red Learn Indicator Light will stay lit. • Press Remote Control Button again. To Erase All Remotes from the Antenna Wire. • If the red Learn Indicator Light blinks...
Owner's Manual - Page 23

... move the garage door: - Installation Step 12: OPERATING WIRELESS KEYPAD WARNING A Moving door can cause serious injury or death. 1 Keep people clear of opening while door is blinking rapidly,the PIN was entered incorrectly. Enter your door opener has a black antenna Indicator LED wire,the Learn Code Button and Indicator LED are located near the antenna. (The light lens...
Owner's Manual - Page 26

... or broken springs are capable of increasing the rate of door closure and increasing the risk of travel, retest the Door Opener. TROUBLESHOOTING GUIDE Safe-T-Beam® System Self-Diagnostic Troubleshooting Source (Red LED) ON OFF OFF 2 BLINKS, Pause (Repeat) 2 BLINKS, Pause (Repeat) 3 BLINKS, Pause (Repeat) 4 BLINKS, Pause (Repeat) Sensor (Green LED) ON OFF ON ON OFF...
Owner's Manual - Page 27

... under the Lens Cover. See page 3. 2. If LED stays ON, have a Genie Factory Authorized Dealer check the Controller Board, or call 1-800-35-GENIE or visit www.geniecompany.com 27 Opener System Self-Diagnostic Troubleshooting • See Status Light on Figure38, page 22) You See 1 BLINK, Pause (Repeat) Problem Motor Drive Board Interrupt Normal operation...
Owner's Manual - Page 28

... balanced as needed . • Check garage door for binding. • Check Open Limit Switch for a short circuit and for proper wiring. • Check Open Force adjustment (see Set Limit Switches and...and Force Controls on page 20). General Troubleshooting (Always Check the Status LED Light) Problem What To Do Opener does not run from Receiver's memory and reprogram for remaining remote ...
Owner's Manual - Page 29

... Dealer for any diagnostic codes. Noisy operation • Ensure all fasteners are tightened. • Check that the garage door and Opener are in Safe-T-Beam® System Self-Diagnostic Troubleshooting Chart (See page 26). General Troubleshooting (Always Check the Status LED Light)(Continued) Problem What To Do Remote Control has less than 25' operating range...

Similar Questions

Garage Door Opener Not Working
Green light and red light are on the safety"eye" When pushing wall, remote or key pad the screw driv...
(Posted by scanty5 9 years ago)
Garage Door Opener.
The unit will not work from the wall remote. The wall remote lights up but does not operat the unit....
(Posted by ckniffen 10 years ago)
Ask a New Question
Use the box below to post a new question about this Genie product .
Points & Prizes
  • You can earn points for nearly everything you do on HelpOwl.com
  • You can trade in those points for gift cards at leading retailers such as Amazon.com and Walmart
  • It's that simple!
See How it Works
Create a Free Account

Genie Manuals

Find free Genie Excelerator manuals and user guides available at ManualOwl.com. Try out our unique manual viewer allowing you to interact with manuals from directly within your browser!

Genie Reviews

View thousands of Genie user reviews and customer ratings available at ReviewOwl.com.

Contact Information

Complete Genie customer service contact information including steps to reach representatives, hours of operation, customer support links and more from ContactHelp.com.

Scoreboard Ratings

See detailed Genie customer service rankings, employee comments and much more from our sister site.