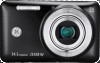
GE J1458W Support Question
GE J1458W Support Question
Find answers below for this question about GE J1458W.Need a GE J1458W manual? We have 22 online manuals for this item!
Question posted by kbrookmad on June 15th, 2013
Hello, My Screen Already Has 16:9 Displayed On It. Do You Know What Menu
setting I use to change it or to check it?
Current Answers
Related GE J1458W Manual Pages
User Manual (English (English)) - Page 1
User Manual
imagination at work
GE Digital Camera
Smart Series : J1458W
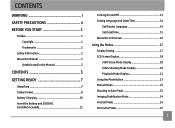
Getting Started Basic Operation
Camera Function Controls
Playback
Using the Menus
Camera Connectivity
Appendix
EN
User Manual (English (English)) - Page 3
... be displayed on a wet surface or places where dripping water or sand may condense inside a closed car in summer. • In a place where the camera is suggested that are stored in the autogenerated folder in your digital camera before turning the camera again. In cold locations, battery performance can deteriorate and battery life can be used...
User Manual (English (English)) - Page 4
... Information
Please read this publication may be reproduced, transmitted, transcribed, stored in a retrieval system, or translated into any language or computer language, in this GE digital camera. Using other types of batteries may shorten the life of General Imaging Company.
All rights reserved. Trademarks All trademarks mentioned in any form, by any means...
User Manual (English (English)) - Page 5
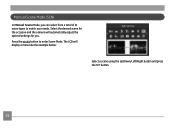
... use your GE digital camera. About This Manual
This manual provides you with a slightly damp, soft cloth. Symbols used to help you locate information quickly and easily:
Indicates useful ...used in this manual Throughout this manual are accurate, however General Imaging Company reserves the right to make changes without notice.
To clean, wipe the camera with instructions on how to use...
User Manual (English (English)) - Page 6
... 7 Camera Views 8 Battery Charging 10 Insert the Battery and SD/SDHC Card (Not included 11
Turning On and Off 13 Setting Language and Date/Time 14
Set Display Language 14 Set Date/Time 15 About the LCD Screen 16
Using the Modes 17 Display Setting 17 LCD Screen Display 18 Still Picture Mode Display 18 Video Shooting Mode Display 20 Playback Mode Display 21 Using the...
User Manual (English (English)) - Page 9
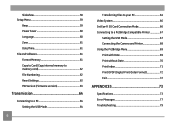
...-Fi SD Card Connection Mode 66 Connecting to a PictBridge Compatible Printer 67
Setting the USB Mode 67 Connecting the Camera and Printer 68 Using the PictBridge Menu 69 Print with Date 69 Print without Date 70 Print Index 71 Print DPOF (Digital Print Order Format 72 Exit 72
APPENDICES 73
Specifications 73 Error Messages 77...
User Manual (English (English)) - Page 12
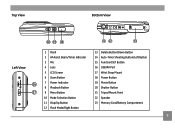
... Assist Beam/Timer Indicator 3 Mic 4 Lens 5 LCD Screen 6 Zoom Button 7 Power Indicator 8 Playback Button 9 Menu Button 10 Mode Selection Button 11 Disp/Up Button 12 Flash Mode/Right Button
13 Delete Button/Down Button 14 Auto-Timer Shooting Button/Left Button 15 Function/SET Button 16 USB/AV Port 17 Wrist Strap Mount 18...
User Manual (English (English)) - Page 19
... use. To learn more about the displayed icons, see "LCD Screen display" on the LCD screen with the liquid inside the monitor. However, there may be some minute points (black, white, red, blue or green) that most of water and induce vomiting Then seek medical assistance immediately.
16 Avoid exposing the LCD screen to indicate the current camera settings...
User Manual (English (English)) - Page 29
... to match your needs. The LCD will automatically adjust the optimal settings for you can select from a total of 21 scene types to enter Scene Mode. Select the desired scene for the occasion and the camera will display a menu like the example below:
Select a scene using the Up/Down/Left/Right button and press the...
User Manual (English (English)) - Page 36
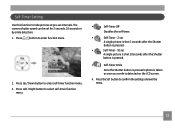
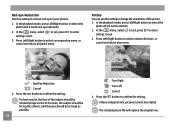
.../ Down button to select self-timer function
menu.
•
Self-Timer Off
Disables the ...screen.
4. The camera shutter speed can be set intervals. Press Left / Right button to enter self-timer function menu. 3. Press the SET button to enter function menu.
2. Press button to confirm the settings and exit the menu.
33 Self-Timer Setting
Use this function to take pictures at pre-set...
User Manual (English (English)) - Page 43
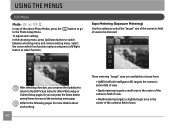
..." sizes are available to switch between shooting menu and camera setting menu.
To adjust each setting. USING THE MENUS
Still Menu
Mode :
In any of the above Photo Modes, press the
func menu
button to go
to be metered. Expo Metering (Exposure Metering)
Use this setting to select the "target" size of the camera's field of view to the Photo Setup...
User Manual (English (English)) - Page 45
...
•
Time-Lapse 30sec
•
Time-Lapse 1min
•
Time-Lapse 5min
•
Time-Lapse 10min
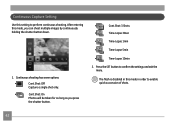
2. Press the SET button to perform continuous shooting. Continuous Capture Setting
Use this setting to confirm the settings and exit the menu. Continuous shooting has seven options:
•
Cont.Shot: Off
Capture a single shot only.
•
Cont.Shot: On
Photos...
User Manual (English (English)) - Page 49
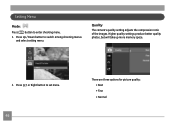
...enter shooting menu.
1. Setting Menu
Mode :
Press
func menu
button to set menu.
46
There are three options for picture quality: • Best • Fine • Normal Higher quality settings produce better quality photos, but will take up more memory space.
2. Press Up / Down button to switch among shooting menus and select setting menu. Quality
The camera's quality setting adjusts the...
User Manual (English (English)) - Page 59
For best results, the face of the picture.
1. In the
func menu
menu, select
setting screen. In the playback mode, press Left/Right button to change the orientation of the subject should be relatively large on the LCD screen, the subject should be facing the camera, and the eyes should be rotated. The rotated picture file will replace...
User Manual (English (English)) - Page 60
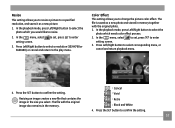
... menu, or
cancel and return playback menu.
:Cancel
4. Press Left/Right button to the play menu. In the
func menu
menu, select
setting screen....change the picture color effect. Press the SET button to enter
3.
Press the SET button to select the photo which needs color effect process.
2.
In the
func menu
menu, select
to set , press SET to confirm the setting...
User Manual (English (English)) - Page 66
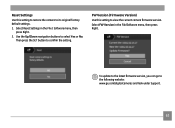
... the setting. Select Reset Settings in the File/Software menu, then press Right.
Select FW Version in the File / Software menu, then press Right.
2. Use the Up/Down navigation buttons to view the current camera firmware version. FW Version (Firmware Version) Use this setting to restore the camera to its original factory default settings.
1.
Reset Settings
Use this setting to select...
User Manual (English (English)) - Page 69
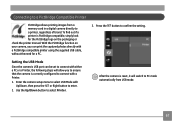
... SD Card Connection Mode
This camera supports wireless connection of an Eye-Fi SD card. Press
func menu
button to select set menu, then enter
connection menu to select Eye-Fi, set it to Internet using the following steps.
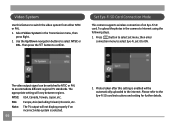
1. PAL: Europe, Asia (excluding Taiwan), Oceania, etc. Video System
Use this setting is selected.
66
2. To upload the photos in...
User Manual (English (English)) - Page 70
Enter the camera setup menu to select USB Mode with Up/Down, then press the SET or Right button to confirm the setting. After the camera is reset, it will allow you can be set to connect with either a PC or a Printer, the following steps will switch to PC mode automatically from a memory card in a digital camera directly to...
User Manual (English (English)) - Page 72

... to enter this item. Select Print with each photo you have set the date and time of your camera, the date and time will appear:
Press the Up/Down button to select a menu item, then Press the SET or Right button to the following screen will be recorded and saved with date from the PictBridge...
User Manual (English (English)) - Page 75
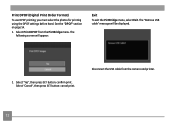
... appear:
Exit
To exit the PictBridge menu, select Exit. The following screen will be displayed.
2. Disconnect the USB cable from the PictBridge menu. Select Print DPOF from the camera and printer.
72
Print DPOF (Digital Print Order Format)
To use DPOF printing, you must select the photos for printing using the DPOF settings before hand. Select "Yes", then press...
Similar Questions

Need Help Getting The Display Screen To Full Mode
Hello, I can't figure out how to get the display screen back to full mode when taking a picture. I ...
Hello, I can't figure out how to get the display screen back to full mode when taking a picture. I ...
(Posted by kbrookmad 10 years ago)

Digital Camera
my ge a1255 digital camera wont stay on and just dies after a few minutes even with brand new batter...
my ge a1255 digital camera wont stay on and just dies after a few minutes even with brand new batter...
(Posted by the1977mikey 11 years ago)

Download The Manual For G E A730 Digital Camera
(Posted by hdenny 12 years ago)

How Do I Take The Write Protect Off Of My W1200 Digital Camera
(Posted by aardav4 12 years ago)

Ge A950 Digital Camera
when i take a picture, then go to view my picture it has lines. how can i fix it??
when i take a picture, then go to view my picture it has lines. how can i fix it??
(Posted by stephanievides 13 years ago)