Get support for GE 27956FE1 - Photophone Cordless Phone

GE 27956FE1 Support Question

GE 27956FE1 Support Question

Find answers below for this question about GE 27956FE1 - Photophone Cordless Phone.
Need a GE 27956FE1 manual? We have 1 online manual for this item!
Question posted by Danielle29985 on August 25th, 2023

Hi, I Bought It Few Years Ago, I Opened It Only Now. I Pressed The Menu Bottom

The person who posted this question about this GE product did not include a detailed explanation. Please use the "Request More Information" button to the right if more details would help you to answer this question.

Requests for more information

Request from INIMITABLE on August 26th, 2023 12:54 AM
Hi there.

I know there is a problem with your device but you did not specify

Current Answers

Answer #1: Posted by Hanna0809 on August 26th, 2023 3:41 AM
This answer was accepted by the poster of the original question.
Hanna0809

Member since:
July 22nd, 2023

Points: 21,130
1,100
points
To turn on and use your GE 27956FE1 device, follow these steps:

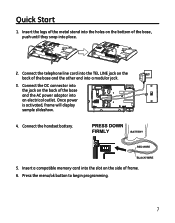
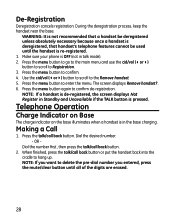
1. **Power On**: Ensure that the device is connected to a power source and the batteries (if applicable) are inserted. Typically, cordless phones like the GE 27956FE1 have a power button or a "Talk" button that you need to press and hold until the screen or indicators light up.

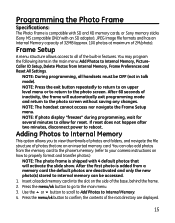
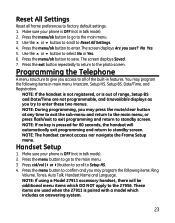
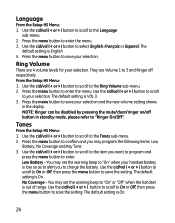
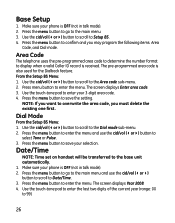
2. **Initial Setup**: Once the device is powered on, it might display a welcome message or prompt you to set up the device. Follow the on-screen instructions to set the language, date, time, and other initial settings.

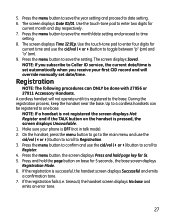
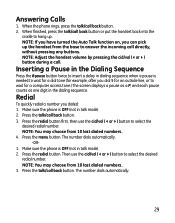
3. **Make a Call**: To make a call, press the "Talk" button or the equivalent button with a phone icon. You should hear a dial tone. Then, dial the phone number you want to call using the keypad. Press the "Talk" button again to initiate the call.

4. **Receive a Call**: When someone calls you, you'll hear a ringing sound. Press the "Talk" button to answer the call. To end the call, press the "End" button or the "Talk" button again.

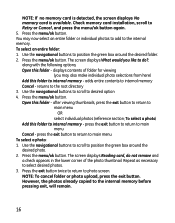
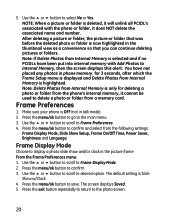
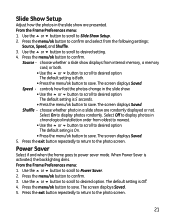
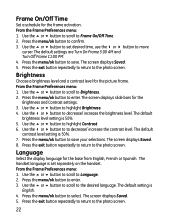
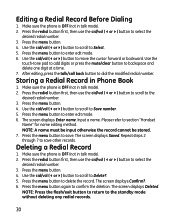
5. **Menu Navigation**: If you pressed the "Menu" button and are now seeing a menu on the screen, use the arrow keys or navigation buttons to scroll through the menu options. Press the corresponding button (e.g., "Select" or "OK") to access and adjust various settings.

6. **Adjust Settings**: Within the menu, you'll find options to adjust settings such as ringtone, volume, display contrast, and more. Navigate through the menu using the arrow keys and follow the prompts to make changes.

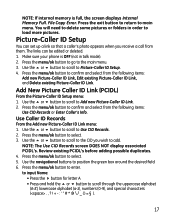
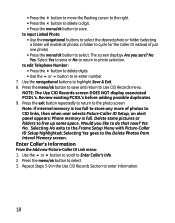
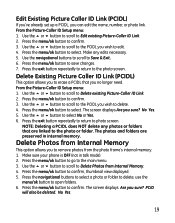
7. **Additional Features**: Depending on your model, the device might have additional features such as caller ID, call history, voicemail, and more. Refer to the user manual for detailed instructions on how to use these features.

8. **Power Off**: To turn off the device, you can typically press and hold the "End" button or a similar button until the screen turns off or you hear a power-off tone.

Remember, the specific buttons and steps might vary slightly based on the exact model of your GE 27956FE1 device. If you're having trouble or need more detailed instructions, it's a good idea to consult the user manual that came with the device.

Answer #2: Posted by SonuKumar on August 26th, 2023 10:38 AM
SonuKumar

Member since:
May 9th, 2021

Points: 16,627,790
100
points


Please respond to my effort to provide you with the best possible solution by using the "Acceptable Solution" and/or the "Helpful" buttons when the answer has proven to be helpful.

Regards,
Sonu
Your search handyman for all e-support needs!!

Related GE 27956FE1 Manual Pages

User Guide - Page 7

... jack on the back of the base and the other end into an electrical outlet. Once power is activated, frame will display sample slideshow. 4. Press the menu/ok button to begin programming.  Connect the DC connector into the jack on the back of the base and the AC power adaptor into a modular...
User Guide - Page 15

...disconnect power to confirm, the contents of inactivity, the frame will activate the slide show. Press the menu/ok button to go to the photo screen without saving any changes. After 60 seconds of...of the built-in the main menu: Add Photos to allow for several minutes to Internal Memory, PictureCaller ID Setup, Delete Photos from the memory card to the phone's memory. (refer to your ...
User Guide - Page 16

..., will remain. 16 displays contents of folder for viewing (you like to the internal memory. Open this folder to internal memory - However, the photos already copied to photo screen. Press the menu/ok button. Press the menu/ok button. press the exit button to return to desired option 4. Use the navigational buttons to scroll to main...
User Guide - Page 17

... will need to delete some pictures or folders in talk mode). 2. Make sure your phone is full, the screen displays Internal Memory Full. Press the menu/ok button to confirm and select from them. Press the menu/ok button to select. 5. Press the menu/ok button to select. 3. The links can set up a link so that a caller...
User Guide - Page 18

... Section to CID links, then when user selects Picture-Caller ID Setup, an alert panel appears: Phone memory is full. Use the navigational buttons to select. 3. Review existing PCIDL's before adding possible duplicates... in folder to cycle for the Caller ID instead of photos to enter information. 18 Press the menu/ok button to save and return to free up some space. Note: If internal memory...
User Guide - Page 19

... photo or folder. Make sure your phone is OFF (not in internal memory. PCID will also be deleted. Make any photos or folders that you to edit. 4. Use the 5 or 6 button to scroll to the PCIDL you sure? Press the menu/ok button to go to open folders. 6. Press the navigational buttons to select a photo...
User Guide - Page 20

..., Slide Show Setup, Frame On/Off Time, Power Saver, Brightness and Language. Make sure your phone is now highlighted in talk mode). 2. Press the exit button repeatedly to return to select No or Yes. Frame Preferences 1. Press the menu/ok button to Frame Preferences. 4. Use the 5 or 6 button to scroll to confirm and select...
User Guide - Page 21

...; Use the 5 or 6 button to scroll to save . Use the 5 or 6 button to scroll to confirm. 3. The default seting is 5 seconds. • Press the menu/ok button to save . Press the menu/ok button to Power Saver. 2. choose whether photo in a slide show are presented. The default setting is Off. 4. Source, Speed, and Shuffle...
User Guide - Page 22

... settings. 3. Use the 5 or 6 button to scroll to decrease/ increase the brightness level. Press the menu/ok button to Frame On/Off Time. 2. Use the 5 or 6 button to scroll to ...time, use the 3 or 4 button to save your selections. Press the menu/ok button to confirm. 3. Press the menu/ok button to enter. 3. Press the menu/ok button to move curser. The screen displays Saved. 5. Use ...
User Guide - Page 23

... repeatedly to return to save. NOTE: During programming, you sure? Make sure your phone is OFF (not in talk mode). 2. NOTE: If using a Model 27911 accessory handset, there will automatically exit programming and return to the main menu. 3. Press the menu/ok button to go to standby screen. Use the 5 or 6 button to Setup...
User Guide - Page 24

...menu. 2. They are 4 volume levels for your selection. Press the menu button to the Ring Volume sub-menu. 2. Press the menu button to enter. Press the menu button to confirm and you want to program and press the menu... range. The default setting is English. 4. The default setting is VOL 3. 3. Press the menu button to the item you may set the warning beep to "On" when your ...
User Guide - Page 25

... for the letter H. Use the cid/vol (3or4) button to scroll to enter the menu. Press the menu button to the Auto Talk sub-menu. 2. Press the menu button to enter the menu. Press the menu button to save your selection. NOTE: If you press any button. The default setting is Handset. 3. The default setting is stored in the idle...
User Guide - Page 26

... touch-tone pad to enter the last two digits of the current year (range: 00 to Setup BS. 4. Make sure your phone is OFF (not in talk mode). 2. Use the cid/vol (3or4) button to scroll to 99). 26 Press the menu button to the base unit automatically. 1. Base Setup 1. Date/Time NOTE: Time...
User Guide - Page 27

...phone is OFF (not in talk mode). 2. On the handset; press the menu button to go to the main menu and use the cid/vol (3or4)button to toggle between "p" (pm) and "a" (am). 9. If the registration is set date/time. Up to 4 cordless... the registration fails (i.e. 5. Press the menu button to confirm and use the cid/vol (3or4) button to scroll to save the year setting and proceed to Caller ...
User Guide - Page 28

...cid/vol (3or4) button to scroll to enter the menu. Making a Call 1. OR - Press the menu button to the Remove handset. 5. When finished, press the talk/call back button or put the handset back... the TALK button is in talk mode). 2. Dial the desired number. - Make sure your phone is re-registered. 1. WARNING: It is not recommended that a handset be deregistered unless absolutely ...
User Guide - Page 29

... the Auto Talk function on, you can pick up the handset from 10 last dialed numbers. 3. Press the menu button. Make sure the phone is OFF (not in talk mode). 2. When finished, press the talk/call directly, without pressing any buttons. Redial To quickly redial a number you dial 9 for a computer access tone.) The screen displays...
User Guide - Page 30

... forward or backward. Use the cid/vol (3or4) button to Select. 5. Make sure the phone is OFF (not in Phone Book 1. Press the menu button to dial the modified redial number. Editing a Redial Record Before Dialing 1. Press the menu button. 4. After editing, press the talk/call back button to delete the record. Storing a Redial Record in talk...
User Guide - Page 31

... call timer shows on or off the hook (during a call), the call back button on Call Waiting calls. During a phone call, you will disconnect. 31 The screen displays All deleted. Press the menu button. Deleting All Redial Records 1. Auto Standby If you turn the ringer OFF, the screen displays RINGER OFF. NOTE: If...
User Guide - Page 36

... You may now change the name, if desired. Make sure the phone is OFF (not in Phone Book. 1. NOTE: Press the flash/exit button to return to delete. 3. Make sure the phone is OFF (not in the Phone Book. Press menu button to the standby mode. NOTE: If the screen displays Memory full and the unit emits...
User Guide - Page 38

... to scroll to Delete?. 3. NOTE: If you don't want to confirm.The screen displays Deleted. Reviewing Phone Book Records 1. Press the phone book button. 3. Press menu button to delete the record when DELETE? TIP: Press the *tone button to the standby mode automatically. 38 Press menu button to proceed to the standby mode. You may now change . NOTE...

Similar Questions

I Have A Ge 27956fe1 - Photophone Cordless And I Need The Diagram Because I Live
I Live in PERU, there are´nt  who repair my phone. Thanks
(Posted by faliagapea 10 years ago)
Ge 27956fe1 Photo Phone
I have the GE PhotoPhone, Model 27956. Our electricity went out during a storm I cant find the manua...
(Posted by carecvti 12 years ago)
Blank Screen
A recent power outage caused screen to go blank; on but without display. Alsonot responding to press...
(Posted by ricknogu 13 years ago)
Ask a New Question
Use the box below to post a new question about this GE product .
Points & Prizes
  • You can earn points for nearly everything you do on HelpOwl.com
  • You can trade in those points for gift cards at leading retailers such as Amazon.com and Walmart
  • It's that simple!
See How it Works
Create a Free Account

GE Manuals

Find free GE 27956FE1 - Photophone Cordless Phone manuals and user guides available at ManualOwl.com. Try out our unique manual viewer allowing you to interact with manuals from directly within your browser!

GE Reviews

View thousands of GE user reviews and customer ratings available at ReviewOwl.com.

Contact Information

Complete GE customer service contact information including steps to reach representatives, hours of operation, customer support links and more from ContactHelp.com.

Scoreboard Ratings

See detailed GE customer service rankings, employee comments and much more from our sister site.

GE Recalls

Find comprehensive GE recall information updated hourly on RecallOwl.com.