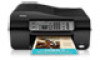
Epson WorkForce 323 Support Question
Epson WorkForce 323 Support Question
Find answers below for this question about Epson WorkForce 323.Need a Epson WorkForce 323 manual? We have 3 online manuals for this item!
Question posted by ronstepr on January 4th, 2017
Close Cover Remove Paper Press Ok
I cannot scan from computer or make a copy but I can make a copy from my computer. printer is saying to CLOSE COVER PAPER JAM . there is no jam and cover is closed.
Current Answers
Answer #1: Posted by wongcie on January 4th, 2017 7:06 AM
wongcie
Member since:
May 4th, 2013 Points: 61,480

Member since:
May 4th, 2013 Points: 61,480
Hi,
You had problem with your e-prom chip. Some model also having such problem, it indicated by paper jam while there were no paper or other foreign object inside the printer. Don't try to fix this by yourself or you will have to replace your logic board.
Wongcie
http://komtip.ml
http://saranteknisi.ml
http://saranteknisi.blogspot.co.id
http://dukunpijet.blogspot.co.id
Related Epson WorkForce 323 Manual Pages
User Manual - Page 9
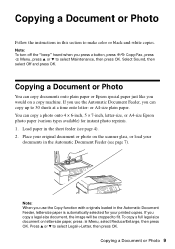
... the instructions in this section to select Maintenance, then press OK. Load paper in the sheet feeder (see page 7). Copying a Document or Photo 9 Note: To turn off the "beep" heard when you copy a legal-size document, the image will be cropped to fit. If you press a button, press r/K Copy/Fax, press x Menu, press u or d to make color or black-and-white...
User Manual - Page 10
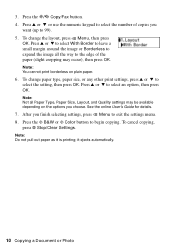
... leave a small margin around the image or Borderless to the edge of copies you finish selecting settings, press x Menu to select the setting, then press OK. To change the layout, press x Menu, then press
OK. Note: Not all the way to expand the image all Paper Type, Paper Size, Layout, and Quality settings may occur), then press OK. Press u or d to begin...
User Manual - Page 16
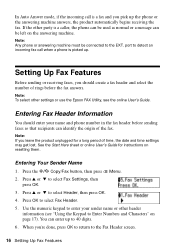
... automatically begins receiving the fax. In Auto Answer mode, if the incoming call when a phone is picked up. port to select Header, then press OK. 4. Press the r/K Copy/Fax button, then press x Menu. 2. Note: If you leave the product unplugged for instructions on the answering machine. Entering Fax Header Information
You should create a fax header...
User Manual - Page 17
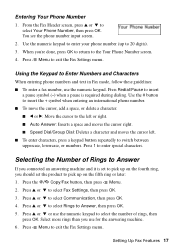
... phone number (up on the fifth ring or later: 1. Use the numeric keypad to the Your Phone Number screen. 4. Press the r/K Copy/Fax button, then press x Menu. 2. Press x Menu to select Your Phone Number, then press OK. Press Redial/Pause to insert
a pause symbol (-) when a pause is set the product to pick up to pick up on...
User Manual - Page 18
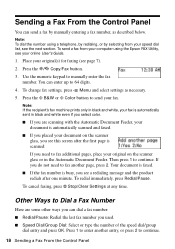
... entry and press OK. To cancel faxing, press y Stop/Clear Settings at any time.
To change fax settings, press x Menu and select settings as described below. Then press 1 to manually...Fax Number
Here are scanning with the Automatic Document Feeder, your document is automatically scanned and faxed.
■ If you can enter up to enter another page, press 2. Press the r/K Copy/Fax button.
3....
User Manual - Page 19

... the fax.
If you run out of paper during printing, you see the Fax ready screen. Receiving Faxes 19 Press 1 to enter another entry or press 2 to continue.
■ If you select. Replace the
phone on , press the Auto Answer button, then press OK.
Receiving Faxes
Before receiving faxes, make sure the Auto Answer light is reduced...
User Manual - Page 22
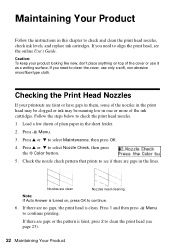
...a few sheets of plain paper in one or more of the ink cartridges.
Press x Menu. 3. If ...press OK to check and clean the print head nozzles, check ink levels, and replace ink cartridges.
Nozzles are faint or have gaps in them, some of the cover or use only a soft, non-abrasive microfiber-type cloth.
Press 1 and then press x Menu to select Maintenance, then press OK. 4. Press...
User Manual - Page 23
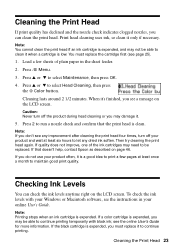
...Cleaning lasts around 2 1/2 minutes.
Press 2 to continue printing temporarily with your Windows or Macintosh software, see the instructions in the sheet feeder.
2. If quality does not improve, one of plain paper in your product and wait at... the ink levels anytime right on the LCD screen. Press u or d to select Maintenance, then press OK.
4. To check the ink levels with black ink;
User Manual - Page 24
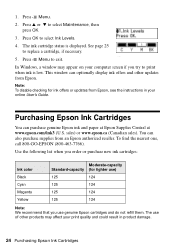
...from Epson, see the instructions in product damage.
24 Purchasing Epson Ink Cartridges
See page 25 to select Maintenance, then press OK.
3. Note: To disable checking for lighter use)
125
124
125
124
125
124
125
124
Note: We recommend... cartridges and do not refill them. You can purchase genuine Epson ink and paper at Epson Supplies Central at www.epson.com/ink3 (U.S.
User Manual - Page 25
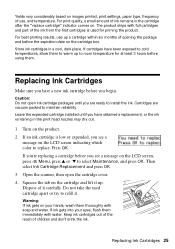
... LCD screen, press x Menu, press u or d to refill it up to maintain reliability. Yields vary considerably based on the cartridge box. If cartridges have a new ink cartridge before the expiration date on images printed, print settings, paper type, frequency of children and don't drink the ink. For best printing results, use , and temperature.
Press OK.
User Manual - Page 26
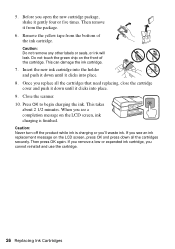
...: Never turn off the product while ink is finished. Then press OK again. Remove the yellow tape from the package.
6. Caution: Do not remove any other labels or seals, or ink will leak.
If ...
7. Press OK to begin charging the ink. Once you see an ink replacement message on the LCD screen, press OK and press down all the cartridges that need replacing, close the cartridge cover and ...
User Manual - Page 34
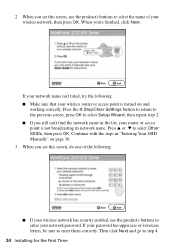
.../Clear Settings button to return to the previous screen, press OK to select Setup Wizard, then repeat step 2. ■ If you see this screen, use... the product's buttons to select the name of the following : ■ Make sure that your router or access point is turned on page 36. 3. If your wireless network, then press OK. Press u or d to step 4.
34 Installing for the First Time When you...
User Manual - Page 36
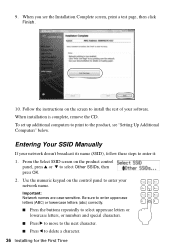
...the numeric keypad on the control panel to select Other SSIDs, then press OK. 2. Follow the instructions on the product control
panel, press u or d to enter your software. Be sure to enter ...or numbers and special characters.
■ Press r to move to the next character. ■ Press l to enter it: 1. When installation is complete, remove the CD. Entering Your SSID Manually
If...
User Manual - Page 37
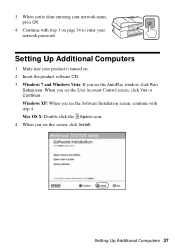
.... 3. When you see this screen, click Install. When you see the Software Installation screen, continue with step 3 on . 2. Mac OS X: Double-click the Epson icon. 4. 3. Make sure your product is turned on page 34 to enter your network name, press OK.
4.
User Manual - Page 43
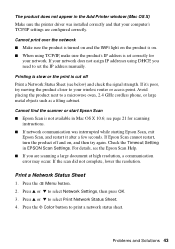
... a Network Status Sheet
1.
The product does not appear in the Add Printer window (Mac OS X)
Make sure the printer driver was interrupted while starting Epson Scan, exit Epson Scan, and restart it 's poor, try again. Press the x Menu button. 2. Cannot print over the network
■ Make sure the product is turned on and the WiFi light on...
User Manual - Page 44
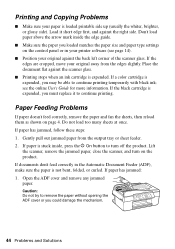
... (usually the whiter, brighter, or glossy side). If paper has jammed, follow these steps: 1. Open the ADF cover and remove any jammed paper. Place the document flat against the right side. If paper has jammed: 1. Do not load too many sheets at once. Printing and Copying Problems
■ Make sure your paper is not bent, folded, or curled. If the black...
User Manual - Page 45
... and Solutions 45 Lift the scanner cover, remove any jammed paper inside, and lower the scanner cover.
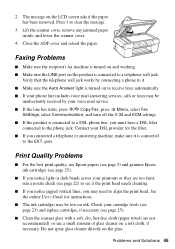
4. Print Quality Problems
■ For the best print quality, use a small amount of glass cleaner on to receive faxes automatically. ■ If your voice mail service. ■ If the line has static, press r/K Copy/Fax, press x Menu, select Fax
Settings, select...
User Manual - Page 49
... §2.909. Trade Name: Epson
Type of Product: Multifunction printer
Model:
C364A (WorkForce 320 Series)
C364B (WorkForce 323/325 Series)
Notices 49 ■ If you should always follow basic safety precautions to reduce the risk of fire, electric shock, and personal injury, including the following two conditions: (1) this device may not cause harmful interference, and (2) this...
Start Here - Page 1
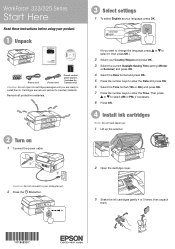
...if necessary.
8 Press OK.
4 Install ink cartridges
Note: Do not load paper yet.
1 Lift up the scanner. Then press
or to install the ink. WorkForce® 323/325 Series
Start ...press or to select it, then press OK.)
2 Select your computer yet.
2 Press the On button.
2 Open the cartridge cover.
3 Shake the ink cartridges gently 4 or 5 times, then unpack
them.
*411868300* *411868300* Remove...
Start Here - Page 2
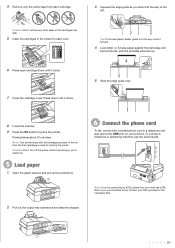
....
6 Press each cartridge.
3 Squeeze the edge guide as you won't be able to the
left. Contact your product. C aution: Don't remove any other seals or the cartridges may leak.
5 Insert the cartridges in the way, move it clicks.
7 Close the cartridge cover. To connect a telephone or answering machine, see the Quick Guide.
N ote: Your printer...
Similar Questions

Diagram Or Video To Show How To Remove Paper Jam -et3760?
(Posted by debbiegordon2000 1 year ago)

I Want To Use Legal Size Paper But It Is Not Listed In Paper Size Options?
(Posted by kjkorberg 2 years ago)

Epson 325 Workforce. Change Ink Get To Maintence. What Button Press Get Cartridg
(Posted by pocialikkaren 9 years ago)

How Can I Remove Paper Jam Inside The Printer? Epson Stylus Nx420
how can I remove paper jam inside my printer?
how can I remove paper jam inside my printer?
(Posted by rcpicar 11 years ago)