Epson SureColor S70670 Support Question
Epson SureColor S70670 Support Question
Find answers below for this question about Epson SureColor S70670.Need a Epson SureColor S70670 manual? We have 3 online manuals for this item!
Question posted by hkerstyn on January 16th, 2013
Mechanical Error
What does "Mechanical Error 159A" mean?
Current Answers
Related Epson SureColor S70670 Manual Pages
Quick Reference Guide - Page 3

... - S30670 2 Front - S30670 2 Inside - S50670 and S70670 3 Back 4
Loading Media 4 Using the Auto Take-up Reel 13 Cutting Off and Removing ... 21 Performing Auto Head Alignment 21 Cleaning the Media System 22 Checking and Cleaning the Print Head 23 Maintaining the Printer 23 Checking Ink Status 24 Replacing Ink Cartridges 25 Washing the Ink System 27 Cleaning the Print Head, Wiper, ...
Quick Reference Guide - Page 8

...in any of the black squares on the bar in back of the printer and the right edge on any of the holes on the back of the printer. 6 | Loading Media
3. Orient the roll based on the printable... side Printable side out
Printable side in
For the S50670/S70670, place the left edge is not in place, ...
Quick Reference Guide - Page 13
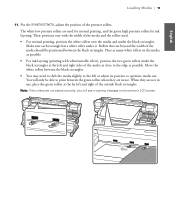
...edge as possible. You will see a warning message on the media as many white rollers on the printer's LCD screen. When they are not in use . Make sure each rectangle has a white roller... used for normal printing, and the green high pressure rollers for ink layering. For the S50670/S70670, adjust the position of the media as close to optimize media use .
Place as possible. ...
Quick Reference Guide - Page 24
S30670
S50670/S70670
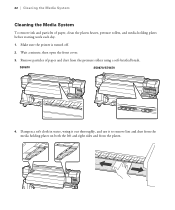
4. Dampen a soft cloth in water, wring it out thoroughly, and use it to remove lint and dust from... Media System
To remove ink and particles of paper and dust from the pressure rollers using a soft-bristled brush.
Make sure the printer is turned off.
2. Remove particles of paper, clean the platen heater, pressure rollers, and media holding plates on both the left...
Quick Reference Guide - Page 27

...:
Icon
Description Ready to print.
Cartridge is low. Cartridge error.
Check the message and clear the error. The height of the indicator shows the approximate level of cleaning...T689200 T715A00 - - - - - Ink is not locked. Replace with a new cartridge. S70670 T715100 T715400 T715300 T715200
T715B00 T715700 T715800 T715500 T715600 Lower the lock lever.
Make sure you have...
Quick Reference Guide - Page 31

...You may need to remove all the ink residue. dirt or ink from your hands or swab. S30670
S50670/S70670
English
Sensors
Sensors
Head 1 Head 2
Caution: Do not touch the nozzle surface or any other internal part ... a clean room wipe. Do not let the cleaning swab touch any other part of the printer or it may stain it may damage the print head.
5. Clean the front and back of the ...
Quick Reference Guide - Page 34
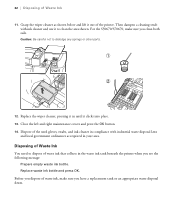
...waste disposal laws
and local government ordinances as shown below and lift it out of the printer. Caution: Be careful not to dispose of Waste Ink
11. Dispose of waste ink...cleaner, pressing it in the waste ink tank beneath the printer when you have a replacement tank or an appropriate waste disposal drum. For the S50670/S70670, make sure you see the following message:
Prepare empty ...
Quick Reference Guide - Page 36
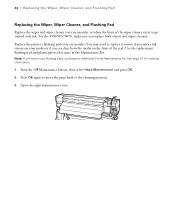
...Kit. Press the # Maintenance button, then select Head Maintenance and press OK.
2. Replace the printer's flushing pad every six months.
Press OK again to move the print head to get stained with... ink. You may need more flushing pads, purchase an Additional Printer Maintenance Kit. For the S50670/S70670, make sure you see dust from the media on the front of the wiper...
Setup Guide - Page 3

...-in Reel ...17 Adjusting the Take-up Reel ...21
Marking the Media Loading Position 25 Choosing a Color Mode (S50670 and S70670 only 27 Installing Ink Cartridges ...27 Installing Software ...30
Connecting to Your System ...30 Updating Your Printer Firmware ...30
Checking the Current Firmware Version 31 Updating the Firmware ...31 Configuring the...
Setup Guide - Page 4

....4 in (1000 mm)
114.3 in (2903 mm)
19.7 in (500 mm)
When choosing a place for the printer, leave adequate room for each printer:
• S30670 - 483 lb (219 kg)
• S50670 - 524 lb (238 kg)
• S70670 - 504 lb (229 kg)
WARNING: Six people are required to all three models.
Avoid locations subject...
Setup Guide - Page 6

4 | Unpacking and Assembling the Printer
Printer and Stand Assembly (S50670 and S70670):
Replacement cartridges
Cable supports
Translated warning labels
Carry bars
Power cable (× 2) Waste ink tank
Legs Hex wrench
Printer Horizontal struts
Media System Assembly:
Waste ink tank brackets
Software and documentation Media alignment label
Take-in reel
Take-in/take-up brackets
Take...
Setup Guide - Page 16

For the S50670/S70670, attach the media alignment label to the front of the guide label on the bar. Attach the brackets to the front bar, aligning the left end with the left end of the printer as shown. Installing the Take-up Reel System
You need the following parts to assemble and attach the take-up Reel System
6. 14 | Installing the Take-up reel system:
1.
Setup Guide - Page 29

...color modes:
• 4-color or 5-color (S50670) • 8-color or 10-color (S70670)
Caution: The color mode cannot be replaced with more information, see your configuration. No matter which... liquid.
3. English
Choosing a Color Mode (S50670 and S70670 only) | 27
Choosing a Color Mode (S50670 and S70670 only)
Turn the printer on and configure the initial settings such as language and date...
Setup Guide - Page 31
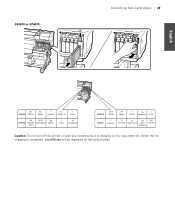
...)
BK (Black)
Y
M
(Yellow) (Magenta)
C (Cyan)
MS
LK/GY
BK
S70670 (Metallic (Light Black) (Black)
Silver)
C (Cyan)
M (Magenta)
S50670
WH (White)
BBKK ((BBllaacckk))
Y
M
C
(Yellow) (Magenta) (Cyan)
S70670
Y (Yellow)
O
LC
LM
WH
(Orange) (Light Cyan) (Light (White)
Magenta)
Caution: Do not turn off the printer or open any covers when it is completed, Load Media...
Setup Guide - Page 34

... an appropriate IP address. EPSON and SureColor are for identification purposes only and may be trademarks of Seiko Epson Corporation.
The EpsonNet Config program you want to configure and click Configuration to access the TCP/IP selection screen. 4. Epson disclaims any and all EPSON printers on the network and displays the MAC...
User Manual - Page 11

... of cartridge installed varies with your printer.
17 Lock levers Raise the levers to unlock the ink cartridges prior to select the auto take -up .
9 Manual switch Use this bottle. S70670: 8 colors/10 colors S50670: ... this holder.
13 Adjuster The adjusters keep the printer in place once they have been attached to the roll core. On : An error occurred. Be sure to disable auto take -up...
User Manual - Page 15

...the lamp lights or flashes. Off
: No error.
24 Control panel See "Control panel" on any of the printer, or removing jammed media. Inside - S70670, S50670
Dirt on page 20.
25 Front cover... as described in the chapters listed in the reference sections below. S70670/S50670" on the control panel's screen. On/flashing : An error has occurred; Check the message on page 39 and "Loading Media...
User Manual - Page 165

...low pressure roller at least 300 mm (11.8 inches) wide. S70670/S50670" on page 156. Flip the Auto switch on the auto ...W to the auto take -up Reel Unit stopped. If the printer is not correctly attached to clear the message from these sources. Are...page 110. Use the high pressure rollers for details. Pressure Roller Error Pressure rollers are not available when 2.5 is 300 mm (11.8...
User Manual - Page 166
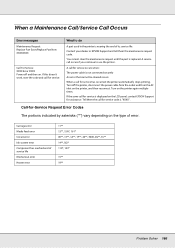
... call for service is displayed on the LCD panel, contact EPSON Support for service has occurred, the printer automatically stops printing.
Carriage error Media feed error Circuit error Ink system error Component has reached end of service life Mechanical error Heater error
11** 12**, 15A*, 161* 00**, 13**, 1A**, 1F**, 20**, 3000, Dx**, Fx** 14**,162* 110*, 143...
User Manual - Page 175

... will be reactivated and sleep mode will be selected in the Printer Setup menu.
The red light is on inside the printer.
The printer enters sleep mode when the Heat Off Timer expires and the heaters turn off for some time and no error occurs. Problem Solver 175 Others
Heaters Turn off or the...
Similar Questions

What Is Fatal Error Id: 1a39
Upon power up the control panel displays Error ID: 1A39, why?
Upon power up the control panel displays Error ID: 1A39, why?
(Posted by jawa102 5 years ago)


Epson Artisan 1430 Inkjet Printer How Much Ink Coverage
(Posted by jayiMo 9 years ago)
How Do You Reset An Epson Pro 7880 Inkjet Printer When It Does Not Communicate
with the computer
with the computer
(Posted by prapdbm 9 years ago)

What Rip Comes With Epson Stylus Pro 3880 Inkjet Printer Designer Edition
(Posted by mojsm 10 years ago)