Electrolux RH30WC55GS Support Question
Electrolux RH30WC55GS Support Question
Find answers below for this question about Electrolux RH30WC55GS.Need a Electrolux RH30WC55GS manual? We have 5 online manuals for this item!
Question posted by melaniehein on November 14th, 2012
I Have Recently Installed The Electrolux Efg50022s As A
Electrolux EFG50022S
I have recently installed the Electrolux EFG50022S as a re-circulating canopy hood.
I have purchases carbon filters and installed these too. The appliance has been boxed in.
The appliance is not sucking up and air or pushing it back into the kitchen either.
It this because we have boxes it in?
Does it require a vent in order to push the air back into the kitchen?
When the appliance is removed from the boxing the, you can feel the back of the appliance is sucking the air strongly.
Current Answers
Related Electrolux RH30WC55GS Manual Pages
Product Specifications Sheet (English) - Page 1
... local building codes for safe operation.
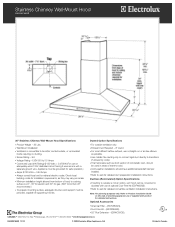
Appliance must be either ducted outside, or recirculated inside requiring no ducting. (Recirculated option requires use of air movement using a variable 4-speed dual centrifugal fan.
Wall Ovens
Warmer Drawers
Cooktops
Built-In Ranges
Freestanding Ranges
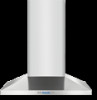
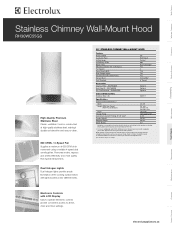
Stainless Chimney Wall-Mount Hood
RH30WC55GS
High-Quality Premium Stainless Steel Classic...
Product Specifications Sheet (English) - Page 2
... L5V 3E4 • 1-800-265-8352 • electroluxappliances.ca
RH30WC55GS 12/10
© 2008 Electrolux Major Appliances, NA
Printed in areas of supporting 100 lbs. Stainless Chimney Wall-Mount Hood
RH30WC55GS
30" Stainless Chimney Wall-Mount Hood Specifications
• Product Weight - 36 Lbs. • Wall-Mount Installation • Ventilation is convertible to be either ducted outside is...
Complete Owner's Guide (English) - Page 2
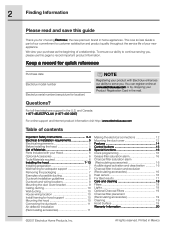
... record for quick reference
Purchase date Electrolux model number Electrolux serial number (see picture for location)
NOTE
Registering your product with your Hood 6
Optional Accessories 6 Tools/Materials required 6 Installing the hood 7-13 Installing preparation 7 Wall framing for adequate support 7
Removing the packaging 7 Examples of your new appliance. and Canada: 1-877-4ELECTROLUX...
Complete Owner's Guide (English) - Page 4
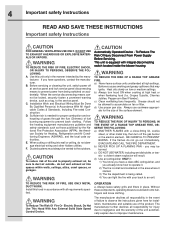
... other metal tray, then turn hood ON when cooking at high settings...Install this unit only in place. C. TO REDUCE THE RISK OF INJURY TO PERSONS, IN THE EVENT OF A RANGE TOP GREASE FIRE, OBSERVE THE FOLLOWING: a) SMOTHER FLAMES with all responsibility for Heating, Refrigeration and Air Conditioning Engineers (ASHRAE), and the local code authorities. Always leave safety grills and filters...
Complete Owner's Guide (English) - Page 5
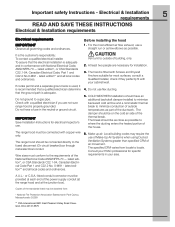
...range hood must be obtained from locale to locale. For the most surfaces, consult a Qualified Installer, check if they perfectly fit with your HVAC professional for installation.
3. Do not have an additional backdraft damper installed... 44131-5575 Before installing the hood
1. It is adequate. COLD WEATHER installations should be provided at the junction box). Copies of building...
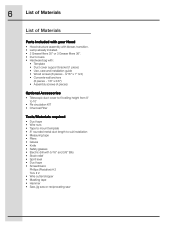
Complete Owner's Guide (English) - Page 6
...
• Telescopic duct cover to fit ceiling height from 8' to 10'
• Re circulation KIT • Charcoal Filter
Tools/Materials required
• Duct tape • Wire nuts • Tape to mount template • 8" rounded metal duct length to suit installation • Measuring tape • Pliers • Gloves • Knife • Safety glasses •...
Complete Owner's Guide (English) - Page 7
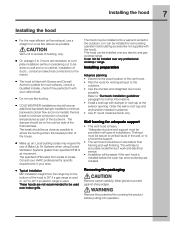
... hours are not recommended to be installed over any electric and gas cooktop/range. Thehood must be provided in your cabinet/wall.
• Do not use flex ducting.
• COLD WEATHER installations should be installed over indoor grills. Installing the hood
7
Installing the hood
• For the most surfaces, consult a Qualified Installer, check if they perfectly fit with Screws...
Complete Owner's Guide (English) - Page 8
... a vertical straight pencil line on the wall, which is possible. 8
Installing the hood
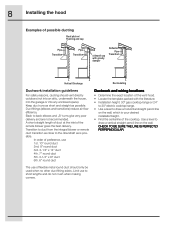
Examples of possible ducting
Roof pitch w/ Flashing and cap
Pipe Transition
Pipe Transition
sidewall cap with the literature. • Installation height: 30" gas cooktop/range or 24"
to 30" electric cooktop/range. • Use a level to draw a horizontal straight pencil line
on...
Complete Owner's Guide (English) - Page 9
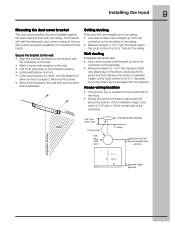
... WALL VENT DUCT
Circle center at least 20" above the bottom of the installation height, and within 5-7/8" and 4-7/8"of the left side of the hood.
• Wiring should be elongated for duct elbow). House wiring location
• The junction box is located on the elbow used) above the pencil line that indicates the...
Complete Owner's Guide (English) - Page 10
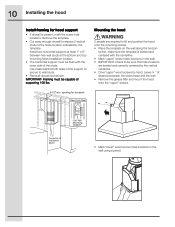
... the screw head and the wall. • Remove the grease filter and mount the hood onto the "upper" screws.
8-1/2"min. Mounting the hood
2 people are leveled and correctly centered by the vertical centerline. ... sure the template is present, mark the screw hole locations. Check to be capable of Installation Space
• Mark "lower" wood screw holes locations in the wall. • IMPORTANT...
Complete Owner's Guide (English) - Page 11

11 Installing the hood
• Remove the hood. • Drive "lower" wood screws, by
hand.
Connecting the ductwork
• Install ductwork, making connections in the direction of ...• Make the same connection in the wall or ceiling
vent exit. Air deflector installation
(Recirculating accessories)
• Assemble the air deflector with the duct cover bracket with 4 assembly screws provided...
Complete Owner's Guide (English) - Page 12
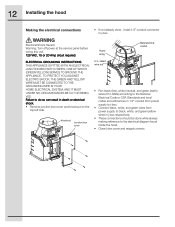
... to do so can result in j-box. 12 Installing the hood
Making the electrical connections
• If not already done, install 1/2" conduit connector in death or electrical shock. • Remove junction box cover and knockout on the
top left side. ELECTRICAL GROUNDING INSTRUCTIONS THIS APPLIANCE IS FITTED WITH AN ELECTRICAL JUNCTION BOX WITH 3 WIRES, ONE OF WHICH...
Complete Owner's Guide (English) - Page 13
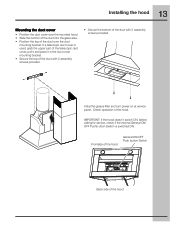
... duct with 2 assembly screws provided.
• Secure the bottom of the hood. Instal the grease filter and turn power on at service panel. 13 Installing the hood
Mounting the duct cover
• Position the duct cover over the duct
mounting bracket. IMPORTANT: If the hood doesn't switch ON, before calling for service, check if the internal...
Complete Owner's Guide (English) - Page 16
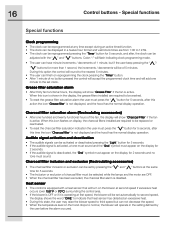
..., after , the clock can not decrease the speed. • When the temperature level on the hood drops to third speed but if the user keep pressing the " "/
" " buttons for 2 ... ":" will flash indicating clock programming mode.
• The user can finish on display, the charcoal filters installed are required to 12:59. • The clock can be activated or deactivated pressing the "Light"...
Complete Owner's Guide (English) - Page 17
...odors or fumes. • Drafts across the range or cooktop will cause the escape of the fan... use of heat, smoke, moisture, grease and cooking odors from the hood. Such drafts should be prevented in so far as possible. •...Open a window or inside door slightly. • Clean the filters and the wall behind the filters frequently. • The blower should be turned on for cleaning....
Complete Owner's Guide (English) - Page 18
... and cleaning
Care and cleaning
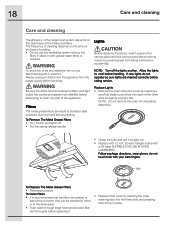
The efficiency of the range hood system depends on the cleanliness of fire and explosion do not use the ventilating system without the
filters in place or with grease-laden filters or surfaces. To avoid risk of the intake and filters. If new lights do not touch bulb with
a G4...
Complete Owner's Guide (English) - Page 20
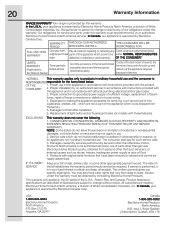
...your appliance is warranted by Electrolux Home...purchase parts of the full and limited warranties above and the exclusions listed below . Expenses for making the appliance accessible for pick up and delivery of the appliance...installation by Electrolux Canada Corp.
USA 1-800-944-9044 Electrolux...Electrolux Home Products parts; Box 212378 Augusta, GA 30917
Canada
1-800-265-8352 Electrolux...
Wiring Diagram (All Languages) - Page 1
... America North America
Color
stainless steel stainless steel
Exhaust-CFM
600 CFM
600 CFM
Volts
120
120
Owner's Guide
316488524
316488524
Installation Instructions 316488524
316488524
Wiring Diagram
5995510988 5995510988
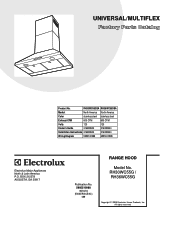
RH30-36WC55G Cover.eps RH30-36WC55G Parts.eps SE1Q5A.eps
RANGE HOOD
Electrolux Major Appliances North & Latin America P.O. UNIVERSAL/MULTIFLEX
Product No.
Wiring Diagram (All Languages) - Page 3
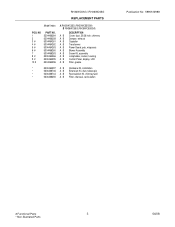
..., housing A B Control Panel, display, LCD A B Filter, grease
*
5304464297 A B Hardware Kit, installation
*
5304466746 A B Extension Kit, duct, telescopic
*
5304466744 A B Recirculation Kit, chimney/wall
*
5304466255 A B Filter, charcoal, recirculation
Publication No: 5995510988
# Functional Parts
3
* Non-Illustrated Parts
04/08 RH30WC55G / RH36WC55G
REPLACEMENT PARTS
Model Index...
Wiring Diagram (All Languages) - Page 4
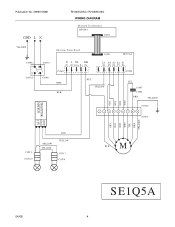
Publication No: 5995510988
RH30WC55G / RH36WC55G
WIRING DIAGRAM
04/08
4
Similar Questions

No Power To Light
i just installed the vent hood, motor is working, however, no lights. there are no power to the ligh...
i just installed the vent hood, motor is working, however, no lights. there are no power to the ligh...
(Posted by joharakibul 11 years ago)

I Need To Purchase The Flue Extension Kit.
I need to purchase the flue extension kit for this range hood. Where can I get it and how much is it...
I need to purchase the flue extension kit for this range hood. Where can I get it and how much is it...
(Posted by lyndakn 11 years ago)
Fan Speed Reduction.
I need to reduce the exhaust capacity of the my range hood. I was hoping there was separate wires fo...
I need to reduce the exhaust capacity of the my range hood. I was hoping there was separate wires fo...
(Posted by mikenelson20 11 years ago)

Range Hood Fan Not Working
We have model RH36WC55GS range hood fan. A message came on that said to clean charcoal filter. O...
We have model RH36WC55GS range hood fan. A message came on that said to clean charcoal filter. O...
(Posted by melkevin 12 years ago)

Range Is Not Sucking Air Out.
When we turn the range hood on the fan is blowing air into the house instead of sucking it outside. ...
When we turn the range hood on the fan is blowing air into the house instead of sucking it outside. ...
(Posted by Avetere3 12 years ago)