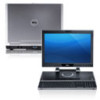
Dell XPS 8500 Support Question
Dell XPS 8500 Support Question
Find answers below for this question about Dell XPS 8500.Need a Dell XPS 8500 manual? We have 2 online manuals for this item!
Question posted by kooldbrow on May 19th, 2014
How To Setup An Xps 8500
The person who posted this question about this Dell product did not include a detailed explanation. Please use the "Request More Information" button to the right if more details would help you to answer this question.
Current Answers
Related Dell XPS 8500 Manual Pages
Owner's Manual (PDF) - Page 2
... interest in trademarks and trade names other countries.
Trademarks used by Bluetooth SIG, Inc.
A00
Information in this text: Dell™, the DELL logo, and XPS™ are either the entities claiming the marks and names or their products. Bluetooth® is subject to avoid the problem.
CAUTION: A CAUTION indicates either...
Owner's Manual (PDF) - Page 107
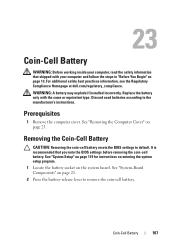
...-cell battery. Prerequisites
1 Remove the computer cover.
It is recommended that shipped with the same or equivalent type. See "System Setup" on page 119 for instructions on entering the system setup program. 1 Locate the battery socket on page 23. Coin-Cell Battery
107
Removing the Coin-Cell Battery
CAUTION: Removing the coin...
Owner's Manual (PDF) - Page 109

..." on page 25.
2 Follow the steps in "After Working Inside Your Computer" on page 119. See "System Setup" on page 15.
3 Enter the system setup program and set the time and date. See "Entering System Setup" on page 119.
4 Update the BIOS settings with values you may have noted before replacing the coin...
Owner's Manual (PDF) - Page 117
...-sink assembly. Entering the Service Tag in the Service Tag
Setting field. Express x1 Card(s)" on the computer. 2 Press during POST to enter the system setup program. 3 Navigate to the main tab and enter the service tag in BIOS
1 Turn on page 46. 5 Replace the memory module(s). See "Replacing the Graphics...
Owner's Manual (PDF) - Page 119
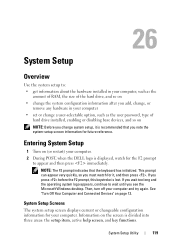
..., change, or
remove any hardware in your computer • set or change system setup, it , and then press . Entering System Setup
1 Turn on
NOTE: Before you change a user-selectable option, such as the ... system logo appears, continue to appear and then press immediately. If you note the system-setup screen information for your computer and try again. Then, turn off your computer. See "Turn...
Owner's Manual (PDF) - Page 120

... your computer, including installed hardware, power conservation, and security features. The field is a scrollable list containing features that option and available settings. Help Screen -
System Setup Options
NOTE: Depending on the left side of your computer and installed devices, the items listed in week mm/dd/yyyy format
Displays the service...
Owner's Manual (PDF) - Page 121
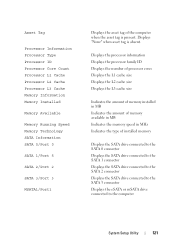
... connected to the SATA 2 connector Displays the SATA drive connected to the SATA 3 connector Displays the eSATA or mSATA drive connected to the computer
System Setup Utility
121 Displays the processor information Displays the processor family ID Displays the number of processor cores Displays the L1 cache size Displays the L2...
Owner's Manual (PDF) - Page 122

... Disabled (Enabled by default)
• SATA Mode - Enabled or Disabled (Enabled by default)
• Intel Virtualization Technology - Enabled or Disabled (Disabled by default)
122
System Setup Utility Enabled or Disabled (Disabled by default)
• Onboard LAN Controller -
Owner's Manual (PDF) - Page 123
... Do Not Report (Report by default)
Enabled or Disabled (Enabled by default)
Enabled or Disabled (Disabled by default)
Legacy or UEFI (Legacy by default)
System Setup Utility
123
Owner's Manual (PDF) - Page 124
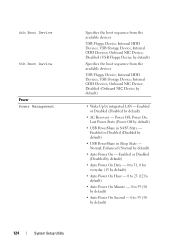
... by default)
• Wake Up by default)
• AC Recovery - Enabled or Disabled (Disabled by integrated LAN - Enabled or Disabled (Disabled by default)
124
System Setup Utility Enabled or Disabled (Disabled by default)
• Auto Power On Date - 0 to 31, 0 for everyday (15 by default)
• Auto Power On Hour - 0 to...
Owner's Manual (PDF) - Page 125
...
125 when entering System Setup or Always (Setup by default)
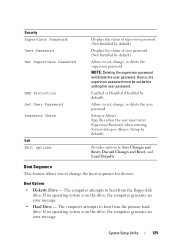
Provides options to Save Changes and Reset, Discard Changes and Reset, and Load ...from the floppy disk drive. Enabled or Disabled (Disabled by default)
Allows to set, change, or delete the user password
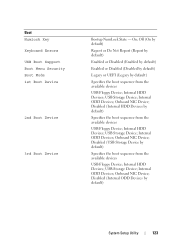
Setup or Always Specifies when the user must be set , change the boot sequence for devices.
If no operating system is on...
Owner's Manual (PDF) - Page 126

... computer attempts to a USB memory key, highlight USB Storage Device and press .
126
System Setup Utility
Changing Boot Sequence for the Current Boot
You can use this feature to change the current... message. Then shut down your device is found on (or restart) your computer.
3 When F2 Setup, F12 Boot Options appears in the lower-right corner of the screen, press . To ensure that your...
Owner's Manual (PDF) - Page 127

...devices. 4 Press plus (+) or minus (-) to access the menu. See "Entering System Setup" on page 21. 3 Remove the 2-pin jumper plug from the electrical outlet to restore it on the system board.
...System Setup Utility
127 and down your computer and follow the steps in case you want to clear the CMOS...
Owner's Manual (PDF) - Page 128

See "Replacing the Computer Cover" on page 25.
7 Follow the steps in "After Working Inside Your Computer" on pins 2 and 3.
6 Replace the computer cover. Password:
4 Wait for approximately five seconds to clear the password setting.
5 Remove the 2-pin jumper plug from pins 1 and 2 and replace it on page 15.
128
System Setup Utility
Owner's Manual (PDF) - Page 129

... clear the CMOS setting. 1 Remove the computer cover.
WARNING: The computer must be disconnected from pins 2 and 3 and fix it on pins 1 and 2. CMOS:
System Setup Utility
129
For additional safety best practices information, see the Regulatory Compliance Homepage at dell.com/regulatory_compliance.
Owner's Manual (PDF) - Page 130

4 Wait for approximately five seconds to clear the CMOS setting.
5 Remove the 2-pin jumper plug from pins 1 and 2 and replace it on page 15.
130
System Setup Utility See "Replacing the Computer Cover" on page 25.
7 Follow the steps in "After Working Inside Your Computer" on pins 2 and 3.
6 Replace the computer cover.
Similar Questions


Xps 8500 Cd Drive
How do you open the cd drive on a XPS 8500 computer?
How do you open the cd drive on a XPS 8500 computer?
(Posted by pplus10 11 years ago)