Dell OptiPlex 210L Support Question
Dell OptiPlex 210L Support Question
Find answers below for this question about Dell OptiPlex 210L.Need a Dell OptiPlex 210L manual? We have 1 online manual for this item!
Question posted by beaznivasa on June 27th, 2014
How To Replace Optiplex 210l Power Button
The person who posted this question about this Dell product did not include a detailed explanation. Please use the "Request More Information" button to the right if more details would help you to answer this question.
Current Answers
Related Dell OptiPlex 210L Manual Pages
Quick Reference Guide - Page 2
Trademarks used in this text: Dell, OptiPlex, and the DELL logo are trademarks of Dell Inc.; Models DCSM, DCNE
September 2006
P/N YC764
Rev. NOTICE: A NOTICE indicates either the entities claiming the marks ...
Quick Reference Guide - Page 5
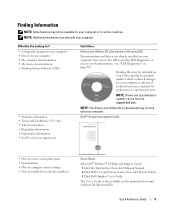
... solve problems
User's Guide Microsoft® Windows® XP Help and Support Center
1 Click the Start button, then click Help and Support. 2 Click Dell User and System Guides, then click System Guides. 3 Click Dell Optiplex User's Guide. You can be available for your computer.
Readme files may be included on page 28...
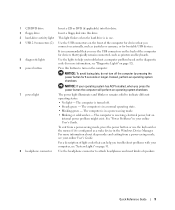
Quick Reference Guide - Page 7

... reinstall your operating system, use the optional Drivers and Utilities CD (ResourceCD) to reinstall my operating system
Windows Help and Support Center
1 Click the Start button and click Help and Support. 2 Type a word or phrase that describes your problem and click
the arrow icon. 3 Click the topic that came with your...
Quick Reference Guide - Page 9
...the computer for more information about sleep modes and exiting from a power-saving mode, press the power button or use the keyboard or the mouse if it is configured as ... help you troubleshoot problems with your online User's Guide. See "Power Problems" in your computer, see "Diagnostic Lights" on page 32).
6 power button
Press this drive.
3 hard-drive activity light This light flickers...
Quick Reference Guide - Page 10
Your computer is equipped with the AC power available in your location.
10
Quick Reference Guide
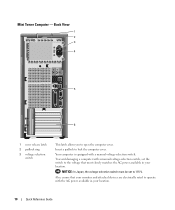
Back View
1 2 3
4
5
6
1 cover ... voltage-selection switch, set to operate with a manual voltage-selection switch. Also, ensure that most closely matches the AC power available in your location. Insert a padlock to open the computer cover. Mini Tower Computer - NOTICE: In Japan, the...
Quick Reference Guide - Page 11
...-Mbps network and the computer. • Orange - It is not detecting a physical connection to the same address. For more information, see your network. 4 power connector
Insert the power cable into this light appear to the parallel connector. The computer is recommended that the network cable has been securely attached. A good connection exists...
Quick Reference Guide - Page 13
... your fingers around the outside of the badge, press firmly, and turn off .
• Steady green -
Quick Reference Guide
13 The computer is being accessed.
3 power button
Press this drive.
It is recommended that can be rotated to a USB device).
To rotate the badge, place your computer. For a description of light codes...
Quick Reference Guide - Page 14
..., ensure that most closely matches the AC power available in your location.
5 padlock ring
Insert a padlock to open the computer cover. Desktop Computer -
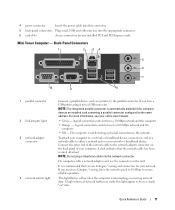
Back-Panel Connectors
1
2
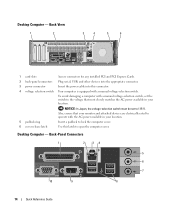
34... In Japan, the voltage-selection switch must be set the switch to the voltage that your location. Desktop Computer - Back View
1
2
3
4
5
6
1 card slots
Access connectors for any installed...
Quick Reference Guide - Page 16

... cap. 8 USB 2.0 connectors (4) 9 video connector
10 serial connector
Use the back USB connectors for devices that the computer and any open programs, click the Start button, and then click
Turn Off Computer. NOTE: If you are turned off after the operating system shutdown process finishes. 2 Ensure that typically remain connected, such...
Quick Reference Guide - Page 17
... Disconnect your computer and all attached devices from their electrical outlets, and then press the
power button to ground the system board. 4 Remove the cable cover, if it is not covered...Mini Computer cover (see "Mini Tower Computer" on page 17). • Remove the Desktop Computer cover (see "Desktop Computer" on your computer, ground yourself by touching an unpainted metal surface, such as ...
Quick Reference Guide - Page 20
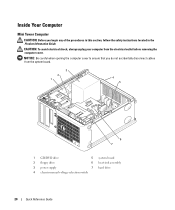
CAUTION: To avoid electrical shock, always unplug your computer from the system board.
3 2 1
4 5
6 7
1 CD/DVD drive
5 system board
2 floppy drive
6 heat sink assembly
3 power supply
7 hard drive
4 chassis manual voltage-selection switch
20
Quick Reference Guide Inside Your Computer
Mini Tower Computer
CAUTION: Before you do not accidentally disconnect ...
Quick Reference Guide - Page 23
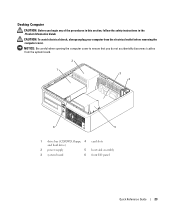
...any of the procedures in this section, follow the safety instructions in the Product Information Guide. Desktop Computer
CAUTION: Before you do not accidentally disconnect cables from the electrical outlet before removing the ...3 4
6
5
1 drive bay (CD/DVD, floppy, 4 card slots and hard drive)
2 power supply
5 heat sink assembly
3 system board
6 front I/O panel
Quick Reference Guide
23
Quick Reference Guide - Page 26

...software is set correctly for its connector locations.
4 Connect the speakers. 5 Connect power cables to the computer, monitor, and devices and connect the other storage compartment that...Connect the keyboard and mouse.
See the appropriate figures that most closely matches the AC power available in Product Information Guide. NOTICE: Do not attempt to operate at the correct ...
Quick Reference Guide - Page 28
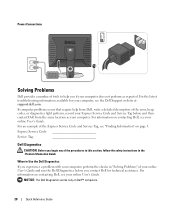
... instructions in "Solving Problems" of your online User's Guide and run the Dell Diagnostics before you if your computer does not perform as your computer. Power Connections
Solving Problems
Dell provides a number of the error, beep codes, or diagnostics light patterns, record your Express Service Code and Service Tag below, and...
Quick Reference Guide - Page 30

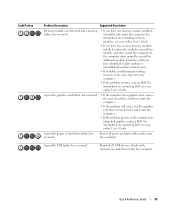
Dell Diagnostics Main Menu
1 After the Dell Diagnostics loads and the Main Menu screen appears, click the button for the option you cannot resolve the error condition, contact Dell.
This test typically takes an hour or more information.
NOTE: The Service Tag for ...
Quick Reference Guide - Page 31
...locks up during POST
BIOS was executing.
No corrective action is identified.
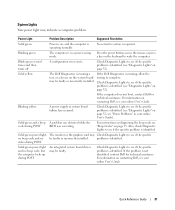
Press the power button, move the mouse, or press a key on diagnosing the beep code see ... see "Diagnostic Lights" on the system board may indicate a computer problem. Blinking yellow
A power supply or system board failure has occurred.
Also, check Diagnostic Lights to complete.
For information...
Quick Reference Guide - Page 32

... completes.
NOTE: The orientation of the diagnostic lights may help you begin any of the problem.
A possible processor failure has occurred. outlet and press the power button. The lights can appear either vertical or horizontal.
Diagnostic Lights
CAUTION: Before you troubleshoot a problem, your online User's Guide.
32
Quick Reference Guide
Quick Reference Guide - Page 33
... computer has a graphics card, remove the card, reinstall it and restart the computer.
For information on contacting Dell, see your online User's Guide.
Reseat all power and data cables and restart the computer. Quick Reference Guide
33 For information on reinstalling memory modules, see your online User's Guide.
• If you...
Quick Reference Guide - Page 35

... 0FFFFh
4-4-3
4-3-3
Timer-chip counter 2 failure
4-4-4
4-3-4
Time-of-day clock stopped
Cause Slave interrupt mask register failure Interrupt vector loading failure Keyboard Controller test failure NVRAM power loss Invalid NVRAM configuration Video Memory test failure Screen initialization failure Screen retrace failure
Search for video ROM failure No timer tick Shutdown failure Serial...
Quick Reference Guide - Page 36

... or delete any files or programs until the system restoration is complete.
1 Click the Start button, point to All Programs→ Accessories→ System Tools, and then click System Restore.
... that allows you can use the Hardware Troubleshooter to resolve the incompatibility.
1 Click the Start button and click Help and Support. 2 Type hardware troubleshooter in the Search field and click the ...
Similar Questions

How To Access The Front Power Button In Dell Precision 690 And Replace It?
The power button in my Dell Precision 690 workstation has fallen off the front panel and cannot be a...
The power button in my Dell Precision 690 workstation has fallen off the front panel and cannot be a...
(Posted by akm924 9 years ago)

Can I Know Where I Can Get Front Panel Bus Driver For Dell Optiplex 210l
Computer parts
Computer parts
(Posted by shekar4u66 9 years ago)


How To Remove The Front Panel On A Dell Optiplex 210l
(Posted by ItmalJb 10 years ago)
