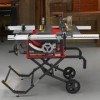
Craftsman 21829 Support Question
Craftsman 21829 Support Question
Find answers below for this question about Craftsman 21829 - Professional 10 in. Portable Table Saw.Need a Craftsman 21829 manual? We have 1 online manual for this item!
Question posted by cplerch on December 19th, 2012
Router Table Accessory
Where does the "table clamping bracket go?. It is shown with the router table parts.
Current Answers
Related Craftsman 21829 Manual Pages
Operation Manual - Page 1
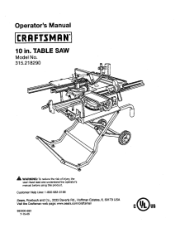
Customer Help Line: 1-800-932-3188 Seam, Roebuck and Co., 3333 BeverPy Rd., Hoffman Estates, IL 60179 USA Visit the Craftsman web page: www.seam.com!cmffsman 983000-693
7-15-05 Operator's Manual
10 in. TABLE SAW
Model No, 315.218290
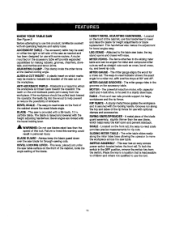
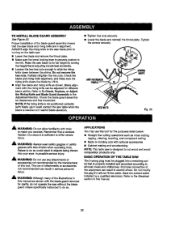
_k WARNING: To reduce the risk of injury,the user must read and understandthe operator's manual before using this product.
Operation Manual - Page 4
... SURE ALL ADJUST-
inspect for and remove all nails from lumber before transpo_ng saw blade. Make sure blade is tight and not trek(rig contact with the accessory.
• DOUBLE CHECK ALL SETUPS. Through-
Do not attempt to whether the tool is properly 9rounded. • USE ONLY CORRECT ELECTRICAL DEVICES: 3-wira e0_.tansiocnords...
Operation Manual - Page 5
... when cross cutting,
• NEVER attempt to free a stalled saw blade without first turning the saw OFF and disconnectingthe saw from power source.
• HOLD THE WORKPIECE FIRMLY AGAINST THE TABLE.,
• ALWAYS USE THE SAW'S MASTER SWITCH TO TURN TIlE ROUTER ON AND OFR
• THIS TOOL shouldhave the fo2low'_nmgarkings:
a) Wear eye protection.
c) Keep hands...
Operation Manual - Page 10
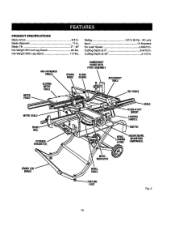
... No Losd Speed 4,800/rain, Cutting Depth at 0 3-9116 in, Cutting Depth at 45 2-1/2 in . Blade Diameter 10 in ,
• AHTI-KICK)BACI[ PAWI.S
SI.IOING MITER TABLE
GUARD/DUST
COVERWITH PIVOTASSEMBLY
BLADE GUARD
ACCESSORY TABLE
RIPFENCE
FRONT RAIL
STORAGE DRACI_T(S}
BEVEL INDICATOR
SCALE ALIGN-A-CUT
INSERT LOCKING HANDLE
HEIGHT/BEVEL ADJUSTING HANDWI_EL
BRACE...
Operation Manual - Page 11
... SAW
See Figure 2.
ACCESSORY TABLE - The accessory table may be used on the workplace. A router mounted on the accessory table. ALIGN-A-CUT INSERT - A WARNING: Do not use with optional clamps and accessories. BLADE GUARD - HEIGHT/BEVEL ADJUSTING HANDWHEEL - LEG STAND - Attached to children and others not qualifiedto use the tool
11 The fence attaches to -read indicatorshows the...
Operation Manual - Page 12
...This saw table has rails on the right side of the cabinet that permitsuse of this tool When usinga listed accessory, unplug the saw motor cord and usa the receptacle and the saw features... possible hazardoususe by looseningthe adjusting clamp, setting the fence to operate the accessory. The saw '-, power switch to the miter scale, and retightening the clamp. This feature is in the...
Operation Manual - Page 15
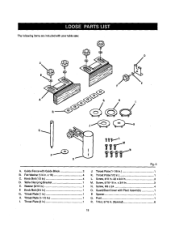
...(5/16 in 1 L. Throat Prate (1 in 1 K. Throat PLate[1-1/8 in 1 H. Knob Bolt (1/2 In 4 D. Throat Plate (1-1/2 in 3 N. x 3/4 in 1 I. Spacer t Q. Guide Fence w_thGuide Block 2 B. Table Clamping Bracket 1 E. Screw, #10 In.-32 x 3/4 In 3 M. Screw, 5/16-18 in . _Spec(a0 6
15 Throat Prate(2 its 1
Fig. 6
J. Post 1 R. Thefolidwing items are includedwith your...
Operation Manual - Page 16

...; Inspect the tool carefullyto make sure the table saw from the carton and place it upright as shown in accidental starting and possible seriouspersonal injury. NEVER remove the saw is in an upright pos'_tion. Failure to heed this warning can resultin back injury. Hold it , check for ass]stance.
_" WARNING: if any parts are missing...
Operation Manual - Page 17
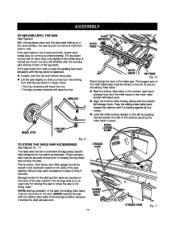
... the leg stand. To secure the sliding miter table: • Restthe slidingmiter table on the bottom right-hand
storage hook and +,hemiter base on a fiat, level surface, the saw 's accessories. g
TO S'fORE THE TABLE SAW ACCESSORIES
See Figures 10. - 11
The table saw has two convenientstorage areas specifically designed for the slidingmiter table are located on the left . NEVER operate the...
Operation Manual - Page 21
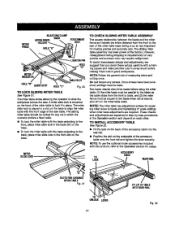
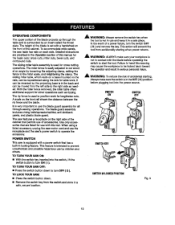
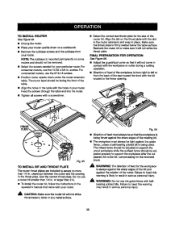
...table scats. TO INSTALL ACCESSORY TABLE See Figure22.
• Fit the tabs on the back of the miter table base duringa cut in which the operator prefersa fixed table.
• To lock the miter table...- The miter table elides allowing the operatorto elide the workplsce across the saw table.
INDICATOR
HOLE=B" QUICKSTOP
HOLE"C"
TABLESLOT Fig. 20
TO LOCK SLIDING MITER TABLE See Flours21.
...
Operation Manual - Page 22
... and rivingknifeare in alignment. Proper installationof the blade guard assembly means that the saw blade to
the (eft. ALWAYS align the rivingknife to the saw b/ade priorto turning on the table saw.
• Lower the blade and remove the throat plate. • Make sure the bevel looldng leveris securelypushed to its full height by...
Operation Manual - Page 25
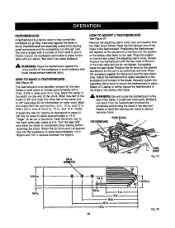
...the bolt and the position of lumber approximately 3/4 in . hote at 6 in., 8 in., 10 in., and 12 in the featherboard. "finger" to be cut to be performed and lock....table or fence. Turn the saw blade.
FEATHERBOARD
A fsatherboard is a device used to completety stop rotating before removing the stock. spaces between the fingers. I
I
3-5/9 in serious personal iniury. Attach a C-clamp...
Operation Manual - Page 33

...
MITERGAUGE STRAIGHT
• Remove the sliding miter table and move the accessory table to the left side.
• Adjust the... bevel angte to the desired setting.
• Set the blade to the ON position.
• Positionthe workpisce fiat on the miter gauge and feed the workpieoe intothe blade.
• When the cut _smade, turn the saw...
Operation Manual - Page 37
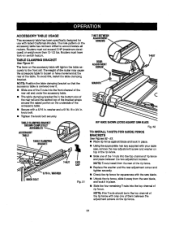
... all reuters. Reuters must not exceed 3 HP (maximum developed) or weigh more than 12-1/2 Ibs.
To avoid this, install the table clamping bracket.
ACCESSORY TABLE USAGE
Th|s accessory table has been spec'dtcaltydesignedfor use with your table
saw blade, and lock it in place, Slidethe four remainingT-nuts into the front channel of the
rear rail and under the...
Operation Manual - Page 39
... yourrouter.
Make sure the throat plate is mounted permanentlyon some routere and should be facingthe front of the router bit.
NOTE: The subbase is firmly seated below the _able surface. The Infeed fence shouldbe adjusted to make sure it will not strike the accessory table or any metal surface.
3g TOINSTALLROUTER
See Ftgure55. •...
Operation Manual - Page 40
... - 59.
• Unplug the saw. • Lowerthe saw to work properly), • Place ... not start any adjustment,
make sure the tool is to the felt.
De not overtighten...table surface. A WARNING." Possib}e
serious injury can occur if hands come in this waTn'lngcoutdresu)tin serious persona_injury. The table... the Blade in contact with the accessory. In cutting operations, the scarewilt...
Operation Manual - Page 44

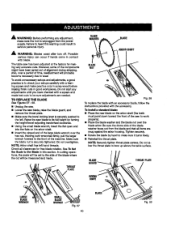
.... SCREW
RAILHOLOER NUT
RAIL CLAMP
WASHER
HE)(MOUNTING BOLT
Fig. 67
TO ADJUST THE ACCESSORY TABLE See Rgure 68.
Rotate the springplate 180° and reinstallon the handle shaft.
• Reassemble all parts end tighten hex nut securely. The rail cramps ate located below , when adjustmentsare required:
• Unplug the saw table.
• Tighten rait holder...
Operation Manual - Page 49
...1
58 01820102D8 59 0181010501
Lever,Accessory "fable 1 Lever Shaft
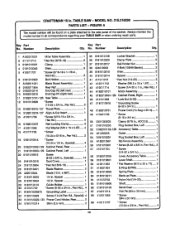
60 ...10-24 x 5/8 in . MODEL NO, 3t5.2t8290 PARTS LIST - Always mention the | model number in . Key Part
Key Part
No. x 36T 1
27 0181010503
1/4 in all correspondenceregardingyour TABLE SAW or when orderingrepair parts. TABLE SAW... 40 0181010214 41 411011707
Locker Bracket 1 Clamp Plate 2 Rail Holder Nut ...
Operation Manual - Page 52
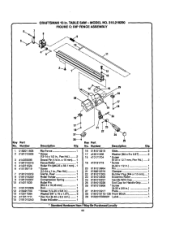
, CRAFTSMAN 10 in . TABLE SAW - No. MODEL NO. 315.218290 FIGURE C: RIP FENCE ASSEMBLY
8
[ey Part No. Rip Fence t * Screw
(12-14 x 1/2 in., Pen Hd.) ........ 2
Dowel Pin (1/4 in . Number
Description
Qty. x 18 ram)..... 1 Fence Roller 1
RollerPin (M6.35 x 38.1 ram) .. 1
* Screw
{10-24 x 1 in., Pe.nHd 1 Clamp, Rear 1 Roller Holder 1
CompressionSpring 1 RollerPin (M3.3 x 19.05 ram 1 Rod...
Operation Manual - Page 55
...ly
b
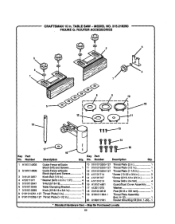
55 No. TABLE SAW - MODEL NO. 315.218290 FIGURE G: ROUTER ACCESSORIES
r_ey Part No. Number
DeaoripUon
Qty.
1 A181014605 Guide Fence w/Guide
10 018101025a-127 Throat Plate... Washer (Mlg x 8.3 x 1.5T 4 "[-Nut(5/16-18 6 "l'ableClamping Bracket 1
13 410101714 14 410101707 15 410101013 16 A181014601 17 412011073
•Screw (10-32 x 3/4 in 3 •Screw (5/16-18 x 3/4 in 3 ...
Similar Questions

Arbor Nut For A Craftsman Professional Table Saw
(Posted by jimszawara 6 months ago)

How To Assemble A Portable Craftsman 21829 Table Saw
(Posted by ceclau 9 years ago)

Safe Height For Table Saw Blade Above Material
What is the recommended safe height for the saw blade to protrude above the material being cut? I sa...
What is the recommended safe height for the saw blade to protrude above the material being cut? I sa...
(Posted by leon18666 10 years ago)

Table Saw Switch Malfunction
Today I pushed my switch on the table saw and it didn't turn off! I had to unplug the table saw. I s...
Today I pushed my switch on the table saw and it didn't turn off! I had to unplug the table saw. I s...
(Posted by gringoticahouse 11 years ago)

What Is A Sears Electronic 10'table Saw Worth
what is a sears electronic 10" table saw w/ext,& base model 113.290650 worth?, it works great
what is a sears electronic 10" table saw w/ext,& base model 113.290650 worth?, it works great
(Posted by mastercook76 11 years ago)