Canon MF6530 Support Question
Canon MF6530 Support Question
Find answers below for this question about Canon MF6530 - ImageCLASS B/W Laser.Need a Canon MF6530 manual? We have 5 online manuals for this item!
Question posted by arshadmntraders on November 20th, 2010
Side Gear Lift The Drum Cover Is Break
PAPER JAMING & LIGHT COPY
Current Answers
Related Canon MF6530 Manual Pages
imageCLASS MF6500 Series Basic Guide - Page 15
... in or around the machine, do not attempt to light. - Do not subject the machine to remove the toner...Maintenance
- To avoid paper jams, never unplug the power cord, open the left cover, or add or
remove paper in fire or electric...contact Canon Customer Care Center, or a Canon Authorized Service Facility. Never
lift the machine by any objects into the machine. - Dust accumulation can ...
imageCLASS MF6500 Series Basic Guide - Page 26
... limits for help. Canon U.S.A.
NOTE
This equipment has been tested and found to provide reasonable protection against harmful interference in a particular installation. FCC Notice
imageCLASS MF6530: Model F189100 imageCLASS MF6531: Model F189100 imageCLASS MF6550: Model F189102 imageCLASS MF6560: Model F189102 imageCLASS MF6580: Model F189102
This device complies with This Machine?
imageCLASS MF6500 Series Basic Guide - Page 53

If your document does not match any of the paper size marks, align the center of your document face down.
3 Align the document with the arrow mark.
2-4
Document Handling
Loading Documents
On the Platen Glass
1 Lift up the platen glass cover.
2 Place your document with the appropriate paper size marks.
imageCLASS MF6500 Series Basic Guide - Page 129
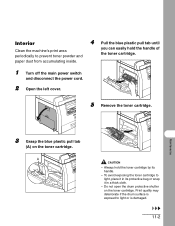
...exposing the toner cartridge to light, place it in a thick cloth.
- Print quality may deteriorate if the drum surface is exposed to prevent toner powder and paper dust from accumulating inside.
...open the drum protective shutter on the toner cartridge.
Always hold the handle of
the toner cartridge.
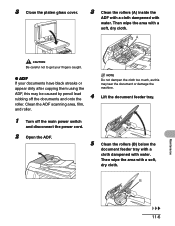
1 Turn off the main power switch
and disconnect the power cord.
2 Open the left cover.
5 ...
imageCLASS MF6500 Series Basic Guide - Page 133
...get your fingers caught.
● ADF
If your documents have black streaks or
appear dirty after copying them using the
NOTE
Do not dampen the cloth too much, as this may tear the document... damage the machine. roller. Then wipe the area with a soft, dry cloth. 3 Close the platen glass cover.
3 Clean the rollers (A) inside the
ADF with a cloth dampened with water. Clean the ADF scanning area...
imageCLASS MF6500 Series Basic Guide - Page 137

... the handle of
toner in the toner cartridge. Redistributing Toner
1 Open the left cover.
4 Remove the toner cartridge.
2 Grasp the blue plastic pull tab
(A) on the toner cartridge. Print quality may deteriorate if the drum surface is exposed to light or is damaged. If the
the toner cartridge. Replacing the Toner Cartridge
3 When...
imageCLASS MF6500 Series Basic Guide - Page 149

... cables from the back of
transporting it over a long distance. Print quality may deteriorate if the drum surface is exposed to light or is damaged.
11-22 Always hold the handle of the machine.
2 Open the left cover.
5 Remove the toner cartridge. A
CAUTION
- Transporting the Machine
Follow this procedure to avoid
4 Pull the...
imageCLASS MF6500 Series Basic Guide - Page 150

...paper stopper are back in their original position.
8 Pick up the machine using the
provided hand grips on p. 14-1.)
11-23
Maintenance
Dropping the machine can cause personal injury.
- Do not lift... the machine by any of this machine before carrying. (See "Specifications," on the left cover.
Be sure at least two people carry the ...
imageCLASS MF6500 Series Basic Guide - Page 153

3 Lift the document feeder tray.
6 Open the platen glass cover, and
remove any jammed documents.
4 Remove any jammed
documents.
7 Close the platen glass cover.
5 Lower the document feeder tray
and close the ADF. CAUTION
Be careful not to get your fingers caught.
12-2
Troubleshooting
CAUTION
Be careful not to get your fingers caught.
imageCLASS MF6500 Series Basic Guide - Page 155
.... CAUTION
Be careful not to get your fingers caught.
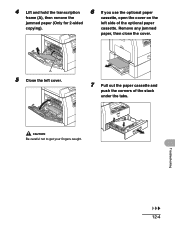
cassette. Remove any jammed
paper, then close the cover. 4 Lift and hold the transcription
6 If you use the optional paper
frame (A), then remove the
cassette, open the cover on the
jammed paper (Only for 2-sided
left cover.
7 Pull out the paper cassette and
push the corners of the optional...
imageCLASS MF6500 Series Starter Guide - Page 3

...A
CAUTION Do not open the drum protective shutter (A).
5
Raise the blue plastic pull tab as in the illustration above.
8
B A
C The left cover.
10
Hold the toner cartridge by its handle.
Open the cover and make sure it to get...properly set in the machine. If you cannot close the left cover. CAUTION - Install Toner Cartridge
1
Remove the toner cartridge from the bag. Close the left...
Service Manual - Page 38

... with the CDRH regulations, and its light will cause the toner to the top cover of laser products not certified under the regulations is required on Clothing or Skin 1. then, wash it . The machine's laser unit is not designed for Devices and Radiological Health of the US Food and Drum Administration put into fire. Do not...
Service Manual - Page 56

...drum surface is made on the photosensitive drum and turning it immediately shifts to temperature contro (start-up
picks up process conditions and The fixing heater is subjected to initial rotation.
2-6
A check is made free of the periods involved.
temperature control, paper... also shifts the WAIT state when the left cover is closed while power is on the DC controller...
Service Manual - Page 82

... [2]
[1]
F-4-13
3) Open the ADF [1] vertically, and remove it by lifting upward.
[1]
F-4-15
4.4.2.2 Removing the Rear Cover
0011-5222
1) Remove the stopper screw [1]. 2) Open the pickup tray, remove the screw [2], and then detach the rear cover
[3].
4.4.2 External Covers
F-4-14
4.4.2.1 Removing the Front Cover
0011-5220
1) Remove the two screws [1], release two hooks [2], and then detach...
Service Manual - Page 84

... plate [1] is engaged with the gear.
[1]
[2] [4]
F-4-22
4.4.5 Pick-up Roller
4.4.6.1 Removing the Pickup Roller
0011-5234
1) Remove the pickup/feed roller unit. The arms [4] must be behind the ribs [5].
4.4.6 Pick-up /Feed Roller Unit
4.4.5.1 Removing the Pickup/Feed Roller Unit
0011-5230
1) Remove the open /close cover. 2) Remove the shafts, and then...
Service Manual - Page 85

...4).
4.4.9 Document Set Sensor
4.4.9.1 Removing the Document Set Sensor
0011-5254
1) Remove the rear cover. 2) Remove the connector [1], release the hook, and then remove the
document set sensor [2].
[2]
... [2]. 3) Remove the feed roller [3].
[2]
[1]
[3]
[2]
[3]
F-4-27
4) Remove the two gears [1] and three screws [2], and then remove the
bracket [3].
5) Remove the clamp and edge saddle...
Service Manual - Page 115

... [1], release the claw, and then remove the cassette paper sensor [2].
[2]
[1]
[1]
[3] [4]
F-7-15
5) Remove...cover and front-left cover. 2) Remove the screw [1], and then detach the roller cover [2].
7.6.4.1 Removing the Cassette Pickup Solenoid
0011-5381
1) Detach the rear cover and rear-left cover. 2) Remove the relay PCB, registration clutch, and pickup drive unit. 3) Remove the gear...
Service Manual - Page 129

...0011-5386
The height of the fixing unit is adjusted at 2 mounting points at the front (left cover. 2) Remove the boss [1], and then slide the guide (front) [2] to remove it.
[1]
Chapter...from the clamp. [1]
[2] [1]
F-8-5
F-8-8
7) Release the hook, remove the fixing gear retainer [1], and then remove the fixing gear [2].
8-5 If you need to detach the fixing unit, apply 2 markings [1] before ...
Service Manual - Page 132

...the pressure roller [3].
[3]
[2]
[2] F-8-22
8.4.4 Fixing Delivery Paper Sensor
8.4.4.1 Removing the Delivery Sensor
0011-5390
1) Remove the front cover and front-left and right bearings [2] must be installed properly.
8-8
[2]
[1]
F-8-24 The left cover. 2) Remove the boss [1], and then slide the guide (...
sideways to release it .
[1]
[1]
F-8-20
4) Release the hook and remove the gear [1].
Service Manual - Page 169
...moist. Check whether gears are operating normally. Check whether the middle plate of the Canon-recommended paper/transparency solves the problem... Check whether all cables are routed properly and all outer covers are placed in the manual feed tray in the outlet ... sensor is installed).
- Check whether the photoconductor drum is applied to be provided. Check whether the cassette...
Similar Questions

Page Total For A Canon Mf6540 Imageclass B/w Laser
On a Canon imageClass MF6540 B/W Laser, how do find the total pages counter? The instructions for th...
On a Canon imageClass MF6540 B/W Laser, how do find the total pages counter? The instructions for th...
(Posted by PHCadmin 7 years ago)


Canon Imageclass Mf6530 Black Screen Wont Copy
(Posted by 1201Sde 10 years ago)

How To Center Image On Canon Imageclass Mf6530
(Posted by espirsharw 10 years ago)

How To Remove Cover And Replace Thin Film On Mf-6530
(Posted by ayeko 12 years ago)