
Brother International LK3-B430 Support Question
Brother International LK3-B430 Support Question
Find answers below for this question about Brother International LK3-B430.Need a Brother International LK3-B430 manual? We have 2 online manuals for this item!
Question posted by info42861 on February 11th, 2022
La Máquina De Hacer Presillas No Me Corta El Hilo.
La máquina de presillas no me corta el hilo.,
Current Answers
Answer #1: Posted by SonuKumar on February 12th, 2022 9:45 AM
SonuKumar

Member since:
May 9th, 2021 Points: 16,638,180

Member since:
May 9th, 2021 Points: 16,638,180
Please respond to my effort to provide you with the best possible solution by using the "Acceptable Solution" and/or the "Helpful" buttons when the answer has proven to be helpful.
Regards,
Sonu
Your search handyman for all e-support needs!!
Related Brother International LK3-B430 Manual Pages
Service Manual - Page 1
SERVICE MANUAL FOR
BROTHER MODEL LK3-B430
.k.A"
c.o.% -ow G•
es
a
•
BROTHER INDUSTRIES, LTD. NAGOYA, JAPAN
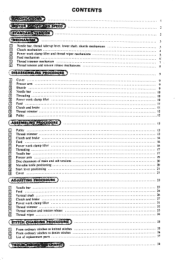
Service Manual - Page 2
...
35
Q From ordinary stitches to denim stitches
36
• List of main and sub tensions
20
to Movable knife positioning
20
M Start lever positioning
21
El Cover
21
ADJUSTING PROCEDURE
23
M Needle bar
23
• Feed
24
Ej Vertical shaft
26
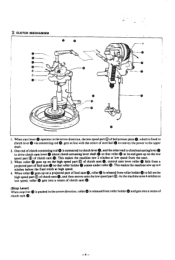
M Clutch and brake
27
M Power work clamp lifter and thread...
Service Manual - Page 3
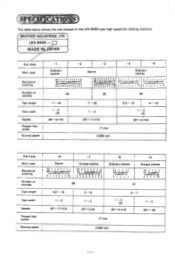
... MADE INpAPAN
J
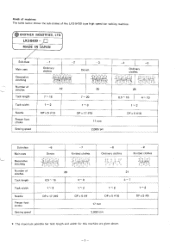
[ Sub-class
Main uses
Decorative stitching
Number of the LK3-6430 type high speed bar tacking machine. i k t 4. : t t it i t 4 i . t t 't
42
35
28
Tack length
7 - 16
Tack width
1 - 2 (3)
Needle
DP x 5 #16
Presser foot stroke
Sewing speed 1
7 - 20 1- 3 DPx 17 #19
17 mm 2.000 rpm
6.5 - 16
4 - 10
1- 2 (3)
DP x 5 #16
Sub-class Main uses Decorative...
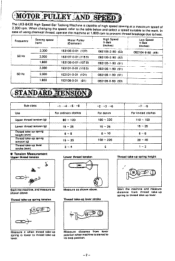
Service Manual - Page 4
...
spring to thread take -up lever.
Thread take -up spring height
4lj kir+ . Thread take-up lever stroke
Start the machine and measure distance from lever position when machine is lower to thread take -up lever. MOTOR :PUL AND
Ic2Ta,hF3sere0eL0qoKufre3punm-scBiy.n4gW3I0chheHe(Snrimpgecmhwihci)SnaagnlptgesheipnredegeaBdtdha,ero1,ITpsapeecraketidne,g(MrtDheMoiefateaommrcrehtaPtoiecunrthle...
Service Manual - Page 6
A
---0 _- This makes the machine sew up on the of feed came so
high speed part © of clutch cam control cam lever ...under roller O. When roller goes up on the low
®. As
the
machine
sews 4 stitches at low speed from roller holder® to fall on a projected part of clutch cam This makes the machine sew 2 stitches at
e. (Stop
When
Lever) stop lver
(1)
is connected ...
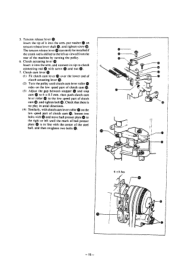
Service Manual - Page 7
....
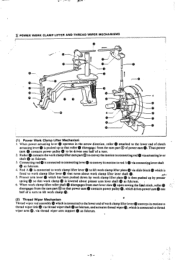
4. Presser arm lever which is connected to connectingleverm toconvey its motion to lift work clamp lifter roller shaft ® disengages from start lever claw upon sewing the fiial stitch, roller
disengages from the cam part QQ of work clamp lifter plate is then pushed up so that turns about presser arm...
Service Manual - Page 8
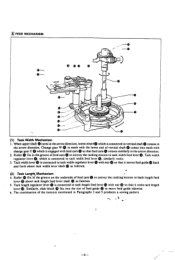
... cam 0 so that feed cam 0 rotates similarly in the groove of vertical shaft 0 comes into the slot of the motions mentioned in Paragraphs 3 and 5 produces a sewing pattern. The combination of feed guide 0 to tack width regulator lever 0 with • change gear C 0 which is connected to tack width feed lever 0.
Service Manual - Page 10
...
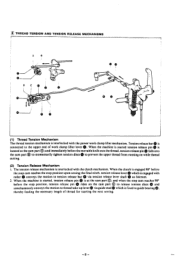
the stop cam reaches the stop position upon sewing the final stitch, tension release lever which is fixed to guide bearing thereby feeding the necessary length of work clamp lifter mechanism. tension release pin 0 rides on while thread cutting.
(2) Tension Release Mechanism I. When the machine is started , tension release pin 0 is at...
Service Manual - Page 11
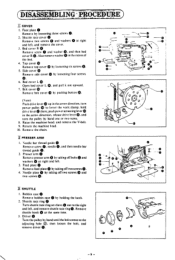
...the pulley by pushing button Q.
(Note) Push drive lever up in the recess of the bed. 4. Raise the machine head. Needle bar thread guide 0
0.
C
O- Shu:tle race cover 0
Remove two screws 0 and washers 0...Remove screw 0. Driver 0 Turn the pulley by taking off two screws 0. hold
0. Return the machine head. 10. G. 4. Also remove washer 0 in the arrow direction. Feed plate 0
Remove...
Service Manual - Page 12

thread take-up lever Q, ®. Power pulley With the machine at the stop ring and washer 0, and then
®, • power cam together with a screwdriver.
®, 5. Power cam 0 (I . Thread take -up lever O.
4.
Main tension assembly 0
...
Service Manual - Page 13
... holder cover 0
Remove two screws 0. Clutch spring
Disengage only the end of clutch spring 0 which
is
at left as viewed from the rear of the machine.
0. 9. Q, 7. Ball presser plate
Remove two bolts 0 and washers 0, and then
ball presser plate m.
and pull out with washer It can
easily be removed if the...
Service Manual - Page 14
... ball holder 0. 2. and remove knife cam
lever 0 together with connecting rod
PULLEY 1. Raise the machine head. 3. Knife cam lever spring 0 Unhook the knife cam lever end of the bed. 5. clutch... plate 0, key 0, washers 0. knife cam lever shaft 4D. Lower the machine head to the level position. 6. and then pulley assembly 0. Pulley assembly €0
Remove nut 0...
Service Manual - Page 15
... that the keyway is in the arrow direction. Knife cam lever spring 0
Turn the pulley until the knife cam lever roller rides on . 3. Return the machine head onto the oil pan. 2. SEM:MANG 1PROCIP)
I1 PULLEY
I .
Service Manual - Page 16

... the
pin on .
8. Brake spring 0
Hook brake spring to spring hook 0.
2. and tighten two
® each screws and CI. Clutch lever assembly 0
0. a) 9. Raise the machine head. 6. El CLUTCH AND BRAKE
I. Move movable knife until its tip meets the needle
plate mark 0, and tighten screw 0.
•
-
0
•
- 5. slide
thread trimming arm A onto the...
Service Manual - Page 17
... of it into the arm. Check that there is in axial directions.
(4) Similarly, with clutch cam lever rollers on the
e low speed part of the machine by turning the pulley.
6. and then retighten two bolts 0. Clutch cam lever Fit clutch cam lever over the lower end of
clutch actuating lever (D.
(2) Turn...
Service Manual - Page 18
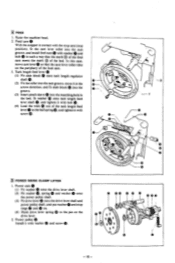
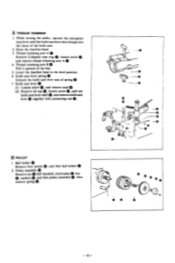
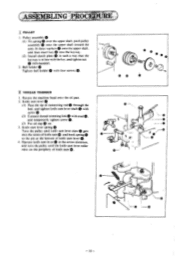
IT FEED
1. Raise the machine head. 2. Feed cam 0
With the stopper in contact with the stop cam (stop position), fit the cam lever roller into the cam groove, and install ...
Service Manual - Page 37

...) 153312-0-00 Change gear 28W (28 stitches) 152719-0.00
Change gear 28W (28 stitches) 152719-0-00 Change gear 42W (42 stitches) 152721-0-00
Work clamp L. R el
4 x IX Itack width 2 mml
R. 152777-0-01 L. 152778-0-01 5 x 22 (tack width 3 mm)
R. 153201-041
L. 153202-0-01 4 x 12 (tack width 2 mm)
R. 152779-0-01
L. 152780-0-01 5 x 12...
Instruction Manual - Page 5
...-classes of stitches
Tack length
Tack width
Needle
Presser foot stroke
Sewing speed
-1
-2
Ordinary clothes
,21 O r ;
a .
LK3-B43O / 1:=1 MADE IN JAPAN
ir Sub-class
Main uses
Decorative stitching
Number of the L.K313430 type high speed bar tacking machine. d a 3'13 '' a r a " 21 " 11" 13 P 31 la I i xi 4 34 3IIIa''10 26n 32 No " IA
42
-3
Denim...
Instruction Manual - Page 23

...de couture Bonneterie Vetements ordinaire Toile
La aguja y el hilo El tipo de aguja y de hilo que se debe de usar son diferentes de acuerdo con el tipo de material en el cual se cose. N°... #100 - #80 # 80 - #50 # 30 - #10
Type of sewing to be used differ according to the type of sewing Knitted goods Ordinary clothes Denim
Nadel und Nahfaden Die Nadel und der Nahfaden sind entsprechend der...
Instruction Manual - Page 37
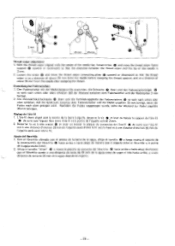
... Faden weggezogen wurde, sollte der Abstand zur Nadel ungefahr 35mm betragen. Afloje el tornillo "Allen" y mueva la plancha de conexi6n del libra hilo 0 hacia arriba o hacia abajo de manera que el libra-hilo quede a una distancia de cerca de 25 mm de la aguja antes de coger el hilo hacia arriba, y a una distancia de cerca de 35mm de...
Similar Questions

Ha Ocurrido Un Fallo. Apague La Máquina Y Vuelva A Encenderla
La máquina trabajo bien ayer y hoy al encenderla me da este mensaje. Que puedo hacer?
La máquina trabajo bien ayer y hoy al encenderla me da este mensaje. Que puedo hacer?
(Posted by leonelmendozagt 2 years ago)

Mi Brother Ke 430d Presenta Error 150 Y No Aparece En El Manual No Se Que Hacer.
mi maquina depronto presento depronto presento el error 150 y ese error no aparece en el manual que ...
mi maquina depronto presento depronto presento el error 150 y ese error no aparece en el manual que ...
(Posted by edgardomoralesbarrios59 4 years ago)

Causas Por Las Que No Enciende La Maquina ??
Electricidad OK Cable OK Cual podria ser otro motivo que no encienda la maquina. Brother Cs-6000i
Electricidad OK Cable OK Cual podria ser otro motivo que no encienda la maquina. Brother Cs-6000i
(Posted by ccastillo4u 9 years ago)

How To Adjust La 2125 Electrical Voltage For India?
I have a Brother LA 2125 sewing machine bought in the U.S and now with me in India. How do I adjust ...
I have a Brother LA 2125 sewing machine bought in the U.S and now with me in India. How do I adjust ...
(Posted by jakes7027 9 years ago)

Where Can I Take A Class For Xl Project Runway 5500 In Las Vegas Nv
(Posted by paulinetween 12 years ago)