Brother International XL 5500 Support Question
Brother International XL 5500 Support Question
Find answers below for this question about Brother International XL 5500 - 42 Stitch Sewing Machine.Need a Brother International XL 5500 manual? We have 1 online manual for this item!
Question posted by paulinetween on November 26th, 2011
Where Can I Take A Class For Xl Project Runway 5500 In Las Vegas Nv
The person who posted this question about this Brother International product did not include a detailed explanation. Please use the "Request More Information" button to the right if more details would help you to answer this question.
Current Answers
Related Brother International XL 5500 Manual Pages
Users Manual - English - Page 2

... electrical outlet when removing covers, lubricating, or when making any other user servicing adjustments mentioned in this manual.
3. Do not pull or push fabric while stitching. This sewing machine is being
administered. 8. Never operate this manual. Never drop or insert any object into water. Switch the...
Users Manual - English - Page 3
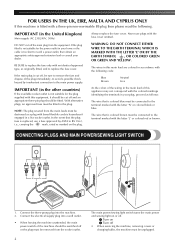
... your dealer. FOR USERS IN THE UK, EIRE, MALTA AND CYPRUS ONLY
If this machine is replaced, use plugs with an identical approved type, as originally fitted, and to ..., an approved fuse must be fitted.
CONNECTING PLUGS AND MAIN POWER/SEWING LIGHT SWITCH
1 2
1.
Connect the electrical supply plug into the machine. 2. In the event that is hazardous if
engaged in the plug...
Users Manual - English - Page 4

... YOUR SEWING MACHINE 6
Connecting Plugs ...6 Main Power/Sewing Light Switch ...7 Foot Controller ...7 Inserting the Needle ...7 Checking the Needle ...8 Changing the Presser Foot ...8 Converting to Free-arm Style ...9 Steadying the Machine ...9
THE CONTROLS ...10
Pattern Selection Dial ...10 Recommended Widths and Lengths for Stitches 11 Stitch Length Dial ...13 Stretch Stitching ...13 Stitch...
Users Manual - English - Page 5

... is only available on and off.
F Main power/sewing light switch (page 7) You can push this to stitch in either direction to choose the stitch you (counterclockwise) to raise and lower the needle.
H Presser foot lever (page 8) This raises and lowers the presser foot. KNOWING YOUR SEWING MACHINE
PRINCIPAL PARTS
1 Bobbin-winding assembly (page 15...
Users Manual - English - Page 6
...)
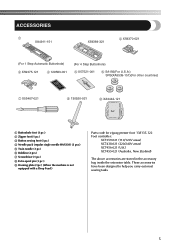
7 X55467-021
8 130920-021
9 XA3442-121
1 Buttonhole foot (1 pc.) 2 Zipper foot (1 pc.) 3 Button sewing foot (1 pc.) 4 Needle pack (regular single needle HAX130) (3 pcs.) 5 Twin needle (1 pc.) 6 Bobbins (3 pcs... Screwdriver (1 pc.) 8 Extra spool pin (1 pc.) 9 Darning plate (1pc.) (When the machine is not
equipped with a Drop Feed.)
Parts code for zigzag presser foot: 138135-122 Foot controller...
Users Manual - English - Page 7
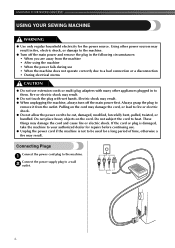
... before continuing use extension cords or multi-plug adapters with wet hands. Always grasp the plug to heat. Pulling on the cord. KNOWING YOUR SEWING MACHINE
USING YOUR SEWING MACHINE
WARNING
● Use only regular household electricity for a long period of time, otherwise a fire may damage the cord, or lead to fire or electric...
Users Manual - English - Page 8

... use sewing-machine needles for home use . If you leave the main power on and step on the foot controller, the machine will start and you press harder, the machine's speed will stop. When you may bend or break and cause injury.
● Never sew with Models XL-5500/XL-5600/XL-5700/ XL-5510/XL-5610/XL-5710.
. Main Power/Sewing Light...
Users Manual - English - Page 9
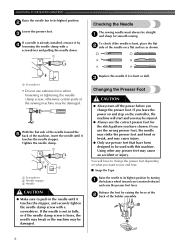
... tightening the needle clamp screw, otherwise certain parts of the needle toward you may be straight 1 and sharp for the stitch pattern you have chosen.
With the flat side of the sewing machine may cause injury.
● Only use presser feet that have to change the presser foot. Tighten the needle clamp.
1
3 2
1 Screwdriver...
Users Manual - English - Page 10
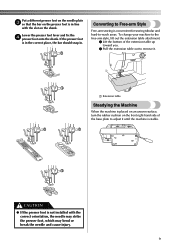
... you.
2 Pull the extension table out to remove it.
1
1 Extension table
Steadying the Machine
When the machine is placed on an uneven surface, turn the rubber cushion on the front right-hand side of...onto the shank. CAUTION
● If the presser foot is convenient for sewing tubular and hard-to Free-arm Style
Free-arm sewing is not installed with the slot on the shank.
Put a different ...
Users Manual - English - Page 11
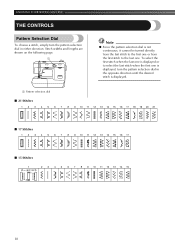
... 12 13 14 15 16 17 18 19 20 21
■ 17 Stitches
1 2 3 4 5 6 7 8 9 10 11 12 13 14 15 16 17
■ 15 Stitches
1
2 3 4 5 6 7 8 9 10 11 12 13 14 15
10 KNOWING YOUR SEWING MACHINE
THE CONTROLS
Pattern Selection Dial
To choose a stitch, simply turn the pattern selection dial in the opposite direction until the...
Users Manual - English - Page 12

... needle position)
13
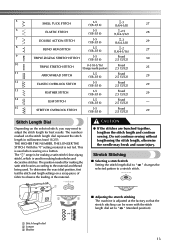
TRIPLE ZIGZAG STRETCH STITCH
3-5 (1/8-3/16)
14
STRETCH OVERLOCK STITCH
3-5 (1/8-3/16)
15
ELASTIC OVERLOCK STITCH
3-5 (1/8-3/16)
16
FEATHER STITCH
3-5 (1/8-3/16)
17
ARROWHEAD STITCH
3-5 (1/8-3/16)
18
DECORATIVE STITCH
3-5 (1/8-3/16)
19
LEAF STITCH
3-5 (1/8-3/16)
20
TREE STITCH
3-5 (1/8-3/16)
21
LEGS STITCH
3-5 (1/8-3/16)
Recommended Length
[mm (inch...
Users Manual - English - Page 13
... 29 25 30 29 29 29 29 30 -
KNOWING YOUR SEWING MACHINE
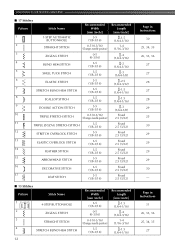
■ 17 Stitches Pattern
1
Stitch Name
1-STEP AUTOMATIC BUTTONHOLE
Recommended Width
[mm (inch)]
3-5 (1/8-3/16)
2
STRAIGHT STITCH
0-5 (0-3/16) (Changes needle position)
3
ZIGZAG STITCH
0-5 (0-3/16)
4
BLIND HEM STITCH
3-5 (1/8-3/16)
5
SHELL TUCK STITCH
3-5 (1/8-3/16)
6
ELASTIC STITCH
3-5 (1/8-3/16)
7
STRETCH BLIND HEM...
Users Manual - English - Page 14
... 2 Longer 3 Shorter
13 SS
1
10
2
2
3
1
■ Adjusting the stretch stitching The machine is used for best results. The " " range is for making a satin stitch (close zigzag stitch), which is not fed. With the "0" setting material is used when sewing on the stitch length dial represent the stitch length in millimeters (mm) (1/25"). The position needed for making...
Users Manual - English - Page 15
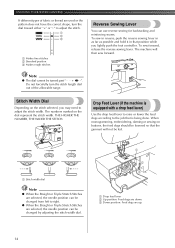
.... THE HIGHER THE NUMBER, THE WIDER THE STITCH.
1
Drop Feed Lever (if the machine is equipped with a drop feed lever)
Use the drop feed lever to raise or lower the feed dogs according to the job that the garment will then sew forward. KNOWING YOUR SEWING MACHINE
If different types of the allowable range.
. Note...
Users Manual - English - Page 16
... thread through the hole on 2 the bobbin from older models are used, the machine will not operate correctly. After the machine stops, cut the thread, slide 6 the shaft to the machine.
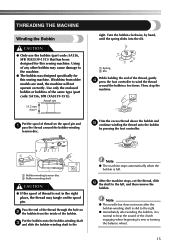
● The bobbin was designed specifically for this sewing machine. THREADING THE MACHINE
Winding the Bobbin
CAUTION
● Only use the bobbin (part code: SA156...
Users Manual - English - Page 17

...
● Setting the bobbin improperly may break the needle.
1
2
1 Wound evenly 2 Wound poorly
1
2
1 Wound evenly 2 Wound poorly
● The bobbin was designed specifically for this sewing machine. Use only the enclosed bobbin or bobbins of the shuttle race by turning 1 the balance wheel toward you (counterclockwise)
and raise the presser foot lever...
Users Manual - English - Page 18
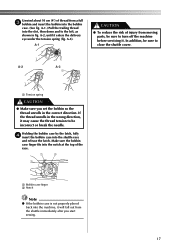
... immediately after you set the bobbin so the thread unrolls in the wrong direction, it may cause the thread tension to turn off the machine before servicing it. A-2
A-3
1
1 Tension spring
CAUTION
● Make sure you start sewing.
17 Holding the bobbin case by the latch, fully 4 insert the bobbin case into the...
Users Manual - English - Page 19
... Tension discs 4 Thread take-up lever
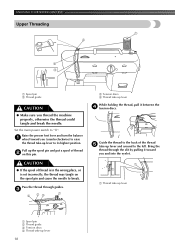
While holding the thread, pull it toward you thread the machine properly, otherwise the thread could tangle and break the needle.
Pass the thread through the slit by ... the spool pin and cause the needle to its highest position. KNOWING YOUR SEWING MACHINE
Upper Threading
1 2
4 3
1 Spool pin 2 Thread guide
CAUTION
● Make sure you (counterclockwise)...
Users Manual - English - Page 23

... turning the screw with thin thread on your next project. For most sewing applications, no adjustment is too loose. Locks appear ...by turning the dial to a lower number. KNOWING YOUR SEWING MACHINE
■ Twin Needle Threading You should thread each needle ...needle by hand, from the spool on the surface of your stitches. Using the needle threader may need to adjust it through thread...
Users Manual - English - Page 28

....
Shell Tuck Stitching
Stitch
Stitch
Stitch Name Pattern Length
Width
[mm (inch)] [mm (inch)]
Shell Tuck Stitch
-3
3-5
(1/64-1/8) (1/8-3/16)
The Shell Tuck Stitch can use the Blind Hem Stitch to finish the edge of a project, like ) edge on non-stretch fabrics, and the Stretch Blind Hem Stitch for stretch fabrics.
Use the Blind Hem Stitch when sewing on lightweight fabric...
Similar Questions

Whats The Resale Value Of The Brother 2300 Prw Limited Edition Project Runway?
(Posted by Anonymous-139615 9 years ago)

How To Thread The Brother Limited Edition Project Runway Sewing Machine
ls2300prw manual
ls2300prw manual
(Posted by jjmaf0 10 years ago)

Brother Xl-5500 Extension Table
Does anyone have: extension table (with or without contents) for Brother xl-5500
Does anyone have: extension table (with or without contents) for Brother xl-5500
(Posted by elspethsharp 11 years ago)

I Need A Zipper Foot For My Brother Xl 5500 Sewing Machine. Where Can I Purchas
(Posted by gardens203 12 years ago)

Brother Xl-5500, My Needle Holder Is Falling
I have a brother xl-5500, my needle holder is falling, it is not the needle that is falling, but the...
I have a brother xl-5500, my needle holder is falling, it is not the needle that is falling, but the...
(Posted by karolbela15 12 years ago)