Brother International 9040CN Support Question
Brother International 9040CN Support Question
Find answers below for this question about Brother International 9040CN - DCP Color Laser.Need a Brother International 9040CN manual? We have 2 online manuals for this item!
Question posted by gethe16507 on March 19th, 2013
Message Push Two Green Taps On Both Side Of The Canister (drum)? How Do I Do
the taps when I open the back are loose and pop out
Current Answers
Related Brother International 9040CN Manual Pages
Users Manual - English - Page 6
...the product that you purchased is not covered by another device or software used with this Product (including but not ... arising from other than defects in materials or workmanship; Brother® Color Laser One-Year On-Site Limited Warranty (USA only)
Who is covered:...Toner Cartridges, Drum Unit, Belt Unit, and Waste Toner Box. „ Except as Paper Feeding Kit, Fuser and Laser Units. For...
Users Manual - English - Page 7
... current published rates. If the Machine and/or accompanying Consumable and Accessory Items are your sole (i.e., only) and exclusive remedies under this warranty. Brother® Color Laser One-Year On-Site Limited Warranty (USA only)
What Brother will do not allow the exclusion or limitation of consequential or incidental damages, the above...
Users Manual - English - Page 26
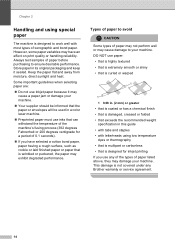
... temperature
dyes or thermography • that is multipart or carbonless
• that is damaged, creased or folded
• that exceeds the recommended weight specification in a color laser machine.
„ Preprinted paper must use inks that can withstand the temperature of the machine's fusing process (392 degrees Fahrenheit or 200 degrees centigrade for...
Users Manual - English - Page 61
... Start button and select Printers and Faxes. Right-click Brother DCP-XXXX Printer. Make sure that Use Printer Offline is a ...drum unit on page 106.)
„ Check the interface cable connection on both the machine and your computer. (See the Quick Setup Guide.)
„ Check that the correct printer driver has been installed and chosen.
„ Check to see if the LCD is showing an error message...
Users Manual - English - Page 66
...Colors are installed properly. (See
Replacing a toner cartridge on page 101.) „ Shake the toner cartridges gently. „ Make sure that the drum unit is closed properly. „ Shake the toner cartridges gently. „ Clean the laser...; Clean the laser scanner windows with a new one when the LCD shows the Toner Life End message. abcdefghijklmnopqrstuvwxyz. ABCDEFGHIJKLMNOPQRSTUVWXYZ...
Users Manual - English - Page 67

... be damaged. ABCDEFGHIJKLMNOPQRSTUVWXYZ. 0123456789. Put in a new drum unit. (See Replacing the drum unit on page 106.)
„ Clean all four corona wires (one for each color) of the drum unit by sliding the green tab. (See Cleaning the corona wires on page 87.)
„ Clean the laser scanner windows with the white line. (See Replacing...
Users Manual - English - Page 77
... box
on the LCD, and put it back into the drum unit again.
1 The toner cartridge color with any sophisticated office product, errors may occur and consumable items may need to replace the belt unit. Troubleshooting and routine maintenance
Error and maintenance messages C
As with the problem is not installed properly.
Call Brother...
Users Manual - English - Page 87
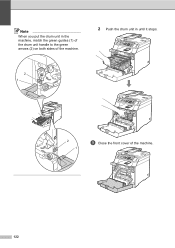
i Put the paper tray firmly back in the machine, match the green guides (1) of the drum unit handle to the green arrows (2) on both sides of the machine. Note
When you put the drum unit in the
machine.
75
Troubleshooting and routine maintenance
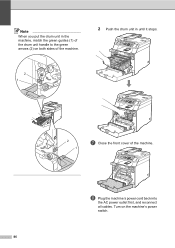
2 Push the drum unit in until it stops.
2 1
C
2 1
h Close the front cover of the machine.
Users Manual - English - Page 98
Turn on both sides of the machine.
2 Push the drum unit in the machine, match the green guides (1) of the machine. h Plug the machine's power cord back into
the AC power outlet first, and reconnect all cables. Note
When you put the drum unit in until it stops.
2 1
2 1
g Close the front cover of the drum unit handle to the green arrows (2) on the machine's power switch.
86
Users Manual - English - Page 109

... AC power outlet first, and reconnect all cables. Note
When you put the drum unit in until it stops.
2 1
C
2 1
v Close the front cover of the machine. Troubleshooting and routine maintenance
2 Push the drum unit in the machine, match the green guides (1) of the drum unit handle to the green arrows (2) on the machine's power switch.
97
Users Manual - English - Page 116

... Clean the corona wires as follows.
1 Push to release the latches of the
white corona wire cover (1), and then open the cover.
1
CAUTION Be sure to ...return the tab to clean the machine. Hold
the cartridge level with both hands and gently shake it from side to side five or six times to spread the toner evenly inside the
drum unit by gently sliding the green...
Users Manual - English - Page 123

Troubleshooting and routine maintenance
Note When you put the drum unit in the machine, match the green guides (1) of the drum unit handle to the green arrows (2) on both sides of the machine.
2 1
1
C
2 1
1
111 Push down the gray lock lever (1).
g Put the drum unit back in the machine as
follows.
1 Make sure that the gray lock
lever...
Users Manual - English - Page 124
2 Push the drum unit in until it could degrade print quality.
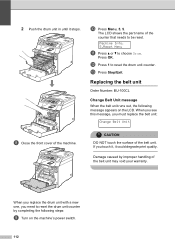
Replacing the belt unit C
Order Number: BU-100CL
Change Belt Unit message
C
When the belt unit runs out, the following steps:
i Turn on the LCD. When you see this message, you must replace the belt unit:
Change Belt Unit
h Close the front cover of...
Users Manual - English - Page 128

Note
When you put the drum unit in the machine, match the green guides (1) of the drum unit handle to the green arrows (2) on both sides of the machine.
2 1
1
2 1
1
116 Push down the gray lock lever (1). g Put the drum unit back in the machine as
follows.
1 Make sure that the gray lock
lever (1) is in the up position and put the drum unit in the machine.
Users Manual - English - Page 129
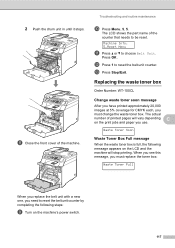
...toner box. 2 Push the drum unit in until it stops.
Press OK. The actual
number of printed pages will stop printing. Waste Toner Soon
Waste Toner Box Full message
C
When the waste...j Press Menu, 5, 5. Replacing the waste toner box C
Order Number: WT-100CL
Change waste toner soon message C
After you have printed approximately 20,000 images at 5% coverage for CMYK each, you use.
Machine Info...
Users Manual - English - Page 133
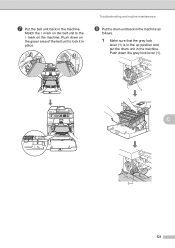
... the gray lock
lever (1) is in the up position and put the drum unit in the machine. Push down on the machine.
g Put the belt unit back in the machine. Match the h mark on the belt unit to the g mark on the green area of the belt unit to lock it in place.
Users Manual - English - Page 134
Note
When you put the drum unit in the machine, match the green guides (1) of the drum unit handle to the green arrows (2) on both sides of the machine.
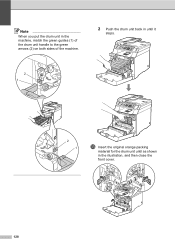
2 Push the drum unit in until it stops.
2 1
2 1
i Close the front cover of the machine.
122
Users Manual - English - Page 135

..., carefully re-pack the machine in (4 pieces of each) 4 Orange packing material for locking the drum unit and the belt unit (4 pieces) 5 A piece of paper (Letter or A4) to protect... careful not to properly prepare the machine for attaching cartons (4 pieces)
123
Color laser printers are complex printing devices. Moving the machine or shipping it be adequately insured with the carrier.
As...
Users Manual - English - Page 140
Note
When you put the drum unit in the machine, match the green guides (1) of the drum unit handle to the green arrows (2) on both sides of the machine.
2 Push the drum unit back in until it
stops.
2 1
2 1
m Insert the original orange packing
material for the drum unit until as shown in the illustration, and then close the front cover.
128
Users Manual - English - Page 163

.../Reduce key 27
Envelopes 9, 11, 12, 13, 15, 16
Error messages on the CD-ROM. B
Belt unit 112 Brother
accessories and supplies ii...iv, vi
C
Canceling print jobs 6
Cleaning corona wire 87 drum unit 90 laser scanner window 83 scanner 82
Consumable items 98 Control panel overview... User's Guide on the CD-ROM. Copy brightness 30 color saturation 30
contrast 26, 30
Enlarge/Reduce key 27
keys...
Similar Questions

How To Reset Brother Drum Dcp-7065dn
(Posted by lmt2hacy 9 years ago)

Reset Brother Message 8890 When Adding New Drum
(Posted by bagusash 10 years ago)

We Replaced Toner Wand Message Says, Toner Error Reinstall Drum Unit
(Posted by Christinelicsw 11 years ago)

How To Reset Brother Drum Dcp 7040
how to reset brother drum dcp 7040
how to reset brother drum dcp 7040
(Posted by mnmredline 11 years ago)
