
Bernina Bernette 340 deco Support Question
Bernina Bernette 340 deco Support Question
Find answers below for this question about Bernina Bernette 340 deco.Need a Bernina Bernette 340 deco manual? We have 1 online manual for this item!
Question posted by mmvisagie on March 14th, 2021
Machine Does Not Stop To Cut Thread When Moving From One Place To Another On The
design. It did stop previously but just stopped to do that. How can this be fixed please?
Current Answers
Answer #1: Posted by Troubleshooter101 on March 18th, 2021 3:59 AM
Troubleshooter101

Member since:
September 30th, 2015 Points: 2,927,030

Member since:
September 30th, 2015 Points: 2,927,030
I wasn't able to find the exact match for this question but you can check this below for 25 machine problems:-
https://sewguide.com/troubleshoot-sewing-machine-problems/
Thanks
Please respond to my effort to provide you with the best possible solution by using the "Acceptable Solution" and/or the "Helpful" buttons when the answer has proven to be helpful. Please feel free to submit further info for your question, if a solution was not provided. I appreciate the opportunity to serve you!
Troublshooter101
Related Bernina Bernette 340 deco Manual Pages
User Guide - Page 2

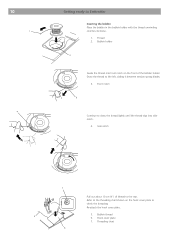
...those parts in terms of double-insulated machines.
1. Do not allow to be ... service center for servicing of design and production technologiy. This sewing and embroidery computer is not...moving parts. Do not unplug by constantly improving them in the product.
See instructions for examination, repair, electrical or mechanical adjustment.
4. Always unplug the sewing...
User Guide - Page 5
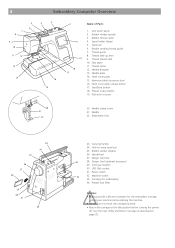
.../Stop button 18. Needle clamp screw 21. Hole for embroidery)
34. Face plate 11. Needle threader 13. Carrying handle
24. Design Card (optional accessory)
29. Machine socket
33. Bobbin thread cutter 4. Thread take-up lever 9. Thread cutter 12. Pocket for the embroidery carriage
behind your machine before starting the machine. • Do not force to move...
User Guide - Page 8
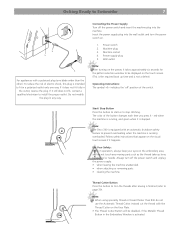
... plug in any moving parts such as the thread take-up time and is activated. Start/ Stop Button Press this button...Thread Button in operation, always keep your eyes on .
1. Thread Cutter Button Press this button to trim the threads after sewing is stopped. Power supply plug 5. Note: The Deco 340 is equipped with an automatic shutdown safety feature to prevent overheating when the machine...
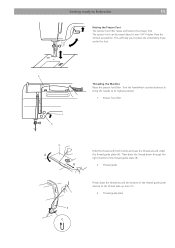
User Guide - Page 9
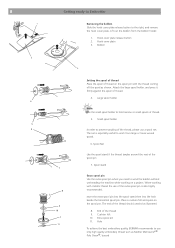
...the bobbin without unthreading the machine while working with the thread coming off the spool as shown. Spool Net
Use the spool stand if the thread tangles around the root of thread.
5. When working on...Note: Use the small spool holder to prevent tangling of the thread should unwind as Mettler Metrosene+® Poly Sheen®, Isacord Place a cushion felt and spool on the spool pin. Small ...
User Guide - Page 10
... the bobbin from the inside to the outside. Cut the thread close to the right. For safety purposes, the motor will stop automatically. Stop the machine after running .
Press the Start/Stop button while holding the thread at the spool.
1. Press the Start/Stop button again. Press the Start/Stop button to stop automatically after the bobbin has made a few...
User Guide - Page 11
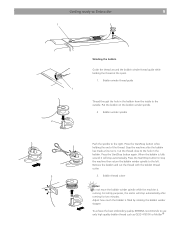
Hook cover plate
7. Bobbin holder
2
Guide the thread into side notch.
4. Threading chart
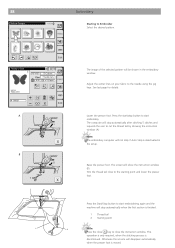
6 Draw the thread to Embroider
Inserting the bobbin Place the bobbin in the bobbin holder with the thread unwinding counter-clockwise.
1. Side notch
7
Pull out about 10 cm (4") of the bobbin holder. 10
1
4
Getting ready to the left, sliding it between tension spring...
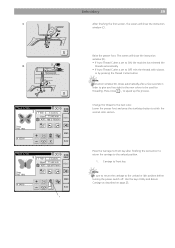
User Guide - Page 12
... to place the embroidery hoop under the thread guide plate (A). Presser foot lifter
2
A B
3
C
Hold the thread with both hands and pass the thread around the bottom of the thread guide plate (B).
2. The presser foot can be raised about 6 mm (1/4") higher than the normal up lever (C).
3. Thread guide
Firmly draw the thread around under the foot.
2
1 3
Threading the Machine Raise...
User Guide - Page 17
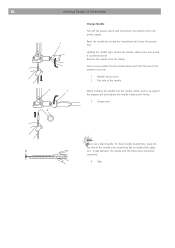
.... A gap between the needle and the flat surface should be
consistent.
4. Gap
To check needle straightness, place the
flat side of the needle to Embroider
1
3
1
2
Change Needle
Turn off the power switch and disconnect the machine from the clamp.
Holding the needle tight, loosen the needle clamp screw by turning the handwheel...
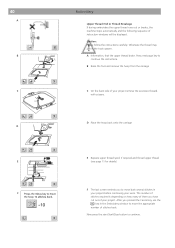
User Guide - Page 20
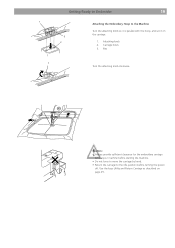
... clockwise. Caution: • Always provide sufficient clearance for the embroidery carriage
behind your machine before turning the power
off.
Carriage holes 3. Use the keys Utility and Return Carriage... Hoop to the idle position before starting the machine. • Do not force to move the carriage by hand. • Return the carriage to the Machine
Turn the attaching knob so it is parallel ...
User Guide - Page 21

... temporary spray adhesive
before hooping • carefully cut -out pieces on the stabilizer, hoop the stabilizer, then fix the sections to the wrong side of the ...placed. For fabrics that there is no adhesive residue on interfacing is pressed (fused) to be used • removable iron-on needle, stitch plate and hook area. Smooth fabrics: to reveal the self-
Cutwork: to fix cut...
User Guide - Page 24
fine fabrics: fine thread (darning thread, embroidery thread)
70-75
medium fabrics: normal thread
80-90
heavyweight fabrics: stronger thread
100, 110, 120
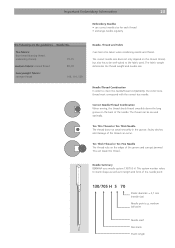
Needle, Thread and Fabric Care has to length and form of the needle. Correct Needle/Thread Combination When sewing, the thread should travel smoothly in the groove.
Too Thick Thread or Too Fine Needle The thread rubs on the...
User Guide - Page 31
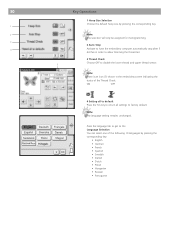
...
status of the following 10 languages by pressing the corresponding key.
1
2
Note:
This selection will only be assigned for monogramming.
3
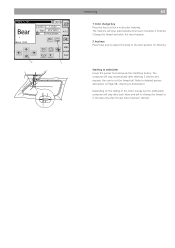
2 Auto Stop
4
Activate to have the embroidery computer automatically stop after 5
stitches in order to allow trimming the thread tail.
3 Thread Check Choose OFF to the Language Selection You can select one of the...
User Guide - Page 37
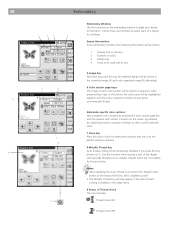
...Thread key Auto thread cutting will be shown in the utility menu.
9 Status of the design with the colour sequence number as well as the recommended thread. Notes: • When disabling the Auto Thread Cut function the Thread Cutter
Button at the head of the Deco 340... colour area will be shown.
1 Sewing time in minutes 2 Number of a design for thread cutting.
36
Embroidery
1
2
3
4
...
User Guide - Page 38
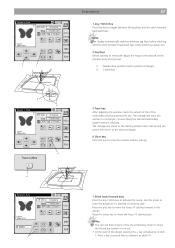
The carriage will return to the previous display. 6 Close key Press this key to close the window without stitching. Press the plus key to move the hoop 10 stitches forward in a rectangle, ...the design Press the minus key to move the embroidery hoop to where
the thread has broken or run out. • At the start of design) 4. Needle drop position (center position of the design pressing ...
User Guide - Page 39
... close X key to close to Embroider Select the desired pattern. Press the Start/Stop button to cut the thread tail by showing the instruction window (A)
Note: The embroidery computer will show the instruction window (B). Press the start embroidering again and the machine will be shown in the setup. A B
1
The image of the selected pattern...
User Guide - Page 40
...position before turning the power switch off. Change the thread to the unload position.
1. Use the keys ...stop button to be used for threading. The screen will show the instruction window (D). • If Auto Thread Cutter is set to ON, the machine has trimmed the
threads automatically. • If Auto Thread Cutter is set to OFF, trim the threads with scissors
or by pressing the Thread...
User Guide - Page 41
...thread broke. D Place the hoop back onto the carriage
E Replace upper thread spool if required and thread upper thread (see page 11 for details)
F The last screen reminds you to move back several stitches in the Embroidery window to move... F
Embroidery
Upper Thread End or Thread Breakage If during embroidery the upper thread runs out or breaks, the machine stops automatically and the following ...
User Guide - Page 44
...machine will stop after each character is finished. Change the thread and stitch the next character.
2 Jog keys Press these keys to adjust the hoop to the start position for lettering
1
Starting to change the thread or it will stop...computer will stop automatically when each letter and ask to embroider Lower the presser foot and press the Start/Stop button. The computer will stop only ...
User Guide - Page 62

... overloading by thread jamming.
See page 12. See page 16, 23, 24 See page 16, 23 See page 16 See page 15
The screen display is not clear.
1 The screen contrast of
fabric is not cut correctly.
1 Key position is not adjusted properly. 2 The control circuit is not working
correctly.
The machine stops and...
User Guide - Page 63
... the
42
Stabilizer
20
Standard accessories
5
Standard keys
25
Start/ Stop Button
7
Starting to Embroider
7
I
Inserting and Removing of the Selected Designs 48
E
Editing and Combining Designs
46
Editing Mode
46
Embroidery
36
Embroidery Hoop
17
Embroidery Information, Important
21
Embroidery Threads
22
Embroidery Window
36
Extra spool pin
8
Extension Table...
Similar Questions

Machine Thread Cut
Machine Does Not Stop To Cut Thread When Moving From One Place To Another On The design
Machine Does Not Stop To Cut Thread When Moving From One Place To Another On The design
(Posted by pule 1 year ago)

Why Does My Mashine Say The Thread Is Broken, But It Is Not Broken?
(Posted by Anonymous-169897 2 years ago)

Thread
neelde thread keeps on breaking. It is also skipping stitches
neelde thread keeps on breaking. It is also skipping stitches
(Posted by lourenebekker77 8 years ago)

How To Thread A Bobbin On A Bernette 56 Sewing Machine
(Posted by scannie2 9 years ago)

My Sewing Machine Bernette 15 Stops Working
After 1 day using my Bernette 15 stops working - engine hoots but doesn't rotate spindle and hand wh...
After 1 day using my Bernette 15 stops working - engine hoots but doesn't rotate spindle and hand wh...
(Posted by sgrayxx 12 years ago)