Audiovox MMD70 Support Question
Audiovox MMD70 Support Question
Find answers below for this question about Audiovox MMD70 - DVD Player With LCD Monitor.Need a Audiovox MMD70 manual? We have 1 online manual for this item!
Question posted by Tasteetra04 on April 16th, 2017
Dvd Won't Eject
DVD will not eject and getting an error message that says no disc
Current Answers
Answer #1: Posted by waelsaidani1 on April 16th, 2017 8:24 AM
waelsaidani1

Member since:
May 12th, 2013 Points: 19,501,797

Member since:
May 12th, 2013 Points: 19,501,797
Turn off your DVD player. You do not want to risk electrical shock while working with it.
Locate your DVD player's manual Eject button. It is usually a small hole located underneath the DVD drawer.
Insert a stiff wire-such as a paperclip or safety pin-into the hole. Push gently and the drawer should open partway. Gently pull the drawer the rest of the way open.
Remove the DVD and see if there is a problem with it. Most DVD player drawers get stuck when a DVD is warped or the label is starting to peel. If the DVD is warped, discard it. If the label is peeling, remove the label.
Turn your DVD player back on. If it gets stuck again on a different DVD, then the problem may be with your DVD player rather than with your DVDs.
Related Audiovox MMD70 Manual Pages
Installation Manual - Page 1
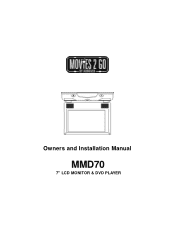
Owners and Installation Manual
MMD70
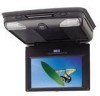
7" LCD MONITOR & DVD PLAYER
Installation Manual - Page 2

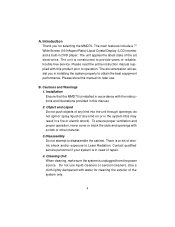
Warnings
Do not use any solvents or cleaning materials when cleaning the video monitor. Before putting on headphones always adjust the volume setting to leave the dome light ... home and other rights owners. Do not use any abrasive cleaners, they may scratch the screen. Lock the LCD screen in the fully closed position when not in the off or auto positions when the vehicle is unattended, as...
Installation Manual - Page 3
... when the vehicle is in "park" or when the vehicle's parking brake is used for television reception, video or DVD play , the LCD panel or video monitor must be installed to the operator of the motor vehicle.
3 An LCD panel or video monitor used for vehicle information, system control, rear or side observation or navigation. Important Notice
An...
Installation Manual - Page 4
... Thank you in DVD player. Use a cloth lightly dampened with this manual for selecting the MMD70. The main features include a 7" Wide Screen (16:9 Aspect Ratio) Liquid Crystal Display (LCD) monitor and a built-in... of any kind on or in the system (this manual.
2. Installation Ensure that the MMD70 is in this may result in a fire or electric shock). do not spill or spray...
Installation Manual - Page 5
... Manual
5 Since this unit plays discs according to direct sunlight or heat sources such as they may be available. Do not touch the surface of disc.
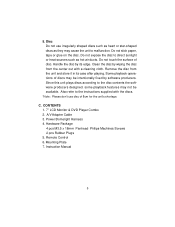
Disc Do not use disc of discs may cause the unit to malfunction. Handle the disc by wiping the disc from the unit and store it in its edge. CONTENTS 1. 7" LCD Monitor & DVD Player Combo 2.
Installation Manual - Page 7
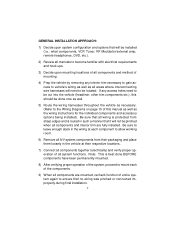
GENERAL INSTALLATION APPROACH:
1) Decide upon system configuration and options that will be installed (i.e.: what components, VCP, Tuner, RF Modulator/external amp, remote headphones, DVD, etc.).
2) Review all manuals to become familiar with electrical requirements and hook ups.
3) Decide upon mounting locations of all components and method of entire system ...
Installation Manual - Page 8
... wire can be required are:
A) Removal of the video monitor and related console accessories.
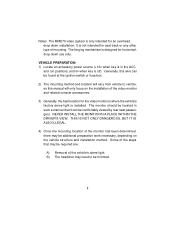
3) Generally, the best location for an overhead, drop down use only. Notes :The MMD70 video system is only intended for the video monitor is where the vehicle's factory dome light is installed. The monitor should be additional preparation work necessary, depending on the...
Installation Manual - Page 10
A/V Source Definitions :
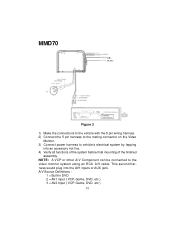
1 = Built-in DVD 2 = AV1 input ( VCP, Game, DVD, etc ) 3 = AV2 Input ( VCP, Game, DVD, etc )
10 MMD70
(RED) (BLACK)
Figure 3
1) Make the connections to the vehicle with the 5 pin wiring harness. 2) Connect the 5 pin harness to the mating connector on the Video
Monitor. 3) Connect power harness to the video monitor system using an RCA A/V cable. This second...
Installation Manual - Page 11
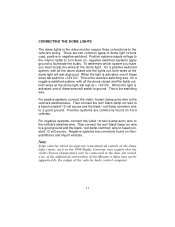
... black / red (lamp common) wire to +12V DC. CONNECTING THE DOME LIGHTS
The dome lights in the video monitor require three connections to the vehicle's switched wire. On a positive switched system, with all the doors closed and... pin switch wire, as the additional current draw of the Monitor's lights may not be supported by the output of dome light circuits used, positive or negative switched.
Installation Manual - Page 12
... Auto
To constant
Factory Dome light circuit
Factory Door ajar switch or Body
To constant
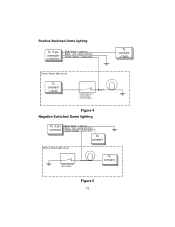
Figure 5
12 Positive Switched Dome lighting
To 3 pin connector on Monitor
Red / black - Lamp common
connector Violet / brown - Lamp Auto
To constant +12vdc
Factory Dome light circuit
To constant +12vdc
Factory Door ajar switch or Body...
Installation Manual - Page 13
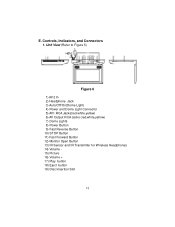
...(red,white,yellow) 6) AV Output RCA Jacks (red,white,yellow) 7) Dome Lights 8) Power Button 9) Fast Reverse Button 10) STOP Button 11) Fast Forward Button 12) Monitor Open Button 13) IR Sensor and IR Transmitter for Wireless Headphones 14) Volume 15) Picture 16) Volume + 17) Play button 18...
Installation Manual - Page 14
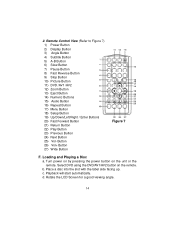
...Stop Button 10) Picture Button 11) DVD /AV1 /AV2 12) Zoom Button 13) Eject Button 14) Numeric Buttons 15) Audio... Button 16) Repeat Button 17) Menu Button 18) Setup Button 19) Up/Down/Left/Right / Enter Buttons 20) Fast Forward Button 21) Return Button 22) Play Button 23) Previous Button 24) Next Button 25) Vol- Loading and Playing a Disc a. Rotate the LCD...
Installation Manual - Page 15
Select source DVD, AV1, AV2 Eject disc Brightness/Contrast/Tint/Color Reduce volume/Lower picture setting Increase volume/Raise picture setting Previous chapter/track Next chapter/track
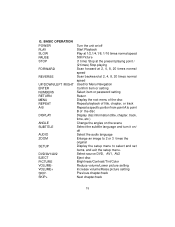
15 G. BASIC OPERATION POWER PLAY SLOW PAUSE STOP
FORWARD
REVERSE
UP/DOWN/LEFT /RIGHT ENTER NUMBERS RETURN MENU REPEAT A-B
DISPLAY
ANGLE SUBTITLE
AUDIO ZOOM
SETUP
DVD/AV1/AV2...
Installation Manual - Page 16
... angles.
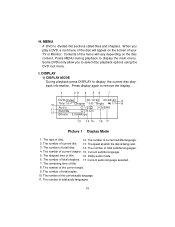
10. The number of your TV or Monitor. When you to display the main menu. Current audio language selected.
7. The number of disc.
12. The type of total audio languages.
16 I. H. Press MENU during playback to select disc playback options using the DVD root menu. MENU A DVD is being read.
3. The number of total...
Installation Manual - Page 17
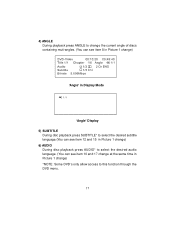
... the desired subtitle language.(You can see item 12 and 15 in Picture 1 change) 6) AUDIO During disc playback press AUDIO* to select the desired audio language. (You can see item 10 and 17 change at the same time in Picture 1 change) *NOTE: Some DVD's only allow access to this function through the...
Installation Manual - Page 20
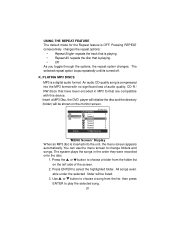
...choose a song from the folder list on the monitor screen.
'MENU Screen' Display When an MP3 disc is compressed into the unit, the menu screen ...DISCS MP3 is OFF. CD-R / RW discs that have been encoded in the order they were recorded onto the disc.
1. An audio CD-quality song is inserted into the MP3 format with this device. Insert a MP3 Disc, the DVD player will initialize the disc...
Installation Manual - Page 24
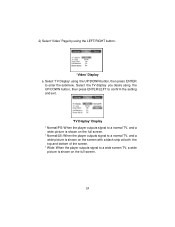
Select the TV display you desire using the LEFT/RIGHT button.
'Video' Display a. 2) Select 'Video' Page by using the UP/DOWN button, then press ENTER/LEFT to confirm the setting and exit.
'TV Display' Display * Normal/PS: When the player outputs signal to a normal TV, and a
wide picture is shown on the full screen...
Installation Manual - Page 26
....
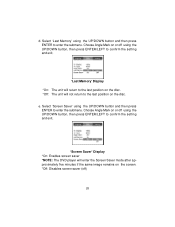
'Last Memory' Display *On: The unit will return to the last position on the disc. *Off: The unit will not return to confirm the setting and exit.
'Screen Saver' Display *On: Enables screen saver *NOTE: The DVD player will enter the Screen Saver mode after approximately five minutes if the same image remains...
Installation Manual - Page 28
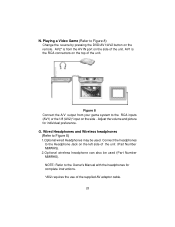
...Manual with the headphones for individual preference. Connect the headphones
to the Headphone Jack on the side . Playing a Video Game (Refer to the RCA inputs (AV1) or the 1/8 (AV2)* input on the left side of the...is from your game system to Figure 8) Change the source by pressing the DVD/AV1/AV2 button on the side of the unit. N. O. NOTE: Refer to Figure 8) 1.Optional wired Headphones...
Installation Manual - Page 29
...
Q.
make sure the modulator and the vehicle radio are turned on Red wire at Video Monitor
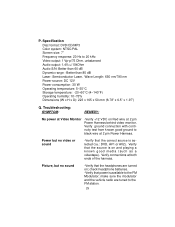
-Verify +12 VDC on ; Verify connections at 2 pin Power Harness. Picture, but no sound
-Verify that ... source is selected (i.e.: DVD, AV1 or AV2). P.
Verify that power is on and playing a known good media (such as a videotape). Specification
Disc format: DVD/CD/MP3 Color system:...
Similar Questions

I Have An Audiovox Mmdv70c Overhead Dvd Player I Need The Dvd Unit It Broken
DVD unit for mmdv70c need part number
DVD unit for mmdv70c need part number
(Posted by Vinnytt 10 years ago)

I Have An Audiovox Overhead Console Dvd Player - Will Not Eject Dvd
my toyota sienna has a overhead dvd player - Audiovox. will not eject dvd. have tried powering o...
my toyota sienna has a overhead dvd player - Audiovox. will not eject dvd. have tried powering o...
(Posted by jkparks5 11 years ago)
Dvd Won't Eject From Machine
Hello, How can I get the dvd to eject from the machine? The disk that is in there currently plays, ...
Hello, How can I get the dvd to eject from the machine? The disk that is in there currently plays, ...
(Posted by ebtraveler33773 11 years ago)

Replacement Part
have a audiovox voh682a overhead car video but needa dvd player, remote and headphones. where can i ...
have a audiovox voh682a overhead car video but needa dvd player, remote and headphones. where can i ...
(Posted by treepalm99 11 years ago)
Dvd Will Not Eject.
The DVD player has a DVD stuck in it. It will play theDVD but it will not eject. It sounds like its ...
The DVD player has a DVD stuck in it. It will play theDVD but it will not eject. It sounds like its ...
(Posted by bignid1 12 years ago)