Asus P8H61-M LX3 Support Question
Asus P8H61-M LX3 Support Question
Find answers below for this question about Asus P8H61-M LX3.Need a Asus P8H61-M LX3 manual? We have 1 online manual for this item!
Question posted by aneesjm on June 5th, 2012
Display Is Rolling
dual second genaratin , win7 diaplay is rolling
Current Answers
Related Asus P8H61-M LX3 Manual Pages
User Manual - Page 1

P8H61-M LX3
Motherboard
User Manual - Page 3

Contents
Safety information vi About this guide vi P8H61-M LX3 specifications summary viii
Chapter 1: Product introduction
1.1 Before you proceed 1-1 1.2 Motherboard overview 1-2
1.2.1 Placement direction 1-2 1.2.2 Screw holes 1-2 1.2.3 Motherboard layout 1-3 1.2.4 Layout contents 1-3 1.3 Central Processing Unit (CPU 1-4 1.3.1 Installing the CPU 1-4 1.3.2 Installing the CPU heatsink and...
User Manual - Page 11

... accessories. Before you for the list of the following precautions before you install motherboard components or change any motherboard settings.
• Unplug the power cord from the wall socket before touching ...Hold components by the edges to the motherboard, peripherals, or components. Refer to page ix for buying an ASUS® P8H61-M LX3 motherboard! If any of the items is damaged or ...
User Manual - Page 12

... it into the holes indicated by circles to secure the motherboard to the chassis. Place this side towards the rear of the chassis
P8H61-M LX3
1-2
ASUS P8H61-M LX3 Failure to do so can damage the motherboard.
Do not overtighten the screws! 1.2 Motherboard overview
Before you install the motherboard, study the configuration of your chassis to ensure that you...
User Manual - Page 14

... cap is released from incorrect CPU installation/removal, or misplacement/loss/incorrect removal of the motherboard, ensure that the PnP cap is shipment/transit-related.
• Keep the cap after installing the motherboard.
Load lever A
B Retention tab
1-4
ASUS P8H61-M LX3 Contact your thumb (A), and then move it to the socket contacts resulting from the...
User Manual - Page 18

... up two fasteners at a time in a diagonal sequence to connect the CPU fan connector!
CPU_FAN
CPU FAN PWM CPU FAN IN
CPU FAN PWR GND
P8H61-M LX3
P8H61-M LX3 CPU fan connector
Do not forget to disengage the heatsink and
fan assembly from the connector on the motherboard labeled CPU_FAN. 3. A
B
A
B B
A
B
A
1-8
ASUS P8H61-M LX3
User Manual - Page 19

... better performance with two Double Data Rate 3 (DDR3) Dual Inline Memory Modules (DIMM) sockets. Carefully remove the heatsink and fan assembly from the motherboard.
5. The figure illustrates the location of the DDR3 DIMM sockets:
DIMM_A1 DIMM_B1
P8H61-M LX3
Channel Channel A Channel B
Sockets DIMM_A1 DIMM_B1
P8H61-M LX3 240-pin DDR3 DIMM sockets
Chapter 1: Product introduction
1-9 A DDR3...
User Manual - Page 20

....
• The maximum 16GB memory capacity can be supported with the same CAS latency. P8H61-M LX3 Motherboard Qualified Vendors Lists (QVL) DDR3-1066 MHz capability
Vendors Part No.
J1108BDSE-DJ-F 7
H5TQ2G83AFR...at a higher frequency, refer to section 2.4 Ai Tweaker menu for the dual-channel configuration.
Size
Crucial ELPIDA
CT12864BA1067.8FF
1GB
EBJ10UE8EDF0-AE-F
1GB
ELPIDA...
User Manual - Page 22

...
ASUS P8H61-M LX3 Locked Retaining Clip
1.4.4 Removing a DIMM
To remove a DIMM:
1. Remove the DIMM from the socket.
1.4.3
Installing a DIMM
Unplug the power supply before adding or removing DIMMs or other system components. Press the retaining clips outward to avoid damaging the DIMM.
3. Simultaneously press the retaining clips outward to both the motherboard and...
User Manual - Page 24

... pins 1-2.
3. Except when clearing the RTC RAM, never remove the cap on pins 2-3 for this motherboard
A
B
C
D
E
F
G
H
Intel PCH SATA controller #0
-
-
-
- For system failure due to pins 2-3. shared
-
-
-
P8H61-M LX3
CLRTC
12
23
Normal (Default)
Clear RTC
P8H61-M LX3 Clear RTC RAM
To erase the RTC RAM: 1. The onboard button cell battery powers the RAM...
User Manual - Page 26

...to [HD]. These two 4-pin Universal Serial Bus (USB) ports are for details.
1-16
ASUS P8H61-M LX3
These two 4-pin Universal Serial Bus (USB) ports are for a chassis-mounted front panel audio ... you connect a high-definition front panel audio module to this connector to avail of the motherboard's high-definition audio capability.
• If you want to connect a high-definition front ...
User Manual - Page 28

... 480 Mbps connection speed. Insufficient air flow inside the system may damage the motherboard components. CPU_FAN
CPU FAN PWM CPU FAN IN
CPU FAN PWR GND
CHA_FAN
P8H61-M LX3
CHA FAN PWM CHA FAN IN
CHA FAN PWR GND
P8H61-M LX3 fan connectors
Do not forget to connect the fan cables to the USB connectors...
User Manual - Page 30

... the features of the Support DVD to change at www.asus.com for reference only.
Double-click the ASSETUP.EXE to avail all motherboard features.
To run the DVD.
1-20
ASUS P8H61-M LX3 1.8 Software support
1.8.1 Installing an operating system
This motherboard supports Windows® XP / Vista / 7 Operating Systems (OS). Refer to display their respective menus.
User Manual - Page 36
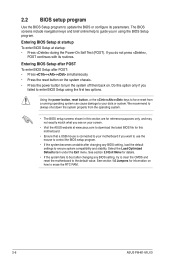
...system becomes unstable after changing any BIOS setting, try to clear the CMOS and reset the motherboard to force reset from the operating system.
• The BIOS setup screens shown in using...ASUS P8H61-M LX3 The BIOS screens include navigation keys and brief online help to guide you see on how to enter BIOS Setup using the BIOS Setup program. Do this section are for this motherboard.
&#...
User Manual - Page 37

... Mode, click Exit/Advanced Mode, then select Advanced Mode. EZ Mode
Friday [10/08/2010]
P8H61-M LX3 BIOS Version : 0301 CPU Type : Intel(R) Core(TM) i5-2400 CPU @ 3.10GHz Total Memory...Menu(F8) button is available only when the boot device is installed to display all fan speeds if available
Displays the CPU/motherboard temperature, CPU/5V/3.3V/12V voltage output, CPU/chassis fan speed
Exits the...
User Manual - Page 38

... For displaying the system temperature, power status, and changing the fan settings For changing the system boot configuration For configuring options for the detailed configurations.
The figure below shows an example of the screen has the following sections for special functions For selecting the exit options and loading default settings
2-8
ASUS P8H61-M LX3
User Manual - Page 42

...may cause the system to Intel spec, ASUS H61 Series motherboard supports 1066/1333MHz DRAM (only).
→←: Select...Displays the current DRAM speed.
2.4.1 Memory Frequency [Auto]
Allows you to configure overclocking-related items.
Be cautious when changing the settings of the Ai Tweaker menu items. Incorrect field values can cause the system to the default setting.
2-12
ASUS P8H61-M LX3...
User Manual - Page 52

...
Version 2.00.1201.
Configuration options: [Disabled] [Enabled]
2-22
ASUS P8H61-M LX3 Advanced Mode
Exit
Main
Ai Tweaker
Advanced
Monitor
Bootup NumLock State
On
Full ...If Error [Enabled]
When this item to [Enabled] to change the system boot options. Disables the full screen logo display feature. Configuration options: [1 sec] [2 sec] [3 sec] [4 sec] [5 sec] [6 sec] [7 sec] ...
User Manual - Page 54

...BIOS version.
2-24
ASUS P8H61-M LX3 Load from Profile Allows you to input the label of the DIMM module installed on the selected slot. Press [Enter] to display the submenu. Advanced Mode
Exit... see section 2.1.2 ASUS EZ Flash 2.
2.8.2 ASUS SPD Information DIMM Slot # [Slot 1]
Displays the Serial Presence Detect (SPD) information of the setup profile. The Setup Profile Status items show Not...
User Manual - Page 60

... Name : Jerry Shen
Declaration Date: Dec. 21, 2011 Year to begin affixing CE marking:2011
Signature
A-4
Appendices EC Declaration of the following apparatus:
Product name :
Motherboard
Model name :
P8H61-M LX3
conform with the essential requirements of Conformity
We, the undersigned,
Manufacturer:
Address, City:
ASUSTek COMPUTER INC.
Similar Questions

Asus P8h61-m Le/usb3 Cannot Boot
My Asus Motherboard P8H61-M LE Rev. 3.0 failed to boot-up or no boot sequence, black screen and no k...
My Asus Motherboard P8H61-M LE Rev. 3.0 failed to boot-up or no boot sequence, black screen and no k...
(Posted by Anonymous-156286 8 years ago)

E Exactly Is The Mobo Head On The Asus P8h61 -mlx Motherboard?
(Posted by victor95221 11 years ago)

How To Boot Asus P8h61-m Lx3 Using Cd
(Posted by devilworksterminato1 11 years ago)

Should My Motherboard Asustek Computer Inc. P8h61-m Le/csm (lga1155) Be Running
(Posted by dijkstrabmd 12 years ago)

No Display In The Monitor
How To Troubleshoot The Motherboard
no display in the monitor but when connected to another computer no problempls help me to troublesho...
no display in the monitor but when connected to another computer no problempls help me to troublesho...
(Posted by jersonsdnnn 12 years ago)