Asus P5VDC-MX Support Question
Asus P5VDC-MX Support Question
Find answers below for this question about Asus P5VDC-MX.Need a Asus P5VDC-MX manual? We have 2 online manuals for this item!
Question posted by eadams034 on April 4th, 2014
Chassis Intruder
every time i boot up it shows chassis intruder
Current Answers
Answer #1: Posted by StLFanMan on April 10th, 2014 9:39 AM
StLFanMan

Member since:
August 14th, 2013 Points: 1,576,405

Member since:
August 14th, 2013 Points: 1,576,405
Check out this YouTube video, which should help your "Chassis Intruder" error:
http://www.youtube.com/watch?v=GDv5K5VAZHA
I hope this helps!
Related Asus P5VDC-MX Manual Pages
Motherboard DIY Troubleshooting Guide - Page 1

P5VDC-MX
Motherboard
Motherboard DIY Troubleshooting Guide - Page 3

... vii About this guide viii P5VDC-MX specifications summary x
Chapter 1: Product introduction
1.1 Welcome 1-2 1.2 Package contents 1-2 1.3 Special features 1-2
1.3.1 Product highlights 1-2 1.3.2 Innovative ASUS features 1-4 1.4 Before you proceed 1-5 1.5 Motherboard overview 1-6 1.5.1 Placement direction 1-6 1.5.2 Screw holes 1-6 1.5.3 Motherboard layout 1-7 1.6 Central Processing Unit...
Motherboard DIY Troubleshooting Guide - Page 11

P5VDC-MX specifications summary
BIOS
4 Mb Flash ROM, AMI BIOS, PnP, WfM2.0, DMI2.0, SM BIOS 2.3
Manageability
WOL by PME, WOR by PME, Chassis Intrussion, PXE, RPL
USB
Internal I/O connectors
Max. 8 USB 2.0 ports
2 x USB 2.0/1.1 connector supports additional 4 USB ports 4 x SATA connector 2 x IDE connector CPU/Chassis fan connectors Game/MIDI connector 24-pin EATX Power connector 4-pin...
Motherboard DIY Troubleshooting Guide - Page 13

This chapter describes the motherboard features and the new technologies it supports.
1Product
introduction
ASUS P5VDC-MX
1-1
Motherboard DIY Troubleshooting Guide - Page 14

... and is damaged or missing, contact your retailer.
1.3 Special features
1.3.1 Product highlights
Latest processor technology
The motherboard comes with a 775-pin surface mount Land Grid Array (LGA) socket designed for the following items.
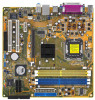
Motherboard
ASUS P5VDC-MX motherboard
Cables
1 x Serial ATA power cable 1 x Serial ATA signal cable 1 x Ultra DMA 133/100 cables 1 x Floppy disk...
Motherboard DIY Troubleshooting Guide - Page 15
...individually dedicated L2 cache to satisfy the rising demand for thinner, more powerful processing capability.
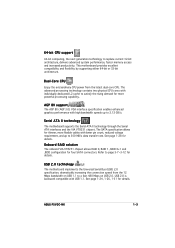
Serial ATA II technology
The motherboard supports the Serial ATA II technology through the Serial ATA interfaces and the VIA VT8251 chipset. The SATA specification allows ... CPU support
64-bit computing, the next generation technology to 300 MB/s data transfer rate. ASUS P5VDC-MX
1-3
Motherboard DIY Troubleshooting Guide - Page 17

...the ATX power supply is a reminder that you install or remove any motherboard component. P5VDC-MX
®
P5VDC-MX Onboard LED
SB_PWR
ON
Standby Power
OFF
Powered Off
ASUS P5VDC-MX
1-5
The illustration below shows the location of the following precautions before you install motherboard components or change any motherboard settings.
• Unplug the power cord from the wall socket...
Motherboard DIY Troubleshooting Guide - Page 18

... removing the motherboard. 1.5 Motherboard overview
Before you place it into the chassis in the image below.
1.5.2 Screw holes Place eight (8) screws into it.
Doing so can cause you physical injury and damage motherboard components.
1.5.1 Placement direction
When installing the motherboard, make sure that you install the motherboard, study the configuration of the chassis
®
P5VDC-MX...
Motherboard DIY Troubleshooting Guide - Page 20

...P5VDC-MX
®
P5VDC-MX CPU Socket 775
Before installing the CPU, make sure that the socket box is facing towards you and the load lever is on your retailer immediately if the PnP cap is missing, or if you see any damage to chipset limitation.The motherboard.../ transit-related.
• Keep the cap after installing the motherboard. If the instructions in the 775-land package.
• Your...
Motherboard DIY Troubleshooting Guide - Page 23

...chassis before you install the heatsink and fan assembly. ASUS P5VDC-MX
1-11
Place the heatsink on top of the installed CPU, making sure that the four fasteners match the holes on the motherboard... heatsink and fan assembly to ensure optimum thermal condition and performance.
• Install the motherboard to the CPU heatsink or CPU before you install the CPU fan and heatsink assembly
&#...
Motherboard DIY Troubleshooting Guide - Page 24
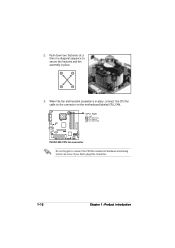
Push down two fasteners at a
time in a diagonal sequence to
secure the heatsink and fan
B
assembly in place, connect the CPU fan cable to the connector on the motherboard labeled CPU_FAN. Hardware monitoring errors can occur if you fail to connect the CPU fan connector! A
A
A
B
B
B
A
P5VDC-MX
3. When the fan and heatsink assembly is in...
Motherboard DIY Troubleshooting Guide - Page 25

Disconnect the CPU fan cable from the
A
A
motherboard.
1.6.3 Uninstalling the CPU heatsink and fan
To uninstall the CPU heatsink and fan:
1. Rotate each fastener counterclockwise.
3. B
A
B
B
A
ASUS P5VDC-MX
1-13 Pull up two fasteners at a
time in a diagonal sequence
to disengage the heatsink
B
and fan assembly from the connector on the motherboard labeled CPU_FAN.
2.
Motherboard DIY Troubleshooting Guide - Page 27
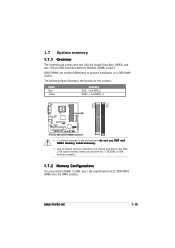
The following figure illustrates the location of the sockets:
Color Blue Yellow
Sockets DDR_1 and DDR_2 DDR2_1 and DDR2_2
P5VDC-MX
DDR2_1 DDR2_2
DDR_1 DDR_2
®
P5VDC-MX DDR DIMM sockets • To prevent damage to the motherboard, d o n o t u s e D D R a n d DDR2 memory simultaneously. • Due to prevent installation on a DDR DIMM socket. 1.7 System memory
1.7.1 Overview
The ...
Motherboard DIY Troubleshooting Guide - Page 31

... to the DDR2 DIMM sockets.
1.7.7 Removing a DDR2 DIMM
Follow these steps to both the motherboard and the components. Simultaneously press the retaining clips outward to unlock the DIMM. Remove the DIMM from the socket.
2
1 DDR2 DIMM notch
ASUS P5VDC-MX
1-19
1.7.6 Installing a DDR2 DIMM(yellow slots)
Unplug the power supply before adding or...
Motherboard DIY Troubleshooting Guide - Page 33

... two PCI groups, making the system unstable and the card inoperable.
D
- -
ASUS P5VDC-MX
1-21 shared - -
1.8.3 Interrupt assignments Standard interrupt assignments
IRQ
Priority
0
1
1
2... Printer Port (LPT1)* System CMOS/Real Time Clock IRQ holder for PCI steering* IRQ...IDE Channel
* These IRQs are usually available for this motherboard
PCI slot 1 PCI slot 2 PCIe x1 slot* ...
Motherboard DIY Troubleshooting Guide - Page 34

When you ask for 1.5v
P5VDC-MX Accelerated Graphics Port (AGP)
Chapter 1: Product introduction The figure shows a network card installed on this motherboard! 3.3V AGP cards are not supported in this motherboard. 1.8.4 PCI slots
The PCI slots support cards such as a LAN card, SCSI card, USB card, and other cards that you buy an AGP card...
Motherboard DIY Troubleshooting Guide - Page 41

... connectors on the fan connectors. Connect the fan cables to allow digital sound output.
Insufficient air flow inside the system may damage the motherboard components. ASUS P5VDC-MX
1-29 CPU and Chassis fan connectors (4-pin CPU_FAN, 3-pin CHA_FAN)
The fan connectors support cooling fans of 350mA~740mA (8.88W max.) or a total of 1A~2.22A...
Motherboard DIY Troubleshooting Guide - Page 43

... separately. Doing so will damage the motherboard! 8. P5VDC-MX
+5V J2B1 J2CX MIDI_OUT J2CY J2B2 MIDI_IN
®
P5VDC-MX Game connector
GAME
+5V J1B1 J1CX GND GND J1CY J1B2 +5V
9. Connect the optional USB/GAME module cable to any of these connectors, then install the module to a slot opening at the back of the system chassis.
Motherboard DIY Troubleshooting Guide - Page 57

... utility described in the future. ASUS P5VDC-MX
2-11 For example, you can change the power management settings. If you are installing a motherboard, reconfiguring your computer in section "2.1 ...; When you start up the computer, the system provides you see on the system chassis. otherwise, POST continues with the opportunity to ensure optimum performance.
See section "2.7 Exit...
Motherboard DIY Troubleshooting Guide - Page 75

... enable or disable RTC to the motherboard, the field shows N/A. If the fan is not connected to generate a wake event. Select Ignored if you do not wish to display the detected fan speed.
Select Ignored if you do not wish to display the detected temperatures. ASUS P5VDC-MX
2-29 Configuration options: [Disabled] [Enabled]
2.5.6 Hardware...
Similar Questions


How To Get Rid Of Chassis Intruded Error In This Motherboard
(Posted by cjpurohit1997 8 years ago)

I Have Just Installed The Above Motherboard But My System Isn't Booting Up
(Posted by Jetibble 10 years ago)


'chassis Intruded.fatal Error... System Halted.
when i switched on my pc, immediatly appears like qustion title. then restart my pc, then windows wo...
when i switched on my pc, immediatly appears like qustion title. then restart my pc, then windows wo...
(Posted by phani2236 11 years ago)