Asus P5GC MX 1333 Support Question
Asus P5GC MX 1333 Support Question
Find answers below for this question about Asus P5GC MX 1333 - Motherboard - Micro ATX.Need a Asus P5GC MX 1333 manual? We have 3 online manuals for this item!
Question posted by piyabandu7d on January 17th, 2023
No Vga Out
no key board work .no display (no VGA out)mouse LED light..processor and other heatzinks are heating
Current Answers
Answer #1: Posted by MercedesAMG on January 17th, 2023 9:25 AM
MercedesAMG

Member since:
January 26th, 2013 Points: 193,710

Member since:
January 26th, 2013 Points: 193,710
The issue with the Asus P5GC MX 1333 not working and showing no display, no keyboard or mouse, and the processor and other heat sinks heating up, could be caused by a few different things. Here are a few steps you can try to troubleshoot the problem:
- Check the power supply: Make sure that the computer is properly plugged in and that the outlet is working. Try plugging it into a different outlet to see if the problem persists.
- Check the connections: Make sure that the keyboard, mouse, and monitor are properly connected to the computer.
- Check the BIOS settings: Make sure that the BIOS settings are configured correctly. You can try resetting the BIOS to the default settings to see if that resolves the issue.
- Check the power button: Make sure that the power button is functioning properly. If the power button is damaged, it may not be able to turn on the computer.
- Check the power supply unit: The issue may be caused by a failing power supply. You can test the power supply with a multimeter and check for the voltage readings.
- Check the graphics card : If the computer has a dedicated graphics card, make sure it is properly seated and that it is functioning properly.
- Check the processor: Make sure that the processor is properly seated and that it is functioning properly. Overheating of the processor could be caused by a malfunctioning cooling fan or thermal paste.
- If none of the above steps resolves the issue, it may be a hardware problem, and you should contact the manufacturer or an authorized service center for further assistance.
Please keep in mind that troubleshooting and repairing a computer can be complex and requires technical knowledge and tools, it is best to let a professional handle it.
Please respond to my effort to provide you with the best possible solution by using the "Acceptable Solution" and/or the "Helpful" buttons when the answer has proven to be helpful. Please feel free to submit further info for your question, if a solution was not provided. I appreciate the opportunity to serve you!
Answer #2: Posted by SonuKumar on January 17th, 2023 9:30 AM
SonuKumar

Member since:
May 9th, 2021 Points: 16,595,890
Member since:
May 9th, 2021 Points: 16,595,890
https://www.asus.com/in/supportonly/p5gc-mx-1333/helpdesk_manual/
follow - english manual and follow troubleshooting guide
Please respond to my effort to provide you with the best possible solution by using the "Acceptable Solution" and/or the "Helpful" buttons when the answer has proven to be helpful.
Regards,
Sonu
Your search handyman for all e-support needs!!
Related Asus P5GC MX 1333 Manual Pages
User Manual - Page 1
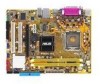
Motherboard
P5GC-MX /1333
User Manual - Page 3
Contents
Notices...vi Safety information vii About this guide viii Typography ix P5GC-MX/1333 specifications summary x
Chapter 1: Product introduction 1.1 Welcome 1-2 1.2 Package contents 1-2 1.3 Special features 1-2
1.3.1 Product highlights 1-2 1.3.2 Innovative ASUS features 1-4 1.4 Before you proceed 1-5 1.5 Motherboard overview 1-6 1.5.1 Placement direction 1-6 1.5.2 Screw holes ...
User Manual - Page 14
....
See page 1-8 for buying an ASUS® P5GC-MX/1333 motherboard! Intel® Core™2 processors can run at a maximum speed of 1333 MHZ FSB on the 65-nanometer (nm) process technology with the list below.
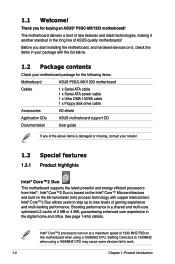
1.2 Package contents
Check your motherboard package for the following items.
Motherboard
ASUS P5GC-MX/1333 motherboard
Cables
1 x Serial ATA cable 1 x Serial ATA power...
User Manual - Page 15
... to 667 MHz. PCI Express™ interface The motherboard fully supports PCI Express, the latest I /O controller hub provide the vital interfaces for PCI Express and high definition audio. ASUS P5GC-MX/1333
1- The dual-channel DDR2 architecture doubles the bandwidth of your system memory to 1-19 for a processor in packets. See pages 1‑15...
User Manual - Page 17
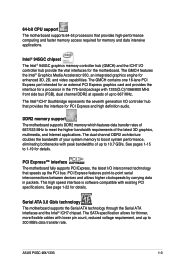
... the location of the following precautions before you install motherboard components or change any motherboard settings.
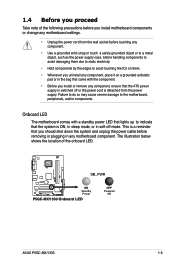
• Unplug the power cord from the power supply. P5GC-MX/1333 R
SB_PWR
ON Standby Power
P5GC-MX/1333 Onboard LED
OFF Powered
Off
ASUS P5GC-MX/1333
1-
1.4 Before you proceed
Take note of the onboard LED. This is detached from the wall socket before touching...
User Manual - Page 18
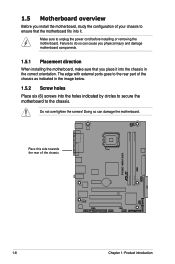
... this side towards the rear of the chassis
P5GC-MX/1333 R
1-
Chapter 1: Product introduction 1.5 Motherboard overview
Before you install the motherboard, study the configuration of your chassis to ensure that you physical injury and damage motherboard components.
1.5.1 Placement direction
When installing the motherboard, make sure that the motherboard fits into it into the chassis in the...
User Manual - Page 20
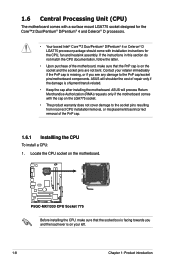
...™2 Duo/Pentium® D/Pentium® 4 or Celeron® D LGA775 processor package should come with the cap on the motherboard. ASUS will process Return Merchandise Authorization (RMA) requests only if the motherboard comes with installation instructions for the CPU, fan and heatsink assembly. P5GC-MX/1333 R
P5GC-MX/1333 CPU Socket 775
Before installing the CPU, make sure that...
User Manual - Page 23
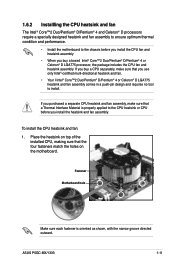
If you buy a boxed Intel® Core™2 Duo/Pentium® D/Pentium® 4 or Celeron® D LGA775 processor, the package includes the CPU fan and heatsink assembly.
ASUS P5GC-MX/1333
1-11
Place the heatsink on the motherboard. To install the CPU heatsink and fan:
1. 1.6.2 Installling the CPU heatsink and fan
The Intel® Core™...
User Manual - Page 24
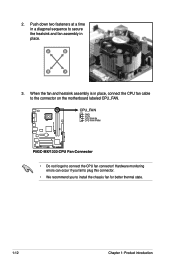
... on the motherboard labeled CPU_FAN. When the fan and heatsink assembly is in place, connect the CPU fan cable to install the chassis fan for better thermal state.
1-12
Chapter 1: Product introduction Push down two fasteners at a time
in
B
place. CPU_FAN
GND +12V CPU FAN IN CPU FAN PWM
P5GC-MX/1333 R
P5GC-MX/1333 CPU Fan...
User Manual - Page 25
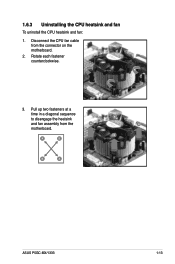
Pull up two fasteners at a
time in a diagonal sequence
to disengage the heatsink
B
and fan assembly from the connector on the motherboard.
2. Disconnect the CPU fan cable from the
A
A
motherboard. Rotate each fastener counterclockwise.
3. B
A
B
B
A
ASUS P5GC-MX/1333
1-13
1.6.3 Uninstalling the CPU heatsink and fan
To uninstall the CPU heatsink and fan:
1.
User Manual - Page 27
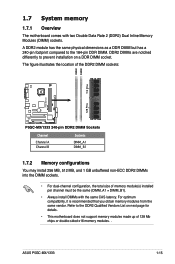
For optimum compatibility, it is recommended that you obtain memory modules from the same vendor. ASUS P5GC-MX/1333
1-15 1.7 System memory
1.7.1 Overview
The motherboard comes with the same CAS latency.
A DDR2 module has the same physical dimensions as a DDR DIMM but has a 240-pin footprint compared to the DDR2 ...
User Manual - Page 31
... from the socket.
2
1 DDR2 DIMM notch
ASUS P5GC-MX/1333
1-19 Align a DIMM on the socket such that it flips out with
extra force.
1
2. Simultaneously press the retaining clips outward to remove a DIMM.
1. Unlock a DIMM socket by pressing the retaining clips outward.
2. Support the DIMM lightly with a notch so that the notch on the...
User Manual - Page 33
...
IRQ holder for PCI steering*
12
PS/2 Compatible Mouse Port*
13
Numeric Data Processor
14
Primary IDE Channel
* These IRQs are usually available for this motherboard
PCI slot 1 PCI slot 2 PCI Express x16 ...IRQ assignments. non-shared -
- ASUS P5GC-MX/1333
1-21 IRQ assignments for ISA or PCI devices. shared -
-
- -
-
-
- shared -
-
-
- shared - -
-
-
-
-
-
-
User Manual - Page 39
ASUS P5GC-MX/1333
1-27 Connect the blue connector to the motherboard's IDE connector, then select one of device(s)
Master Slave Master Slave
Cable ...IDE cable.
• Use the 80-conductor IDE cable for Ultra DMA 100/66/33 signal cables. P5GC-MX/1333 R
PRI_IDE
P5GC-MX/1333 IDE Connector
Single device Two devices
Drive jumper setting Cable-Select or Master Cable-Select
Master Slave
Mode ...
User Manual - Page 41
...~2.2A (26.4W max.) at +12V.
Insufficient air flow inside the system may damage the motherboard components. ASUS P5GC-MX/1333
1-29 Digital Audio connector (4-1 pin SPDIF_OUT) This connector is purchased separately.
DO NOT place jumper caps on the motherboard, making sure that the black wire of each cable matches the ground pin of the...
User Manual - Page 42

...not boot up if the power is inadequate.
• The ATX 12 V Specification 2.0-compliant PSU passed the motherboard power requirement test with the following configuration:
CPU
:
Memory
:
...with a higher power rating if you intent to install additional devices. ATX12V
EATXPWR
P5GC-MX/1333 R
+12V DC GND
P5GC-MX/1333 ATX Power Connector
+12V DC +3 Volts
GND
+12 Volts
+12 Volts
+5V...
User Manual - Page 43

ASUS P5GC-MX/1333
1-31
Doing so will damage the motherboard! The USB module is purchased separately.
CD (black)
P5GC-MX/1333 R
Right Audio Channel Ground Ground Left Audio Channel
P5GC-MX/1333 Internal Audio Connector
Enable the CD-IN function in the audio utility when using this connector.
8. USB connectors (10-1 pin USB56, USB78) These connectors are ...
User Manual - Page 44
...)
+5VSB_MB
P5GC-MX/1333 Intrusion Connector
1-32
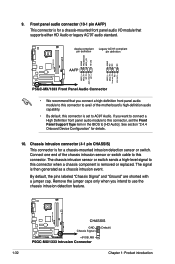
Chapter 1: Product introduction Chassis intrusion connector (4-1 pin CHASSIS) This connector is then generated as a chassis intrusion event. Front panel audio connector (10-1 pin AAFP)
This connector is set the Front Panel Support Type item in the BIOS to [HD Audio]. 9. Connect one end of the motherboard's high...
User Manual - Page 45
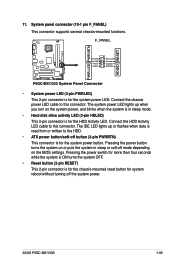
... chassis-mounted reset button for the system power button.
ASUS P5GC-MX/1333
1-33 11. F_PANEL
P5GC-MX/1333 R
PWR LED PWR BTN HDLED RESET
GND PWR PLEDPLED+
Reset Ground IDELEDIDELED+
P5GC-MX/1333 System Panel Connector
• System power LED (2-pin PWRLED)
This 2-pin connector is for the system power LED. System panel connector (10-1 pin F_PANEL) This connector supports several...
User Manual - Page 49
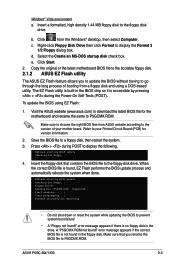
... BIOS without having to go through the long process of your Printed Circuit Board (PCB) for the motherboard and rename the same to P5GCMX.ROM.
Floppy found !" Completed. Start ...display the Format 3 1/2 Floppy dialog box. Right-click Floppy Disk Drive then click Format to a floppy disk, then restart the system. 3.
ASUS P5GC-MX/1333
2- e. Copy the original or the latest motherboard...
Similar Questions

F2
Hi my motherboard when I turn it's on its always not displaying always code F2 can u guys help
Hi my motherboard when I turn it's on its always not displaying always code F2 can u guys help
(Posted by xcelimpilo 6 months ago)

Which Graphics Is Compatible For This Graphic Card
Which graphics is compatible for this graphic card
Which graphics is compatible for this graphic card
(Posted by Anonymous-174181 10 months ago)

Asus P5n-em Hdmi - Motherboard - Micro Atx - Lga775 Socket - Geforce 7100
Is this motherboard supported in windows 7 ?
Is this motherboard supported in windows 7 ?
(Posted by jgferguson 9 years ago)

No Audio
how can i locate the audio circuit onboard of a p5gcmx motherboard
how can i locate the audio circuit onboard of a p5gcmx motherboard
(Posted by gualbertogalimba 11 years ago)

Asus P5-gc Mx/1333 Mother Board It Is Giving The Eror 'cpu Overclocking Eror'
(Posted by kpsadique 13 years ago)