Acer S240HL Support Question
Acer S240HL Support Question
Find answers below for this question about Acer S240HL.Need a Acer S240HL manual? We have 1 online manual for this item!
Question posted by harry17704 on July 10th, 2012
Where Is The Power Button?
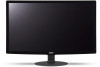
Which of the five buttons on the bottom of the monitor is the power button? The manual shows icons for each button but there are no icons on the buttons. There is no map of button positions in the manual. I have tried pressing all five buttons but nothing happens.
Current Answers
Answer #1: Posted by david28003 on July 15th, 2012 2:59 AM
david28003

Member since:
July 15th, 2012 Points: 3,250
Member since:
July 15th, 2012 Points: 3,250


Related Acer S240HL Manual Pages
User Manual - Page 2
...or changes. Record the model number, serial number, purchase date and place of this manual or supplementary documents and publications. Other companies' product names or trademarks are registered trademarks... for a particular purpose. Acer LCD Monitor User Guide
Model number Serial number Date of purchase Place of Acer Incorporated. Acer LCD Monitor User Guide Original Issue: 03/2010
...
User Manual - Page 3

Keep this case, the screen is displayed for future reference. Turn off the power switch for your monitor
Please carefully follow these instructions carefully.
Follow all the time.
• Due to the nature of the previous screen
may flicker during
initial use .
• ...
User Manual - Page 4

...and openings are not sure of the type of power available, consult your hearing, follow these instructions.
...power cord. When you .
Never spill liquid of any kind onto or into the product.
• To avoid damage of internal components and to prevent battery leakage,
do not place the product on a vibrating surface.
• Never use this product near water. • Do not place this monitor...
User Manual - Page 5
...yourself, as opening or removing covers may result in performance, indicating a need
to replace the power cord set, make sure that the total rating of all servicing to rain or water •...the plug into the wall outlet does not exceed the fuse rating.
• Do not overload a power outlet, strip or receptacle by other risks. Contact your electrician for service
• the product does ...
User Manual - Page 7

... immediately and inform your company's health and safety department. The following section provides tips for power management:
• Activate display's Sleep mode within 15 minutes of user inactivity. •...also at risk of the monitor, using a footrest, or raising your leg
muscles Finding your comfort zone
Find your comfort zone by pushing the power button. Nevertheless, some pixels ...
User Manual - Page 8

...; placing your display in such a way that the side faces the window or any light source
• minimizing room light by looking away from the monitor and
focusing on how to reduce eyestrain.
User Manual - Page 9
TABLE OF CONTENTS
UNPACKING 1 ATTACHING / REMOVING THE BASE 2 SCREEN POSITION ADJUSTMENT 2 CONNECTING THE POWER CORD 3 SAFETY PRECAUTION 3 CLEANING YOUR MONITOR 3 POWER SAVING 4 DDC...4 CONNECTOR PIN ASSIGNMENT 5 STANDARD TIMING TABLE 7 INSTALLATION 8 USER CONTROLS 9 TROUBLESHOOTING 15
User Manual - Page 10
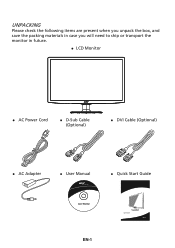
UNPACKING
Please check the following items are present when you unpack the box, and save the packing materials in case you will need to ship or transport the monitor in future.
LCD Monitor
AC Power Cord
D-Sub Cable (Optional)
DVI Cable (Optional)
AC Adapter
User Manual
Quick Start Guide
EN-1
User Manual - Page 11
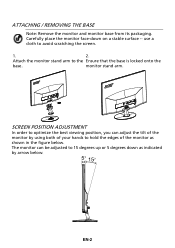
... hold the edges of the monitor as indicated by using both of the monitor by arrow below .
SCREEN POSITION ADJUSTMENT
In order to optimize the best viewing position, you can be adjusted to avoid scratching the screen.
1.
2. ATTACHING / REMOVING THE BASE
Note: Remove the monitor and monitor base from its packaging. The monitor can adjust the tilt...
User Manual - Page 12
... a Cord Set consisting of H05VV-F cord and plug rated 10 A, 250 V. The cord set should have the appropriate safety approvals for your area.
This monitor has a universal power supply that allows operation in either 100/120V AC or 220/240 V AC voltage area.
SAFETY PRECAUTION
Avoid placing the...
User Manual - Page 13
... example, supported resolutions and corresponding timing.
The monitor supports DDC2B standard.
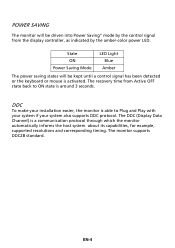
State ON Power Saving Mode
LED Light Blue
Amber
The power saving states will be kept until a control signal has been detected or the keyboard or mouse is activated. POWER SAVING
The monitor will be driven into Power Saving" mode by the control signal from...
User Manual - Page 14

CONNECTOR PIN ASSIGNMENT
15-Pin Color Display Signal Cable
PIN NO. 1. 2. 3. 4. 5. 6. 7. 8. DESCRIPTION +5V
Logic Ground Monitor Ground DDC-Serial Data
H-Sync V-Sync DDC-Serial Clock
EN-5 DESCRIPTION Red
Green Blue Monitor Ground DDC-return R-Ground G-Ground B-Ground
PIN NO. 9. 10. 11. 12. 13. 14. 15.
User Manual - Page 15
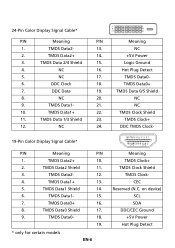
... 0/5 Shield
8. NC
9. TMDS Clock Shield
11.
TMDS Data1-
15.
7. TMDS Data0+
16.
8. on device)
SCL SDA DDC/CEC Ground +5V Power Hot Plug Detect TMDS Data2-
13. TMDS Data2+
14.
+5V Power
3.
Hot Plug Detect
5.
DDC Clock
18.
NC
24.
TMDS Data1 Shield
14.
6. CEC Reserved (N.C. TMDS Data0-
6.
NC
20.
TMDS Data2...
User Manual - Page 17

... VGA video cable to your host system, please follow the steps as given below: Steps 1. 1-1 Connect Video Cable
a. Power-ON Monitor and Computer Power-ON the monitor first, then power-ON the computer. INSTALLATION
To install the monitor to the computer. 1-2 Connect Digital Cable (Only Dual-input model) a. b. DC
D-Sub DVI
HDMI
D
DC IN HDMI
DVI...
User Manual - Page 18

... to activate the OSD menu. MENU OSD functions Press this button to activate the Auto Adjustment function.
EN-9 USER CONTROLS
Base Controls
Power Switch / Power LED: To turn the monitor ON or OFF. The Auto Adjustment function is active, press the Minus or Plus buttons to set the HPos, VPos, Clock and Focus. Lights up...
User Manual - Page 19
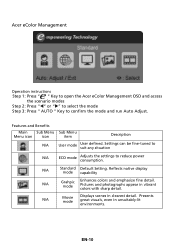
...;" or "" to select the mode Step 3: Press " AUTO " Key to reduce power consumption. N/A
Standard Default Setting. Pictures and photographs appear in unsuitably-lit environments. Reflects native ...colors and emphasize fine detail.
Features and Benefits
Main Sub Menu Sub Menu
Menu icon
icon
item
Description
N/A
User mode
User defined. Settings can be fine-tuned to suit ...
User Manual - Page 24
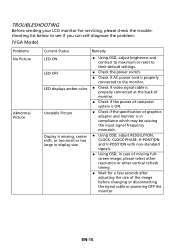
... properly connected at the back of monitor.
Check if the power of computer system is ON.
Check if the specification of graphics adapter and monitor is in compliance which may be causing the input signal frequency mismatch.
Using OSD, adjust RESOLUTION, CLOCK, CLOCK-PHASE, H-POSITION and V-POSITION with non-standard signals.
...
User Manual - Page 25
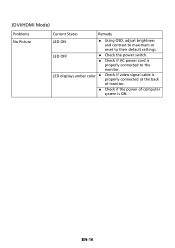
... Picture
Current Status
Remedy
LED ON
Using OSD, adjust brightness and contrast to maximum or reset to the monitor. EN-16 LED OFF
Check the power switch.
Check if AC power cord is ON.
LED displays amber color Check if video signal cable is properly connected at the back...
User Manual - Page 26
...) Italy Tel: +39-02-939-921, Fax: +39-02 9399-2913 www.acer.it
Hereby declare that: Product: Trade Name: Model Number: SKU Number:
LCD Monitor Acer S240HL S240HL 0~9, a ~ z, or A ~ Z)
Is compliant with the essential requirements and other relevant provisions of the following EC directives, and that production units of certain Hazardous Substances...
User Manual - Page 27
... for this device must accept any interference received, including interference that may not cause harmful interference, and (2) this declaration:
Product: Model Number: SKU Number:
LCD Monitor
S240HL
S240HL 0~9, a ~ z, or A ~ Z)
Name of Responsible Party: Address of the FCC Rules. Acer Representative
Phone No.:
254-298-4000
Fax No.:
254-298-4147 The following two...
Similar Questions


Acer S200hl Power Button Not Working
I have an Acer S200HL for many months, the power button is good after the purchase but after turning...
I have an Acer S200HL for many months, the power button is good after the purchase but after turning...
(Posted by jrvignacio 9 years ago)


Acer S240hl Monitor Unable To Alter Brightness
I have the Acer S240HL monitor. All setup and working with VGA cable connected but unable to alter t...
I have the Acer S240HL monitor. All setup and working with VGA cable connected but unable to alter t...
(Posted by tsrios 10 years ago)

Which Is The And - Buttons To Adjust Colour & Brightness On The Acer S240hl
(Posted by brumant48 10 years ago)