
Acer EK240Y Support Question
Acer EK240Y Support Question
Find answers below for this question about Acer EK240Y.Need a Acer EK240Y manual? We have 1 online manual for this item!
Question posted by vignestrade on February 20th, 2023
I Dont Find Power Button?
I dont find Power Button?
Current Answers
Answer #1: Posted by SonuKumar on February 20th, 2023 8:36 AM
SonuKumar

Member since:
May 9th, 2021 Points: 16,627,780

Member since:
May 9th, 2021 Points: 16,627,780
The Acer EK240Y is a monitor that doesn't come with a built-in power button. Instead, it is designed to turn on automatically when it is connected to a power source and a signal source, such as a computer.
To turn off the monitor, you can either unplug it from the power source or turn off the computer that it is connected to. Alternatively, you can enable the power-saving mode on the monitor, which will turn off the screen after a certain period of inactivity.
If you are having trouble getting the monitor to turn on, make sure that it is properly connected to both the power source and the signal source. If the problem persists, you may want to contact Acer customer support for further assistance.
Please respond to my effort to provide you with the best possible solution by using the "Acceptable Solution" and/or the "Helpful" buttons when the answer has proven to be helpful.
Regards,
Sonu
Your search handyman for all e-support needs!!
Answer #2: Posted by khanjee on February 20th, 2023 11:46 AM
khanjee

Member since:
July 23rd, 2016 Points: 205,300
Member since:
July 23rd, 2016 Points: 205,300
Please Accept my answer by providing you with the best possible solution. Would be more glade.
THANK YOU
Related Acer EK240Y Manual Pages
User Manual - Page 2
...belong to their respective companies.
Acer Incorporated. All correspondence concerning your computer. Acer LCD Monitor User Guide
Model number Serial number Date of purchase Place of purchase
Acer and the... Acer logo are used herein for a particular purpose. Acer LCD Monitor User Guide Original Issue: 10/2017
Changes may be incorporated in the space provided ...
User Manual - Page 3
... system by
• uIfntphluegsgyinstgemall hpaoswmerualtdiappletesrosufrrocems tohfeppoowweerr,sduipscpolinesn.ect power from the
system by changing the image or turning off the power switch for hours. Keep this case, the screen is purposed for future reference. iii
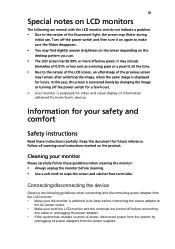
Special notes on LCD monitors
The following are turned off before connecting aMnaykceabsulereorbuontphluthggeinLgCDthme...
User Manual - Page 4
...stand or table. If you are provided for ventilation to ensure reliable
operation of power indicated on the power cord. Do not locate this
product where people will probably cause unexpected short current ...a built-in a fire or electric shock. iv
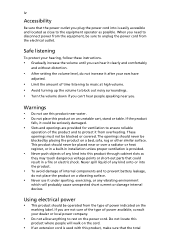
Accessibility
Be sure that the power outlet you plug the power cord into is easily accessible and located as close to the equipment operator as
...
User Manual - Page 5
...ermatpetdto7 sAer1v2ic5eVthmisinpirmoudmuc,tVyDoEuraspelpfr,oavseodpoerniintsgeoqruriveamleonvtin, 4g.5covers
•may interfere with a three-wire grounded plug.
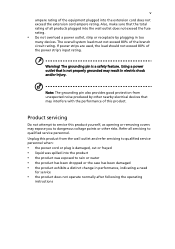
fTithseinovaegrarollusnysdteedmploowadermouusttlento. Make sure the power outlet
is equipped with a three-wire grounded plug. Do not insert the pluWg ainrntoinag!noTnhe-ggrorouunnddeidngpopwinerisoaustalefte.tCyofenatatuctrey...
User Manual - Page 8
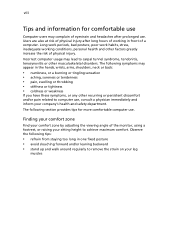
...mode by pushing the power button. CInocmorpreucttercoumseprsumtear yuscaogmepmlaainy olefaedyteostcraarinpaalntdunhneealdsaycnhdersoamftee,rtpenrodloonnigtiesd... vides coldness or weakness
tips
for power management:
• Activate display's Sleep mode within 30 minutes of the monitor, using a
Tfohoetfroesllto, worinrgaisseincgtioynouprrosivttidinegs thiepisgfhotrtmo ...
User Manual - Page 10
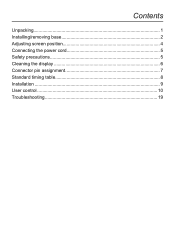
Contents
Unpacking 1 Installing/removing base 2 Adjusting screen position 4 Connecting the power cord 5 Safety precautions 5 Cleaning the display 6 Connector pin assignment 7 Standard timing table 8 Installation 9 User control 10 Troubleshooting 19
User Manual - Page 11
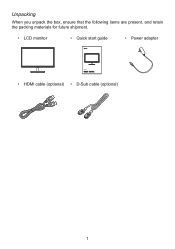
Unpacking
When you unpack the box, ensure that the following items are present, and retain the packing materials for future shipment.
• LCD monitor
• Quick start guide
• Power adapter
LCD Monitor
USER GUIDE
• HDMI cable (optional) • D-Sub cable (optional)
1
User Manual - Page 13
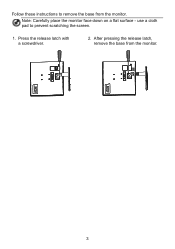
Press the release latch with a screwdriver.
2. Note: Carefully place the monitor face down on a flat surface -
After pressing the release latch, remove the base from the monitor. use a cloth pad to remove the base from the monitor.
3 Follow these instructions to prevent scratching the screen.
1.
User Manual - Page 15

... dust, as this may shine on 100/120 volts or 220/240 volts AC. Cleaning the display
When you clean the monitor, follow the instructions carefully. • Before cleaning, unplug the monitor's power adapter. • Use a soft cloth to gently wipe the screen and the front and sides of an overly bright background...
User Manual - Page 17
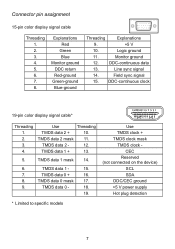
... signal cable*
Threading 1. 2. 3. 4.
TMDS data 1 -
15.
7. TMDS data 0 mask 17.
9. TMDS data 1 mask 14.
6.
TMDS data 0 +
16.
8.
TMDS data 2 mask 11. Explanations Red Green Blue
Monitor ground DDC return Red-ground
Green-ground Blue-ground
Threading
Explanations
9.
+5 V
10.
TMDS data 2 -
12.
Line sync signal
14...
User Manual - Page 19
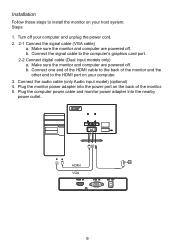
... signal cable to install the monitor on your computer. 3. Make sure the monitor and computer are powered off. HHDDMMII VVGGAA
9 Plug the computer power cable and monitor power adapter into the power port on the back of the monitor and the
other end to the HDMI port on your computer and unplug the power cord. 2. 2-1 Connect the signal cable...
User Manual - Page 20
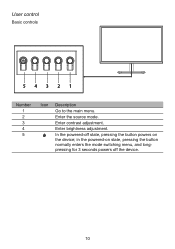
Enter contrast adjustment. Enter brightness adjustment.
in the powered-on the device; In the powered-off state, pressing the button powers on state, pressing the button normally enters the mode switching menu, and longpressing for 3 seconds powers off the device.
10 Enter the source mode. User control
Basic controls
54321
Number 1 2 3 4 5
Icon Description
Go to the main menu.
User Manual - Page 21
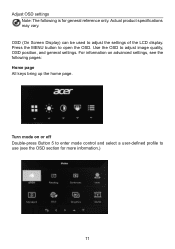
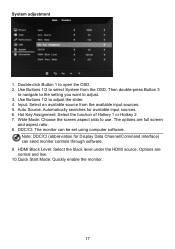
...OSD position, and general settings.
Use the OSD to adjust the settings of the LCD display. Press the MENU button to use (see the following is for more information.)
11 Adjust OSD settings Note: The following pages: Home ...OSD section for general reference only. For information on or off Double-press Button 5 to enter mode control and select a user-defined profile to open the OSD.
User Manual - Page 22

... degree of difference between light and dark. 5. Contrast: Contrast can be adjusted from the OSD. When finished, use Buttons 1/2/3/4 to adjust the settings you want to adjust. 3. Double-press Button 1 to adjust the slider. 4. Use Buttons 1/2 to select the Picture from 0 to the setting you need. Picture adjustment
1. Note: Adjusts the balance between...
User Manual - Page 24

...choose Cool, Warm, Normal,
Blue Light or custom User Settings. 6. sRGB Mode is warm. Use Buttons 1/2 to select Color from the OSD. Gamma Mode allows you want to improve the color matching display .... 14 The default value
is 2.2 (the standard value for Windows). 5. Then double-press Button 3 to
navigate to the setting you to open the OSD. 2. Modes: Select the preferred mode. 7. Use...
User Manual - Page 25

Performance adjustment
1. Use Buttons 1/2 to adjust the slider.
15 Use Buttons 1/2 to select Performance from the OSD. Then double-press
Button 3 to navigate to the setting you want to open the OSD. 2. Double-click Button 1 to adjust. 3.
User Manual - Page 26

... disappears. Language: Set the OSD menu language. 5. Transparency can
be 0% (off), 20%, 40%, 60%, or 80%. 7. Double-click Button 1 to prevent the OSD button from the OSD. If the OSD lock persists, check if Buttons 1/2 are functioning.
16 OSD adjustment
1. OSD Timeout: Adjust the delay before closing the OSD menu. 6. OSD Lock: The...
User Manual - Page 27
... Source: Automatically searches for Display Data Channel/Command Interface) can be set using computer software. DDC/CI: The monitor can send monitor controls through software. 9. Note: DDC/CI (abbreviation for available input sources. 6. Use Buttons 1/2 to adjust. 3. Input: Select an available source from the OSD. Hot Key Assignment: Select the function of Hotkey...
User Manual - Page 29
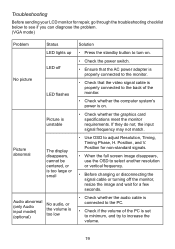
... low
Solution
• Press the standby button to turn on.
• Check the power switch.
• Ensure that the AC power adapter is properly connected to the monitor.
• Check that the video signal...cable is connected to the PC.
• Check if the volume of the monitor.
• Check whether the computer system's power is set to minimum, and try to increase the volume.
19 If they do...
User Manual - Page 30
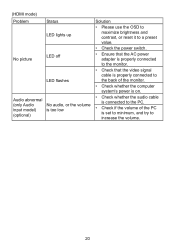
..., or reset it to a preset value.
• Check the power switch.
• Ensure that the AC power adapter is properly connected to the monitor.
• Check that the video signal cable is properly connected to... the back of the monitor.
• Check whether the computer system's power is on.
• Check whether the audio cable is connected to...
Similar Questions

Display No But Power Button Blinking Why
i use Windows 10 64 bit version i5 processer i bought recently acerp166hql 15.6 inches backlit led m...
i use Windows 10 64 bit version i5 processer i bought recently acerp166hql 15.6 inches backlit led m...
(Posted by jyothiraghu39 2 years ago)

Acer S200hl Power Button Not Working
I have an Acer S200HL for many months, the power button is good after the purchase but after turning...
I have an Acer S200HL for many months, the power button is good after the purchase but after turning...
(Posted by jrvignacio 9 years ago)

Where Is The Power Button?
Which of the five buttons on the bottom of the monitor is the power button? The manual shows icons f...
Which of the five buttons on the bottom of the monitor is the power button? The manual shows icons f...
(Posted by harry17704 11 years ago)

Power Button For Acer S202hl?
I am having difficulty locating the actual Power Button for this monitor. The monitor will not come ...
I am having difficulty locating the actual Power Button for this monitor. The monitor will not come ...
(Posted by Wautash 12 years ago)