eMachines Desktop PC User Guide
Page 5
www.emachines.com Chapter 6: Customizing Windows 57 Adjusting the screen and desktop settings 58 Adjusting the color depth 58 Adjusting the screen resolution 59 Changing the colors ... television settings 66 Changing the mouse settings 67 Adding and modifying user accounts 67 Changing power-saving settings 69 Changing the power scheme 69 Changing advanced power settings 69 Activating and using Hibernate mode 70 Installing an uninterruptible power supply 71 Chapter 7: Protecting Your Computer 73 Hardware security 74 Kensington lock slot 74 Data security...
www.emachines.com Chapter 6: Customizing Windows 57 Adjusting the screen and desktop settings 58 Adjusting the color depth 58 Adjusting the screen resolution 59 Changing the colors ... television settings 66 Changing the mouse settings 67 Adding and modifying user accounts 67 Changing power-saving settings 69 Changing the power scheme 69 Changing advanced power settings 69 Activating and using Hibernate mode 70 Installing an uninterruptible power supply 71 Chapter 7: Protecting Your Computer 73 Hardware security 74 Kensington lock slot 74 Data security...
eMachines Desktop PC User Guide
Page 77
... View, click Performance and Maintenance. 2 Click/Double-click the Power Options icon. The Power Options Properties dialog box opens. 71 www.emachines.com 3 Click the Hibernate tab. 4 Click the Enable hibernation check box, then click Apply. Installing an uninterruptible power supply To install an uninterruptible power supply (UPS): Help For more information about setting up an uninterruptible...
... View, click Performance and Maintenance. 2 Click/Double-click the Power Options icon. The Power Options Properties dialog box opens. 71 www.emachines.com 3 Click the Hibernate tab. 4 Click the Enable hibernation check box, then click Apply. Installing an uninterruptible power supply To install an uninterruptible power supply (UPS): Help For more information about setting up an uninterruptible...
eMachines Desktop PC User Guide
Page 91
....emachines.com O online help 2, 3 opening documents 16 files 7 files across network 54 folders 9 programs 7 P pasting files and folders 10, 18 text and graphics 18 playing audio CD 33 audio file 32, 33 Media Player file 33 multimedia files 33 music CD 33 Windows Media Player file 33 power ...advanced settings 69 changing advanced settings 69 changing schemes 69 Hibernate mode 70 schemes 69 using UPS 71 power supply uninterruptible 71 printer sharing 53 printing documents 17 files across network 55 Program Guide ...
....emachines.com O online help 2, 3 opening documents 16 files 7 files across network 54 folders 9 programs 7 P pasting files and folders 10, 18 text and graphics 18 playing audio CD 33 audio file 32, 33 Media Player file 33 multimedia files 33 music CD 33 Windows Media Player file 33 power ...advanced settings 69 changing advanced settings 69 changing schemes 69 Hibernate mode 70 schemes 69 using UPS 71 power supply uninterruptible 71 printer sharing 53 printing documents 17 files across network 55 Program Guide ...
8512635 - eMachines Desktop Hardware Reference Guide
Page 21
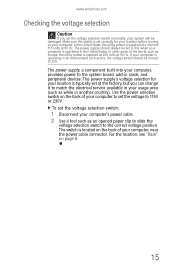
www.emachines.com Checking the voltage selection Caution If you can change it to match the electrical service available in your computer. In other areas of your computer to set the voltage to 115V or 230V. For the location, see "Back" on the back of your computer's power cable...sure this , the voltage switch should always be damaged. In the United States, the utility power is set the voltage selection switch: 1 Disconnect your computer, near the power cable connector. The power supply's voltage selection for your location before turning on the back of the world, such as Europe...
www.emachines.com Checking the voltage selection Caution If you can change it to match the electrical service available in your computer. In other areas of your computer to set the voltage to 115V or 230V. For the location, see "Back" on the back of your computer's power cable...sure this , the voltage switch should always be damaged. In the United States, the utility power is set the voltage selection switch: 1 Disconnect your computer, near the power cable connector. The power supply's voltage selection for your location before turning on the back of the world, such as Europe...
8512635 - eMachines Desktop Hardware Reference Guide
Page 53
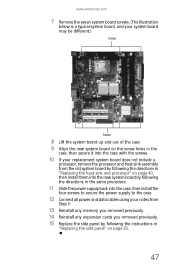
www.emachines.com 7 Remove the seven system board screws. (The illustration below is a typical system board, and your system board may be different.) Screws Screws 8 Lift the ... into the new system board by following the directions in the same procedure. 11 Slide the power supply back into the case, then install the four screws to secure the power supply to the case. 12 Connect all power and data cables using your notes from Step 5. 13 Reinstall any memory you removed previously. 14...
www.emachines.com 7 Remove the seven system board screws. (The illustration below is a typical system board, and your system board may be different.) Screws Screws 8 Lift the ... into the new system board by following the directions in the same procedure. 11 Slide the power supply back into the case, then install the four screws to secure the power supply to the case. 12 Connect all power and data cables using your notes from Step 5. 13 Reinstall any memory you removed previously. 14...
8512635 - eMachines Desktop Hardware Reference Guide
Page 99
www.emachines.com Caution The Full System Restore option deletes all files on . • If a peripheral device, ... software up all cables are done. You still need at least 4 GB of Windows XP. This process deletes your computer is supplying power. Format and Recover dialog box opens. 6 Click Yes. When file recovery has finished, the System Restore dialog box opens. Your...program settings reconfigured. The System Restore - Make sure that is connected correctly to a grounded AC power outlet that you back up to bring your existing data files, but all USB peripheral devices.
www.emachines.com Caution The Full System Restore option deletes all files on . • If a peripheral device, ... software up all cables are done. You still need at least 4 GB of Windows XP. This process deletes your computer is supplying power. Format and Recover dialog box opens. 6 Click Yes. When file recovery has finished, the System Restore dialog box opens. Your...program settings reconfigured. The System Restore - Make sure that is connected correctly to a grounded AC power outlet that you back up to bring your existing data files, but all USB peripheral devices.
8512635 - eMachines Desktop Hardware Reference Guide
Page 119
www.emachines.com screen 69, 82 screen area 82 screen resolution 82 technical support 93 telephone support 93 Web site connection speed 73 Windows Media Center 75 turning off computer 7, 18 turning on computer 7, 17 tutoring fee-based 95 U uninterruptible power supply (UPS) 14 updating Windows 54 UPS 14 USB port 7, 9, 27 V volume adjusting 25 adjusting modem 82 controls 25 muting 25 troubleshooting 88 W Windows key 20 Windows Media Center troubleshooting 75 Windows Product Key Code 3 Windows Update 54 wired Ethernet troubleshooting 70 working safely 12 Z Zip drive 60 Zip drive port 9 113
www.emachines.com screen 69, 82 screen area 82 screen resolution 82 technical support 93 telephone support 93 Web site connection speed 73 Windows Media Center 75 turning off computer 7, 18 turning on computer 7, 17 tutoring fee-based 95 U uninterruptible power supply (UPS) 14 updating Windows 54 UPS 14 USB port 7, 9, 27 V volume adjusting 25 adjusting modem 82 controls 25 muting 25 troubleshooting 88 W Windows key 20 Windows Media Center troubleshooting 75 Windows Product Key Code 3 Windows Update 54 wired Ethernet troubleshooting 70 working safely 12 Z Zip drive 60 Zip drive port 9 113


