
User Guide
Page 44
...in the original packaging materials. ■ Keep diskettes and your computer away from your computer's operating system, software, and hardware. www.eMachines.com Windows Update scans your computer and provides you with a tailored selection of Windows that you can clog the internal mechanisms. ■...; Do not block the ventilation fan. ■ When storing your computer for an extended period of your computer: ■ When transporting your computer, we recommend that ...
...in the original packaging materials. ■ Keep diskettes and your computer away from your computer's operating system, software, and hardware. www.eMachines.com Windows Update scans your computer and provides you with a tailored selection of Windows that you can clog the internal mechanisms. ■...; Do not block the ventilation fan. ■ When storing your computer for an extended period of your computer: ■ When transporting your computer, we recommend that ...
User Guide
Page 74
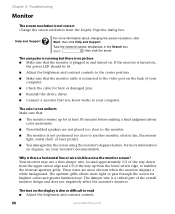
...box , then click the arrow. The color is not positioned too close to read ■ Adjust the brightness and contrast controls. 68 www.eMachines.com Your monitor may use a thin damper wire, located approximately 1/3 of the way down from the upper screen edge and 1/3 of the ... damaged pins. ■ Reinstall the device driver. ■ Connect a monitor that the monitor cable is dim or difficult to another monitor, electric fan, fluorescent light, metal shelf, or laser printer. ■ You demagnetize the screen using the monitor's degauss feature. The damper wire is not correct...
...box , then click the arrow. The color is not positioned too close to read ■ Adjust the brightness and contrast controls. 68 www.eMachines.com Your monitor may use a thin damper wire, located approximately 1/3 of the way down from the upper screen edge and 1/3 of the ... damaged pins. ■ Reinstall the device driver. ■ Connect a monitor that the monitor cable is dim or difficult to another monitor, electric fan, fluorescent light, metal shelf, or laser printer. ■ You demagnetize the screen using the monitor's degauss feature. The damper wire is not correct...
NG3 Hardware Reference
Page 6
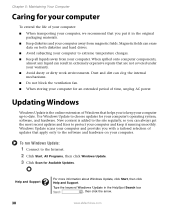
www.emachines.com Contents Updating Windows 142 BigFix 142 Managing hard drive space 143 Checking hard drive space 143 Using Disk Cleanup 143 Checking the hard drive ... battery 159 Adding or replacing a CD or DVD drive 160 Replacing the memory card reader 162 Adding or replacing a hard drive 163 Replacing the rear fan 165 Replacing the power supply 166 Replacing the heat sink 167 Replacing the front I/O panel 168 Adding or replacing an expansion card 171 Replacing the...
www.emachines.com Contents Updating Windows 142 BigFix 142 Managing hard drive space 143 Checking hard drive space 143 Using Disk Cleanup 143 Checking the hard drive ... battery 159 Adding or replacing a CD or DVD drive 160 Replacing the memory card reader 162 Adding or replacing a hard drive 163 Replacing the rear fan 165 Replacing the power supply 166 Replacing the heat sink 167 Replacing the front I/O panel 168 Adding or replacing an expansion card 171 Replacing the...
NG3 Hardware Reference
Page 26
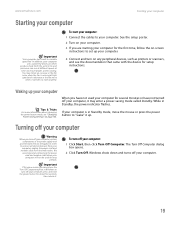
...To turn off your computer Important Your computer has a built-in Windows to "wake" it may notice an increase in the fan noise when the fan is in Standby, the power indicator flashes. In order to ensure proper system cooling. Windows shuts down and turns off your ...computer, it up your computer uses a powerful processor which produces heat. www.emachines.com Starting your computer Starting your computer. 19 While in...
...To turn off your computer Important Your computer has a built-in Windows to "wake" it may notice an increase in the fan noise when the fan is in Standby, the power indicator flashes. In order to ensure proper system cooling. Windows shuts down and turns off your ...computer, it up your computer uses a powerful processor which produces heat. www.emachines.com Starting your computer Starting your computer. 19 While in...
NG3 Hardware Reference
Page 147
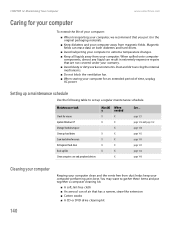
... Dust and dirt can of air that are not covered under your computer performing at its best. CHAPTER 12: Maintaining Your Computer www.emachines.com Caring for your computer To extend the life of your computer: ■ When transporting your computer, we recommend that you put together...computer cleaning kit: ■ A soft, lint-free cloth ■ An aerosol can clog the internal mechanisms. ■ Do not block the ventilation fan. ■ When storing your computer away from your computer. Magnetic fields can erase data on both diskettes and hard drives. ■ Avoid subjecting ...
... Dust and dirt can of air that are not covered under your computer performing at its best. CHAPTER 12: Maintaining Your Computer www.emachines.com Caring for your computer To extend the life of your computer: ■ When transporting your computer, we recommend that you put together...computer cleaning kit: ■ A soft, lint-free cloth ■ An aerosol can clog the internal mechanisms. ■ Do not block the ventilation fan. ■ When storing your computer away from your computer. Magnetic fields can erase data on both diskettes and hard drives. ■ Avoid subjecting ...
NG3 Hardware Reference
Page 160
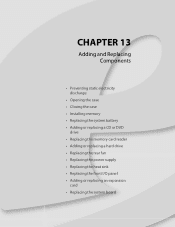
CHAPTER 13 Adding and Replacing Components • Preventing static electricity discharge • Opening the case • Closing the case • Installing memory • Replacing the system battery • Adding or replacing a CD or DVD drive • Replacing the memory card reader • Adding or replacing a hard drive • Replacing the rear fan • Replacing the power supply • Replacing the heat sink • Replacing the front I/O panel • Adding or replacing an expansion card • Replacing the system board
CHAPTER 13 Adding and Replacing Components • Preventing static electricity discharge • Opening the case • Closing the case • Installing memory • Replacing the system battery • Adding or replacing a CD or DVD drive • Replacing the memory card reader • Adding or replacing a hard drive • Replacing the rear fan • Replacing the power supply • Replacing the heat sink • Replacing the front I/O panel • Adding or replacing an expansion card • Replacing the system board
NG3 Hardware Reference
Page 172
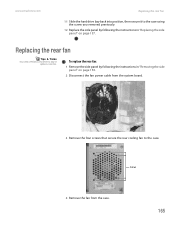
... the system board. 3 Remove the four screws that secure the rear cooling fan to the case. Replacing the rear fan Tips & Tricks You need a Phillips screwdriver to add or replace a rear fan. www.emachines.com Replacing the rear fan 11 Slide the hard drive bay back into position, then secure it to the case using...
... the system board. 3 Remove the four screws that secure the rear cooling fan to the case. Replacing the rear fan Tips & Tricks You need a Phillips screwdriver to add or replace a rear fan. www.emachines.com Replacing the rear fan 11 Slide the hard drive bay back into position, then secure it to the case using...
NG3 Hardware Reference
Page 173
... supply forward about one inch. 166 The arrows on the new fan must be pointed toward the back of the case for correct air flow. 6 Connect the new fan's power cable to the case. CHAPTER 13: Adding and Replacing Components www.emachines.com 5 Use the four screws you removed previously to secure the...
... supply forward about one inch. 166 The arrows on the new fan must be pointed toward the back of the case for correct air flow. 6 Connect the new fan's power cable to the case. CHAPTER 13: Adding and Replacing Components www.emachines.com 5 Use the four screws you removed previously to secure the...
NG3 Hardware Reference
Page 174
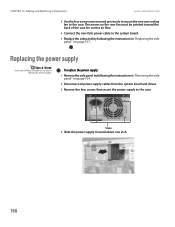
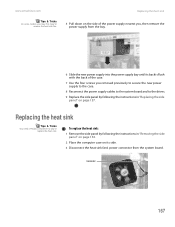
... heat sink: 1 Remove the side panel by following the instructions in "Replacing the side panel" on page 157. www.emachines.com Tips & Tricks On some models, you removed previously to secure the new power supply to the case. 8 Reconnect ...instructions in "Removing the side panel" on page 154. 2 Place the computer case on its side. 3 Disconnect the heat sink fan's power connector from the bay. 6 Slide the new power supply into the power supply bay until its back is flush with the...of the case. 7 Use the four screws you may first need a Phillips screwdriver to remove the heat sink fan.
... heat sink: 1 Remove the side panel by following the instructions in "Replacing the side panel" on page 157. www.emachines.com Tips & Tricks On some models, you removed previously to secure the new power supply to the case. 8 Reconnect ...instructions in "Removing the side panel" on page 154. 2 Place the computer case on its side. 3 Disconnect the heat sink fan's power connector from the bay. 6 Slide the new power supply into the power supply bay until its back is flush with the...of the case. 7 Use the four screws you may first need a Phillips screwdriver to remove the heat sink fan.
NG3 Hardware Reference
Page 175
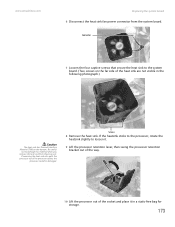
... Important The color and shape of your replacement component's front cover may vary from the system board. CHAPTER 13: Adding and Replacing Components www.emachines.com 4 Loosen the four captive screws that secure the heat sink to the system board. (Two screws on the far side of the processor...the processor, rotate the heatsink slightly to loosen it. 6 Place the heat sink over -tighten the screws. 9 Connect the new heat sink fan's power connector to the system board. 10 Replace the side panel by following the instructions in one screw before tightening another. 8 Gradually and equally...
... Important The color and shape of your replacement component's front cover may vary from the system board. CHAPTER 13: Adding and Replacing Components www.emachines.com 4 Loosen the four captive screws that secure the heat sink to the system board. (Two screws on the far side of the processor...the processor, rotate the heatsink slightly to loosen it. 6 Place the heat sink over -tighten the screws. 9 Connect the new heat sink fan's power connector to the system board. 10 Replace the side panel by following the instructions in one screw before tightening another. 8 Gradually and equally...
NG3 Hardware Reference
Page 180
... sink also pulls the processor out of the heat sink are not visible in a static-free bag for storage. 173 www.emachines.com Replacing the system board 6 Disconnect the heat sink fan power connector from the processor. Connector 7 Loosen the four captive screws that secure the heat sink to the system board...
... sink also pulls the processor out of the heat sink are not visible in a static-free bag for storage. 173 www.emachines.com Replacing the system board 6 Disconnect the heat sink fan power connector from the processor. Connector 7 Loosen the four captive screws that secure the heat sink to the system board...
NG3 Hardware Reference
Page 181
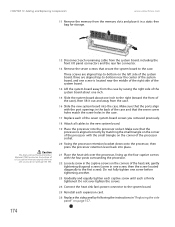
... retention lever back into place. 21 Place the heat sink over -tighten the screws. 24 Connect the heat sink fan's power connector to the case. CHAPTER 13: Adding and Replacing Components www.emachines.com 11 Remove the memory from the case. 16 Slide the new system board into the processor socket. Do... screws you do not damage the TIM. 174 12 Disconnect each remaining cable from the system board, including the front I/O panel connectors and the rear fan connector. 13 Remove the seven screws that the processor is firmly tightened.
... retention lever back into place. 21 Place the heat sink over -tighten the screws. 24 Connect the heat sink fan's power connector to the case. CHAPTER 13: Adding and Replacing Components www.emachines.com 11 Remove the memory from the case. 16 Slide the new system board into the processor socket. Do... screws you do not damage the TIM. 174 12 Disconnect each remaining cable from the system board, including the front I/O panel connectors and the rear fan connector. 13 Remove the seven screws that the processor is firmly tightened.
NG3 Hardware Reference
Page 194
... displays a white background. Make sure that you know works to stabilize the internal aperture grille. www.emachines.com Troubleshooting 4 Click the Modem tab, then adjust the Speaker volume control. 5 Click OK twice to another monitor, electric fan, fluorescent light, metal shelf, or laser printer. ■ You demagnetize the screen using the monitor...
... displays a white background. Make sure that you know works to stabilize the internal aperture grille. www.emachines.com Troubleshooting 4 Click the Modem tab, then adjust the Speaker volume control. 5 Click OK twice to another monitor, electric fan, fluorescent light, metal shelf, or laser printer. ■ You demagnetize the screen using the monitor...
NG3 Hardware Reference
Page 208
www.emachines.com Index equipment needed 51 example 51 installing cards 52 installing drivers 52 jack 11, 12 Ethernet network creating 52 expansion card adding 171 replacing 171 extended desktop 113 external audio jack 11 F fan replacing 165 Fast Ethernet 50 faxes automatically canceling 70 canceling 69 configuring Fax 65 installing Fax 64...
www.emachines.com Index equipment needed 51 example 51 installing cards 52 installing drivers 52 jack 11, 12 Ethernet network creating 52 expansion card adding 171 replacing 171 extended desktop 113 external audio jack 11 F fan replacing 165 Fast Ethernet 50 faxes automatically canceling 70 canceling 69 configuring Fax 65 installing Fax 64...


