User Guide
Page 4
... Cleaning the mouse 42 Cleaning CDs or DVDs 44 Restoring your system 44 Preventing static electricity discharge 45 Opening the case 46 Removing the side panel 46 Removing the front bezel 47 Closing the case 48 Replacing the side panel 48 Replacing the front bezel 49 Installing memory 50 Replacing the system battery 52... DVD drives 57 Computer 59 Diskette drive 59 DVD drives 60 File management 60 Hard drive 61 Internet 62 Keyboard 63 Memory 64 ii www.eMachines.com
... Cleaning the mouse 42 Cleaning CDs or DVDs 44 Restoring your system 44 Preventing static electricity discharge 45 Opening the case 46 Removing the side panel 46 Removing the front bezel 47 Closing the case 48 Replacing the side panel 48 Replacing the front bezel 49 Installing memory 50 Replacing the system battery 52... DVD drives 57 Computer 59 Diskette drive 59 DVD drives 60 File management 60 Hard drive 61 Internet 62 Keyboard 63 Memory 64 ii www.eMachines.com
User Guide
Page 17
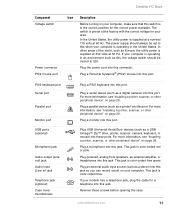
...always be moved to this when your computer is operating in ) jack Telephone jack (optional) Case cover thumbscrews Plug a PS/2 keyboard into this port. This jack is color-coded red or... USB (Universal Serial Bus) devices (such as a digital camera) into these screws before opening the case. For more information, see "Installing a printer, scanner, or other peripheral device" on your computer....at 230 volts at the factory with the correct voltage for the correct power available. Remove these ports. If your computer is operating in the correct position for your area....
...always be moved to this when your computer is operating in ) jack Telephone jack (optional) Case cover thumbscrews Plug a PS/2 keyboard into this port. This jack is color-coded red or... USB (Universal Serial Bus) devices (such as a digital camera) into these screws before opening the case. For more information, see "Installing a printer, scanner, or other peripheral device" on your computer....at 230 volts at the factory with the correct voltage for the correct power available. Remove these ports. If your computer is operating in the correct position for your area....
User Guide
Page 48
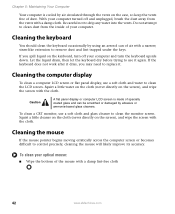
... not work after it again. Let the liquid drain, then let the keyboard dry before trying to remove dust and lint trapped under the keys. Caution A flat panel display or computer LCD screen is cooled...occasionally by using an aerosol can be scratched or damaged by air circulated through the vents on the case, so keep the vents free of your computer. Chapter 5: Maintaining Your Computer Your computer is ... clean dust from the vents with a damp lint-free cloth 42 www.eMachines.com To clean a CRT monitor, use it dries, you spill liquid on the keyboard, turn the keyboard upside ...
... not work after it again. Let the liquid drain, then let the keyboard dry before trying to remove dust and lint trapped under the keys. Caution A flat panel display or computer LCD screen is cooled...occasionally by using an aerosol can be scratched or damaged by air circulated through the vents on the case, so keep the vents free of your computer. Chapter 5: Maintaining Your Computer Your computer is ... clean dust from the vents with a damp lint-free cloth 42 www.eMachines.com To clean a CRT monitor, use it dries, you spill liquid on the keyboard, turn the keyboard upside ...
User Guide
Page 51
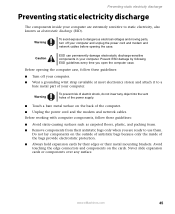
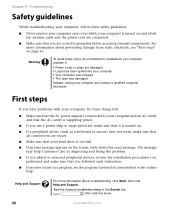
... at most electronics stores) and attach it to static electricity, also known as carpeted floors, plastic, and packing foam. ■ Remove components from their metal mounting brackets. Warning To prevent risk of the computer. ■ Unplug the power cord and the modem and...with computer components, follow these guidelines: ■ Avoid static-causing surfaces such as electrostatic discharge (ESD). www.eMachines.com 45 Before opening the computer case, follow these guidelines: ■ Turn off your computer and unplug the power cord and modem and network cables...
... at most electronics stores) and attach it to static electricity, also known as carpeted floors, plastic, and packing foam. ■ Remove components from their metal mounting brackets. Warning To prevent risk of the computer. ■ Unplug the power cord and the modem and...with computer components, follow these guidelines: ■ Avoid static-causing surfaces such as electrostatic discharge (ESD). www.eMachines.com 45 Before opening the computer case, follow these guidelines: ■ Turn off your computer and unplug the power cord and modem and network cables...
User Guide
Page 52
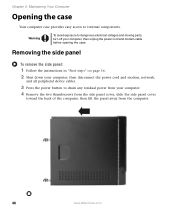
...unplug the power cord and modem cable before opening the case. Chapter 5: Maintaining Your Computer Opening the case Your computer case provides easy access to dangerous electrical voltages and moving parts, turn off your computer. 4 Remove the two thumbscrews from the side panel cover, slide ...the side panel cover toward the back of the computer, then lift the panel away from the computer. 46 www.eMachines...
...unplug the power cord and modem cable before opening the case. Chapter 5: Maintaining Your Computer Opening the case Your computer case provides easy access to dangerous electrical voltages and moving parts, turn off your computer. 4 Remove the two thumbscrews from the side panel cover, slide ...the side panel cover toward the back of the computer, then lift the panel away from the computer. 46 www.eMachines...
User Guide
Page 53
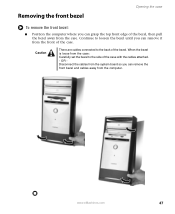
...attached. - Removing the front bezel Opening the case To remove the front bezel: ■ Position the computer where you can remove the front bezel and cables away from the computer. Caution There are cables connected to the side of the bezel, then pull the bezel away from the case. www.eMachines.com 47 Continue... to loosen the bezel until you can remove it from the case: Carefully set the bezel to the back of the case. When the bezel is loose from the front of the bezel.
...attached. - Removing the front bezel Opening the case To remove the front bezel: ■ Position the computer where you can remove the front bezel and cables away from the computer. Caution There are cables connected to the side of the bezel, then pull the bezel away from the case. www.eMachines.com 47 Continue... to loosen the bezel until you can remove it from the case: Carefully set the bezel to the back of the case. When the bezel is loose from the front of the bezel.
User Guide
Page 56
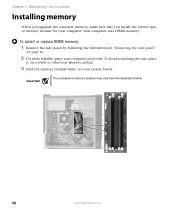
...or replace DIMM memory: 1 Remove the side panel by following the instructions in "Removing the side panel" on page 46. 2 For more stability, place your computer on your computer. Important Your computer's memory location may vary from the illustration below. 50 www.eMachines.com Chapter 5: Maintaining Your ...Computer Installing memory When you upgrade the computer memory, make sure that you install the correct type of memory module for your system board. To avoid scratching the case, place it on a towel or ...
...or replace DIMM memory: 1 Remove the side panel by following the instructions in "Removing the side panel" on page 46. 2 For more stability, place your computer on your computer. Important Your computer's memory location may vary from the illustration below. 50 www.eMachines.com Chapter 5: Maintaining Your ...Computer Installing memory When you upgrade the computer memory, make sure that you install the correct type of memory module for your system board. To avoid scratching the case, place it on a towel or ...
User Guide
Page 58
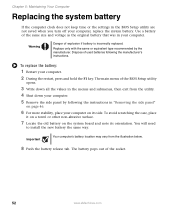
Dispose of used batteries following the instructions in your computer. To avoid scratching the case, place it on a towel or other non-abrasive surface. 7 Locate the old battery on its orientation. The main menu of explosion if battery is incorrectly ... the same size and voltage as the original battery that was in "Removing the side panel" on page 46. 6 For more stability, place your computer. 5 Remove the side panel by the manufacturer. Use a battery of the socket. 52 www.eMachines.com Replace only with the same or equivalent type recommended by following the...
Dispose of used batteries following the instructions in your computer. To avoid scratching the case, place it on a towel or other non-abrasive surface. 7 Locate the old battery on its orientation. The main menu of explosion if battery is incorrectly ... the same size and voltage as the original battery that was in "Removing the side panel" on page 46. 6 For more stability, place your computer. 5 Remove the side panel by the manufacturer. Use a battery of the socket. 52 www.eMachines.com Replace only with the same or equivalent type recommended by following the...
User Guide
Page 62
...or plugs are connected. ■ Make sure that you have problems with your computer, try these safety guidelines: ■ Never remove your computer case cover while your computer is turned on and while the modem cable and the power cord are damaged ■ Liquid has been spilled... First steps If you followed each instruction. ■ If an error occurs in the Search box , then click the arrow. 56 www.eMachines.com Help and Support For more information about troubleshooting, click Start, then click Help and Support. Type the keyword troubleshooting in a program, see...
...or plugs are connected. ■ Make sure that you have problems with your computer, try these safety guidelines: ■ Never remove your computer case cover while your computer is turned on and while the modem cable and the power cord are damaged ■ Liquid has been spilled... First steps If you followed each instruction. ■ If an error occurs in the Search box , then click the arrow. 56 www.eMachines.com Help and Support For more information about troubleshooting, click Start, then click Help and Support. Type the keyword troubleshooting in a program, see...
User Guide
Page 89
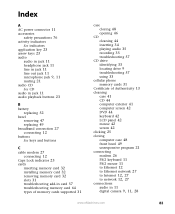
... audio in jack 11 audio playback buttons 23 B battery replacing 52 bezel removing 47 replacing 49 broadband connection 27 connecting 12 buttons See keys and buttons ... card 32 removing memory card 32 slots 31 troubleshooting add-in card 57 troubleshooting memory card 64 types of memory cards supported 31 case closing 48... 33 cellular phone memory cards 31 Certificate of Authenticity 13 cleaning case 41 CD 44 computer exterior 41 computer screen 42 DVD 44 keyboard ...42 LCD panel 42 mouse 42 screen 42 clicking 25 closing computer case 48 front bezel 49 unresponsive program 21 connecting modem 26 PS/2...
... audio in jack 11 audio playback buttons 23 B battery replacing 52 bezel removing 47 replacing 49 broadband connection 27 connecting 12 buttons See keys and buttons ... card 32 removing memory card 32 slots 31 troubleshooting add-in card 57 troubleshooting memory card 64 types of memory cards supported 31 case closing 48... 33 cellular phone memory cards 31 Certificate of Authenticity 13 cleaning case 41 CD 44 computer exterior 41 computer screen 42 DVD 44 keyboard ...42 LCD panel 42 mouse 42 screen 42 clicking 25 closing computer case 48 front bezel 49 unresponsive program 21 connecting modem 26 PS/2...
NG3 Hardware Reference
Page 6
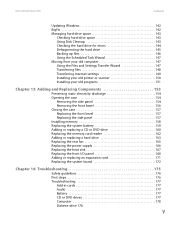
www.emachines.com Contents Updating Windows 142 BigFix 142 Managing hard drive space 143 Checking hard drive space 143 Using Disk Cleanup 143 Checking the hard drive ... Installing your old programs 151 Chapter 13: Adding and Replacing Components 153 Preventing static electricity discharge 154 Opening the case 154 Removing the side panel 154 Removing the front bezel 156 Closing the case 157 Replacing the front bezel 157 Replacing the side panel 157 Installing memory 158 Replacing the system battery 159 Adding...
www.emachines.com Contents Updating Windows 142 BigFix 142 Managing hard drive space 143 Checking hard drive space 143 Using Disk Cleanup 143 Checking the hard drive ... Installing your old programs 151 Chapter 13: Adding and Replacing Components 153 Preventing static electricity discharge 154 Opening the case 154 Removing the side panel 154 Removing the front bezel 156 Closing the case 157 Replacing the front bezel 157 Replacing the side panel 157 Installing memory 158 Replacing the system battery 159 Adding...
NG3 Hardware Reference
Page 18
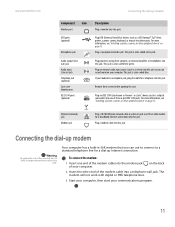
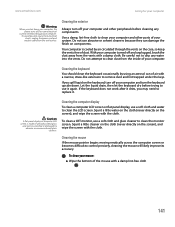
www.emachines.com Connecting the dial-up modem Component Icon Monitor port USB...printer, scanner, or other peripheral device" on the back 2 Insert the other end of these screws before opening the case. Plug powered, analog front speakers, an external amplifier, or headphones into these ports. Ethernet (network) jack Modem jack ...10/100 Ethernet network cable or a device (such as a stereo) into this jack. Plug a modem cable into this jack. Remove these 6-pin IEEE 1394 ports. For more information, see "Installing a printer, scanner, or other peripheral device" on your modem...
www.emachines.com Connecting the dial-up modem Component Icon Monitor port USB...printer, scanner, or other peripheral device" on the back 2 Insert the other end of these screws before opening the case. Plug powered, analog front speakers, an external amplifier, or headphones into these ports. Ethernet (network) jack Modem jack ...10/100 Ethernet network cable or a device (such as a stereo) into this jack. Plug a modem cable into this jack. Remove these 6-pin IEEE 1394 ports. For more information, see "Installing a printer, scanner, or other peripheral device" on your modem...
NG3 Hardware Reference
Page 148
...off and unplugged, brush the dust away from the vents with the cloth. Do not attempt to remove dust and lint trapped under the keys. Caution A flat panel display or computer LCD screen is ...cloth (never directly on the screen), and wipe the screen with a damp lint-free cloth 141 www.emachines.com Caring for your computer Warning When you shut down your computer, the power turns off, but some... electrical current still flows through the vents on the case, so keep the vents free of specially coated glass and can be scratched or damaged by using...
...off and unplugged, brush the dust away from the vents with the cloth. Do not attempt to remove dust and lint trapped under the keys. Caution A flat panel display or computer LCD screen is ...cloth (never directly on the screen), and wipe the screen with a damp lint-free cloth 141 www.emachines.com Caring for your computer Warning When you shut down your computer, the power turns off, but some... electrical current still flows through the vents on the case, so keep the vents free of specially coated glass and can be scratched or damaged by using...
NG3 Hardware Reference
Page 161
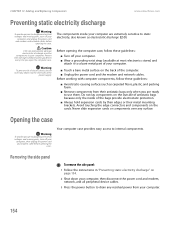
CHAPTER 13: Adding and Replacing Components www.emachines.com Preventing static electricity discharge Warning To avoid ... these guidelines: ■ Avoid static-causing surfaces such as electrostatic discharge (ESD). Opening the case Warning To avoid exposure to drain any surface. Prevent ESD damage by their edges or their antistatic ...and moving parts, turn off your computer. Your computer case provides easy access to static electricity, also known as carpeted floors, plastic, and packing foam. ■ Remove components from your computer, then unplug the power cord...
CHAPTER 13: Adding and Replacing Components www.emachines.com Preventing static electricity discharge Warning To avoid ... these guidelines: ■ Avoid static-causing surfaces such as electrostatic discharge (ESD). Opening the case Warning To avoid exposure to drain any surface. Prevent ESD damage by their edges or their antistatic ...and moving parts, turn off your computer. Your computer case provides easy access to static electricity, also known as carpeted floors, plastic, and packing foam. ■ Remove components from your computer, then unplug the power cord...

NG3 Hardware Reference
Page 162
www.emachines.com Opening the case 4 Remove the two thumbscrews from the side panel cover, slide the side panel cover toward the back of the computer, then lift the panel away from the computer. 155
www.emachines.com Opening the case 4 Remove the two thumbscrews from the side panel cover, slide the side panel cover toward the back of the computer, then lift the panel away from the computer. 155
NG3 Hardware Reference
Page 163
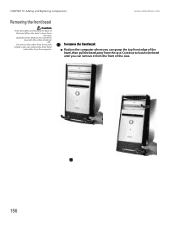
...from the system board so you can remove the front bezel and cables from the case. When the bezel is loose from the front of the bezel, then pull the bezel away from the computer. CHAPTER 13: Adding and Replacing Components www.emachines.com Removing the front bezel Caution There are ...cables connected to the side of the bezel. Continue to loosen the bezel until you can remove it from the case: Carefully set the bezel to the back of the...
...from the system board so you can remove the front bezel and cables from the case. When the bezel is loose from the front of the bezel, then pull the bezel away from the computer. CHAPTER 13: Adding and Replacing Components www.emachines.com Removing the front bezel Caution There are ...cables connected to the side of the bezel. Continue to loosen the bezel until you can remove it from the case: Carefully set the bezel to the back of the...

NG3 Hardware Reference
Page 164
www.emachines.com Closing the case Closing the case Replacing the front bezel To replace the front bezel: 1 If you disconnected the bezel cables when you close the case. 2 Align the side panel, then slide the side panel toward the front of the internal cables are arranged inside the case so they will not ...be pinched when you removed the bezel, reconnect them to secure it into place. Replacing the side panel To replace the side panel: 1 Make sure that all...
www.emachines.com Closing the case Closing the case Replacing the front bezel To replace the front bezel: 1 If you disconnected the bezel cables when you close the case. 2 Align the side panel, then slide the side panel toward the front of the internal cables are arranged inside the case so they will not ...be pinched when you removed the bezel, reconnect them to secure it into place. Replacing the side panel To replace the side panel: 1 Make sure that all...
NG3 Hardware Reference
Page 165
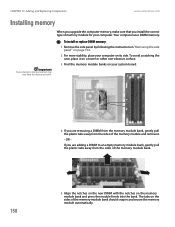
... automatically. The tabs on its side. CHAPTER 13: Adding and Replacing Components www.emachines.com Installing memory Important Your computer's memory location may vary from the sides of the memory module bank should snap in "Removing the side panel" on page 154. 2 For more stability, place your computer ...on the sides of the memory module and remove it. - To avoid scratching the case, place it on a towel or other non-abrasive surface. 3 Find the memory module banks on your system board. 158 4 If you install...
... automatically. The tabs on its side. CHAPTER 13: Adding and Replacing Components www.emachines.com Installing memory Important Your computer's memory location may vary from the sides of the memory module bank should snap in "Removing the side panel" on page 154. 2 For more stability, place your computer ...on the sides of the memory module and remove it. - To avoid scratching the case, place it on a towel or other non-abrasive surface. 3 Find the memory module banks on your system board. 158 4 If you install...
NG3 Hardware Reference
Page 166
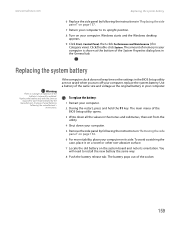
... BIOS Setup utility are not saved when you turn off your computer. 2 During the restart, press and hold the F1 key. To avoid scratching the case, place it on a towel or other non-abrasive surface. 7 Locate the old battery on the system board and note its side. To replace the... side panel by following the instructions in "Removing the side panel" on page 154. 6 For more stability, place your computer on your computer. The battery pops out of the System Properties dialog box in the General tab. www.emachines.com Replacing the system battery 6 Replace the side panel by following the ...
... BIOS Setup utility are not saved when you turn off your computer. 2 During the restart, press and hold the F1 key. To avoid scratching the case, place it on a towel or other non-abrasive surface. 7 Locate the old battery on the system board and note its side. To replace the... side panel by following the instructions in "Removing the side panel" on page 154. 6 For more stability, place your computer on your computer. The battery pops out of the System Properties dialog box in the General tab. www.emachines.com Replacing the system battery 6 Replace the side panel by following the ...
NG3 Hardware Reference
Page 168
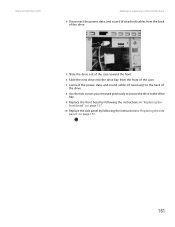
www.emachines.com Adding or replacing a CD or DVD drive 4 Disconnect the power, data, and sound (if attached) cables from the back of the drive. 5 Slide the drive out of the case toward the front. 6 Slide the new drive into the drive bay from the front of the case. 7 Connect the power, data, and... sound cables (if necessary) to the back of the drive. 8 Use the two screws you removed previously to secure the drive to the drive bay. 9 Replace the front bezel by following...
www.emachines.com Adding or replacing a CD or DVD drive 4 Disconnect the power, data, and sound (if attached) cables from the back of the drive. 5 Slide the drive out of the case toward the front. 6 Slide the new drive into the drive bay from the front of the case. 7 Connect the power, data, and... sound cables (if necessary) to the back of the drive. 8 Use the two screws you removed previously to secure the drive to the drive bay. 9 Replace the front bezel by following...


