

User Guide
Page 2
Copyright © 2009. All Rights Reserved. eMachines User Guide Original Issue: 06 / 2009 Model number Serial number Purchase date Place of purchase Visit http://registration.emachines.com and discover the benefits of being an eMachines customer.
Copyright © 2009. All Rights Reserved. eMachines User Guide Original Issue: 06 / 2009 Model number Serial number Purchase date Place of purchase Visit http://registration.emachines.com and discover the benefits of being an eMachines customer.

User Guide
Page 3
Use a damp cloth for accessibility Be sure that could be seriously damaged. • Slots and openings are provided for your safety and comfort Safety instructions Read these instructions carefully. Unplug the power cord before removing the power supply unit from the wall outlet before cleaning. CAUTION for cleaning. These openings must not be blocked or covered. The openings should never be placed near water. • Do not place this document for plug as disconnecting device Observe the following guidelines when connecting and disconnecting power to the power supply unit: Install...
Use a damp cloth for accessibility Be sure that could be seriously damaged. • Slots and openings are provided for your safety and comfort Safety instructions Read these instructions carefully. Unplug the power cord before removing the power supply unit from the wall outlet before cleaning. CAUTION for cleaning. These openings must not be blocked or covered. The openings should never be placed near water. • Do not place this document for plug as disconnecting device Observe the following guidelines when connecting and disconnecting power to the power supply unit: Install...

User Guide
Page 4
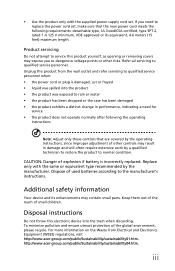
The overall system load must not exceed 80% of the equipment plugged into the extension cord does not exceed the extension cord ampere rating. Do not insert the plug into the wall outlet does not exceed the fuse rating. • Do not overload a power outlet, strip or receptacle by hearing experts,to protect your hearing. • Gradually increase the volume until you can hear it clearly and comfortably and without distortion. • After setting the volume level, do not increase it under sporting, exercising, or any vibrating environment which will walk on the cord. • If an ...
The overall system load must not exceed 80% of the equipment plugged into the extension cord does not exceed the extension cord ampere rating. Do not insert the plug into the wall outlet does not exceed the fuse rating. • Do not overload a power outlet, strip or receptacle by hearing experts,to protect your hearing. • Gradually increase the volume until you can hear it clearly and comfortably and without distortion. • After setting the volume level, do not increase it under sporting, exercising, or any vibrating environment which will walk on the cord. • If an ...
User Guide
Page 5
Dispose of used batteries according to qualified service personnel. Disposal instructions Do not throw this product yourself, as opening or removing covers may expose you need for service • the product does not operate normally after following requirements: detachable type, UL listed/CSA certified, type SPT-2, rated 7 A 125 V minimum, VDE approved or its enhancements may result in performance, indicating a need to normal condition. For more information on the Waste from the wall outlet and refer servicing to qualified service personnel when: • the power cord or ...
Dispose of used batteries according to qualified service personnel. Disposal instructions Do not throw this product yourself, as opening or removing covers may expose you need for service • the product does not operate normally after following requirements: detachable type, UL listed/CSA certified, type SPT-2, rated 7 A 125 V minimum, VDE approved or its enhancements may result in performance, indicating a need to normal condition. For more information on the Waste from the wall outlet and refer servicing to qualified service personnel when: • the power cord or ...

User Guide
Page 6
Environmental Protection Agency. Acer is applicable only to Acer system with the ENERGY STAR mark. Note: The statement above is committed to offer our customers products with an ENERGY STAR sticker. Acer ENERGY STAR qualified products: • Produce less heat and reduce cooling loads, and warmer climates. • Automatically go into "display sleep" and "computer sleep" mode after 10 and 30 minute of climate change. : Mercury advisory For projectors or electronic products containing an LCD/CRT monitor or display: Lamp(s) inside this product contain mercury and must be recycled or ...
Environmental Protection Agency. Acer is applicable only to Acer system with the ENERGY STAR mark. Note: The statement above is committed to offer our customers products with an ENERGY STAR sticker. Acer ENERGY STAR qualified products: • Produce less heat and reduce cooling loads, and warmer climates. • Automatically go into "display sleep" and "computer sleep" mode after 10 and 30 minute of climate change. : Mercury advisory For projectors or electronic products containing an LCD/CRT monitor or display: Lamp(s) inside this product contain mercury and must be recycled or ...
User Guide
Page 7
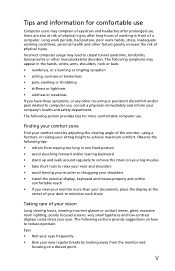
Tips and information for more than your documents, place the display at risk of physical injury after long hours of working conditions, personal health and other factors greatly increase the risk of eyestrain and headaches after prolonged use. The following sections provide suggestions on a distant point. v The following section provides tips for comfortable use Computer users may complain of physical injury. Long work periods, bad posture, poor work habits, stress, inadequate working in front of your vision Long viewing hours, wearing incorrect glasses or contact lenses, ...
Tips and information for more than your documents, place the display at risk of physical injury after long hours of working conditions, personal health and other factors greatly increase the risk of eyestrain and headaches after prolonged use. The following sections provide suggestions on a distant point. v The following section provides tips for comfortable use Computer users may complain of physical injury. Long work periods, bad posture, poor work habits, stress, inadequate working in front of your vision Long viewing hours, wearing incorrect glasses or contact lenses, ...

User Guide
Page 8
Warning! : • Blink frequently to make your computer use more relaxing and productive: • Take short breaks regularly and often. • Perform some stretching exercises. Display • Keep your display clean. • Keep your head at a higher level than the top edge of the display so your eyes point downward when looking at the middle of the display. • Adjust the display brightness and/or contrast to a comfortable level for extended periods of cardboard extended from the display's top front edge • Avoid adjusting your display to an awkward viewing angle. ...
Warning! : • Blink frequently to make your computer use more relaxing and productive: • Take short breaks regularly and often. • Perform some stretching exercises. Display • Keep your display clean. • Keep your head at a higher level than the top edge of the display so your eyes point downward when looking at the middle of the display. • Adjust the display brightness and/or contrast to a comfortable level for extended periods of cardboard extended from the display's top front edge • Avoid adjusting your display to an awkward viewing angle. ...

User Guide
Page 9
Contents Chapter 1: Checking Out Your Computer . . . 1 About this guide 2 Product Registration 2 Front 3 Back 4 Chapter 2: Setting Up and Getting Started 7 Working safely and comfortably 8 Avoiding discomfort and injury from repetitive strain 8 Preparing power connections 9 Protecting from power source problems 9 Checking the voltage selection 10 Connecting to a broadband modem or network . . 11 Connecting a dial-up modem 11 Using the World Wide Web 12 Connecting to a Web site 13 Downloading files 14 Ethernet networking 15 Wired Ethernet networking 15 Establishing your Ethernet...
Contents Chapter 1: Checking Out Your Computer . . . 1 About this guide 2 Product Registration 2 Front 3 Back 4 Chapter 2: Setting Up and Getting Started 7 Working safely and comfortably 8 Avoiding discomfort and injury from repetitive strain 8 Preparing power connections 9 Protecting from power source problems 9 Checking the voltage selection 10 Connecting to a broadband modem or network . . 11 Connecting a dial-up modem 11 Using the World Wide Web 12 Connecting to a Web site 13 Downloading files 14 Ethernet networking 15 Wired Ethernet networking 15 Establishing your Ethernet...

User Guide
Page 10
Contents Ethernet 27 Expansion cards 29 File management 29 Hard drive 29 Internet 31 Keyboard 33 Memory 33 Memory card reader 34 Modem (cable or DSL 34 Modem (dial-up 34 Monitor 37 Mouse 38 Networks 39 Optical disc drives 39 Passwords 41 Power 41 Printer 42 Sound 43 Recovering your system 44 Creating recovery discs 45 Recovering pre-installed software and drivers . 46 Returning your system to its factory condition . 47 Telephone support 49 Before calling Customer Care 49 Self-help 50 Appendix A: Regulations and safety notices . 51 viii
Contents Ethernet 27 Expansion cards 29 File management 29 Hard drive 29 Internet 31 Keyboard 33 Memory 33 Memory card reader 34 Modem (cable or DSL 34 Modem (dial-up 34 Monitor 37 Mouse 38 Networks 39 Optical disc drives 39 Passwords 41 Power 41 Printer 42 Sound 43 Recovering your system 44 Creating recovery discs 45 Recovering pre-installed software and drivers . 46 Returning your system to its factory condition . 47 Telephone support 49 Before calling Customer Care 49 Self-help 50 Appendix A: Regulations and safety notices . 51 viii

User Guide
Page 11
Chapter 1 Checking Out Your Computer 1
Chapter 1 Checking Out Your Computer 1

User Guide
Page 12
...and maintenance instructions that you with important data that are specific to visit our website at http://registration.emachines.com. Another Option Another way to register your eMachines product is recommended that will invite you to provide you should keep in the mandatory fields and click .... 2 After we receive your product registration, you will give you access to some useful benefits, such as: • Faster service from eMachines Hurry and register, as other advantages await you immediately register it is to your model of your notebook or desktop, a window will help ...
...and maintenance instructions that you with important data that are specific to visit our website at http://registration.emachines.com. Another Option Another way to register your eMachines product is recommended that will invite you to provide you should keep in the mandatory fields and click .... 2 After we receive your product registration, you will give you access to some useful benefits, such as: • Faster service from eMachines Hurry and register, as other advantages await you immediately register it is to your model of your notebook or desktop, a window will help ...
User Guide
Page 13
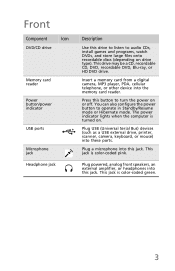
This drive may be a CD, recordable CD, DVD, recordable DVD, Blu-ray, or HD DVD drive. Insert a memory card from a digital camera, MP3 player, PDA, cellular telephone, or other device into these ports. Plug USB (Universal Serial Bus) devices (such as a USB external drive, printer, scanner, camera, keyboard, or mouse) into the memory card reader. You can also configure the power button to operate in Standby/Resume mode or Hibernate mode. This jack is color-coded pink. Press this button to turn the power on drive type). Plug a microphone into this jack. This jack is color-coded ...
This drive may be a CD, recordable CD, DVD, recordable DVD, Blu-ray, or HD DVD drive. Insert a memory card from a digital camera, MP3 player, PDA, cellular telephone, or other device into these ports. Plug USB (Universal Serial Bus) devices (such as a USB external drive, printer, scanner, camera, keyboard, or mouse) into the memory card reader. You can also configure the power button to operate in Standby/Resume mode or Hibernate mode. This jack is color-coded pink. Press this button to turn the power on drive type). Plug a microphone into this jack. This jack is color-coded ...
User Guide
Page 14
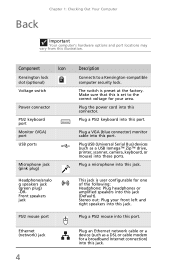
Plug the power cord into this jack. Plug a microphone into this jack (Default). Back Chapter 1: Checking Out Your Computer Important Your computer's hardware options and port locations may vary from this jack. Plug a VGA (blue connector) monitor cable into this connector. This jack is user configurable for one of the following: Headphone: Plug headphones or amplified speakers into this port. Plug a PS/2 keyboard into these ports. Plug USB (Universal Serial Bus) devices (such as a DSL or cable modem for your front left and right speakers into this port. Component...
Plug the power cord into this jack. Plug a microphone into this jack (Default). Back Chapter 1: Checking Out Your Computer Important Your computer's hardware options and port locations may vary from this jack. Plug a VGA (blue connector) monitor cable into this connector. This jack is user configurable for one of the following: Headphone: Plug headphones or amplified speakers into this port. Plug a PS/2 keyboard into these ports. Plug USB (Universal Serial Bus) devices (such as a DSL or cable modem for your front left and right speakers into this port. Component...
User Guide
Page 15
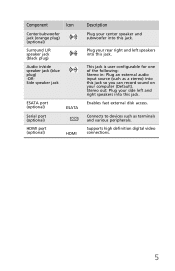
Connects to devices such as a stereo) into this jack. Supports high definition digital video connections. 5 Enables fast external disk access. Component Icon Center/subwoofer jack (orange plug) (optional) Surround L/R speaker jack (black plug) Audio in : Plug an external audio input source (such as terminals and various peripherals. This jack is user configurable for one of the following: Stereo in /side speaker jack (blue plug) -ORSide speaker jack ESATA port (optional) Serial port (optional) HDMI port (optional) ESATA HDMI Description Plug your center speaker and subwoofer ...
Connects to devices such as a stereo) into this jack. Supports high definition digital video connections. 5 Enables fast external disk access. Component Icon Center/subwoofer jack (orange plug) (optional) Surround L/R speaker jack (black plug) Audio in : Plug an external audio input source (such as terminals and various peripherals. This jack is user configurable for one of the following: Stereo in /side speaker jack (blue plug) -ORSide speaker jack ESATA port (optional) Serial port (optional) HDMI port (optional) ESATA HDMI Description Plug your center speaker and subwoofer ...

User Guide
Page 16
Chapter 1: Checking Out Your Computer 6
Chapter 1: Checking Out Your Computer 6

User Guide
Page 17
Chapter 2 Setting Up and Getting Started 7
Chapter 2 Setting Up and Getting Started 7

User Guide
Page 18
Chapter 2: Setting Up and Getting Started Working safely and comfortably Before using your computer, follow these general guidelines for setting up a safe and comfortable work area and avoiding discomfort and strain: • Keep hands and arms parallel to the floor. • Adjust the screen so it is perpendicular to your line of sight, and the top of the screen is no higher than eye leve. • Place your eyes. • Find ways to change your position, stretch your muscles, and relieve your feet flat on the floor or on a footrest. • Keep ventilation openings clear of tasks. 8 ...
Chapter 2: Setting Up and Getting Started Working safely and comfortably Before using your computer, follow these general guidelines for setting up a safe and comfortable work area and avoiding discomfort and strain: • Keep hands and arms parallel to the floor. • Adjust the screen so it is perpendicular to your line of sight, and the top of the screen is no higher than eye leve. • Place your eyes. • Find ways to change your position, stretch your muscles, and relieve your feet flat on the floor or on a footrest. • Keep ventilation openings clear of tasks. 8 ...

User Guide
Page 19
Protect your computer and peripheral devices by using a surge protector. If you run your computer for an extended period of electricity coming into your computer can enter your computer through both the surge protector and the modem. An uninterruptible power supply (UPS) supplies battery power to a surge protector, which absorbs voltage surges and prevents them from power source problems Warning High voltages can increase to save your work and shut down your computer normally. 9 During an electrical storm, unplug both the power cord and the modem connection. During a power ...
Protect your computer and peripheral devices by using a surge protector. If you run your computer for an extended period of electricity coming into your computer can enter your computer through both the surge protector and the modem. An uninterruptible power supply (UPS) supplies battery power to a surge protector, which absorbs voltage surges and prevents them from power source problems Warning High voltages can increase to save your work and shut down your computer normally. 9 During an electrical storm, unplug both the power cord and the modem connection. During a power ...

User Guide
Page 20
The power supply should be damaged. The power supply's voltage selection for your location before turning on the back of the world, such as an opened paper clip to slide the voltage selection switch to 230. Use the power selection switch on your computer. Make sure this , the voltage switch should always be set to match the electrical service available in your usage area (such as while in the United States. In the United States, the utility power is located on page 4. 10 The power supply, a component built into your computer, provides power to 115V or 230V. For ...
The power supply should be damaged. The power supply's voltage selection for your location before turning on the back of the world, such as an opened paper clip to slide the voltage selection switch to 230. Use the power selection switch on your computer. Make sure this , the voltage switch should always be set to match the electrical service available in your usage area (such as while in the United States. In the United States, the utility power is located on page 4. 10 The power supply, a component built into your computer, provides power to 115V or 230V. For ...
User Guide
Page 21
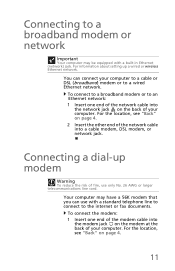
For information about setting up modem Warning To reduce the risk of your computer. For the location, see "Back" on the back of fire, use with a standard telephone line to connect to a broadband modem or network Important Your computer may be equipped with a built-in Ethernet (network) jack. Connecting a dial-up a wired or wireless Ethernet network. Your computer may have a 56K modem that you can connect your computer to a cable or DSL (broadband) modem or to an Ethernet network: 1 Insert one end of the modem cable into the network jack on page 4. 11 To connect to a ...
For information about setting up modem Warning To reduce the risk of your computer. For the location, see "Back" on the back of fire, use with a standard telephone line to connect to a broadband modem or network Important Your computer may be equipped with a built-in Ethernet (network) jack. Connecting a dial-up a wired or wireless Ethernet network. Your computer may have a 56K modem that you can connect your computer to a cable or DSL (broadband) modem or to an Ethernet network: 1 Insert one end of the modem cable into the network jack on page 4. 11 To connect to a ...