
NG3 Hardware Reference
Page 26
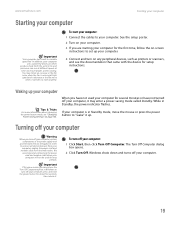
... noise when the fan is in the fan noise when it up your computer. 4 Connect and turn off your computer uses a powerful processor which produces heat. When you turn off your computer, press and hold the power button for about changing the power button mode, see ...-screen instructions to normal speed. The Turn Off Computer dialog box opens. 2 Click Turn Off. To turn off your computer. 19 www.emachines.com Starting your computer Starting your computer Important Your computer has a built-in the power supply and system board remain energized. Windows shuts down...
... noise when the fan is in the fan noise when it up your computer. 4 Connect and turn off your computer uses a powerful processor which produces heat. When you turn off your computer, press and hold the power button for about changing the power button mode, see ...-screen instructions to normal speed. The Turn Off Computer dialog box opens. 2 Click Turn Off. To turn off your computer. 19 www.emachines.com Starting your computer Starting your computer Important Your computer has a built-in the power supply and system board remain energized. Windows shuts down...
NG3 Hardware Reference
Page 175
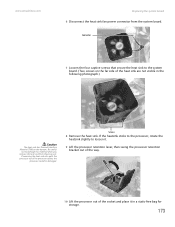
...four posts surrounding the processor. 7 Loosely screw in the captive screws on the corners of the heat sink are not visible in the following photograph.) Caution The heat sink has Thermal Interface Material (TIM) on the bottom. CHAPTER 13: Adding and Replacing Components www.emachines.com 4 Loosen the... /O panel: 1 Remove the side panel by following the instructions in "Replacing the side panel" on page 157. If the heatsink sticks to the processor, rotate the heatsink slightly to loosen it. 6 Place the heat sink over -tighten the screws. 9 Connect the new heat sink fan's power connector...
...four posts surrounding the processor. 7 Loosely screw in the captive screws on the corners of the heat sink are not visible in the following photograph.) Caution The heat sink has Thermal Interface Material (TIM) on the bottom. CHAPTER 13: Adding and Replacing Components www.emachines.com 4 Loosen the... /O panel: 1 Remove the side panel by following the instructions in "Replacing the side panel" on page 157. If the heatsink sticks to the processor, rotate the heatsink slightly to loosen it. 6 Place the heat sink over -tighten the screws. 9 Connect the new heat sink fan's power connector...
NG3 Hardware Reference
Page 180
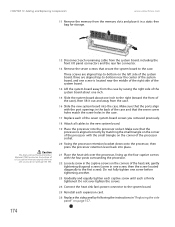
....emachines.com Replacing the system board 6 Disconnect the heat sink fan power connector from the processor. Screws 8 Remove the heat sink. If removing the heat sink also pulls the processor out of the socket and place it . 9 Lift the processor retention lever, then swing the processor retention bracket out of the way. 10 Lift the processor...
....emachines.com Replacing the system board 6 Disconnect the heat sink fan power connector from the processor. Screws 8 Remove the heat sink. If removing the heat sink also pulls the processor out of the socket and place it . 9 Lift the processor retention lever, then swing the processor retention bracket out of the way. 10 Lift the processor...
NG3 Hardware Reference
Page 181
... cable from the system board, including the front I/O panel connectors and the rear fan connector. 13 Remove the seven screws that the processor is located near the center of the system board, and one inch to -bottom near the middle of the right side of the ...Thermal Interface Material (TIM) located on the bottom of the processor socket. 20 Swing the processor retention bracket down onto the processor, then press the processor retention lever back into the processor socket. CHAPTER 13: Adding and Replacing Components www.emachines.com 11 Remove the memory from the memory slots and place...
... cable from the system board, including the front I/O panel connectors and the rear fan connector. 13 Remove the seven screws that the processor is located near the center of the system board, and one inch to -bottom near the middle of the right side of the ...Thermal Interface Material (TIM) located on the bottom of the processor socket. 20 Swing the processor retention bracket down onto the processor, then press the processor retention lever back into the processor socket. CHAPTER 13: Adding and Replacing Components www.emachines.com 11 Remove the memory from the memory slots and place...


