
User Guide
Page 7
Checking the Voltage Selection 2-2 3. Turning the Computer On and Off 2-4 Turning On the Computer 2-4 Turning Off the Computer 2-4 Using Your Computer Using an Optional Floppy Disk Drive 3-1 Using an Optional Media Reader 3-2 Inserting the Media 3-2 Removing the Media 3-3 Using an ...
Checking the Voltage Selection 2-2 3. Turning the Computer On and Off 2-4 Turning On the Computer 2-4 Turning Off the Computer 2-4 Using Your Computer Using an Optional Floppy Disk Drive 3-1 Using an Optional Media Reader 3-2 Inserting the Media 3-2 Removing the Media 3-3 Using an ...

User Guide
Page 11
... of its components. A flat and hard surface. Moderate environment conditions. Appropriate power sources. Setting Up Your System This chapter describes how to set up and turn on your equipment to three-hole, grounded outlets. Chapter 1 No electromagnetic interference. Good air circulation. Do not place your computer from extremes in this chapter...
... of its components. A flat and hard surface. Moderate environment conditions. Appropriate power sources. Setting Up Your System This chapter describes how to set up and turn on your equipment to three-hole, grounded outlets. Chapter 1 No electromagnetic interference. Good air circulation. Do not place your computer from extremes in this chapter...
User Guide
Page 12
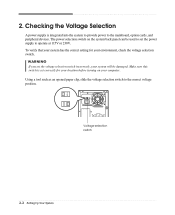
... incorrectly, your system will be used to set correctly for your computer. To verify that your system has the correct setting for your location before turning on the system back panel can be damaged. Using a tool such as an opened paper clip, slide the voltage selection switch to the mainboard, option...
... incorrectly, your system will be used to set correctly for your computer. To verify that your system has the correct setting for your location before turning on the system back panel can be damaged. Using a tool such as an opened paper clip, slide the voltage selection switch to the mainboard, option...

User Guide
Page 14
... the optical drive (D:) while your computer, follow these steps: 1. Turning On the Computer To turn off the monitor and any other peripheral devices. 2-4 Setting Up Your System Turn on the computer or to turn on the monitor, and any other peripheral devices connected to your information...Off Follow the instructions below to shut down the system. 4. NOTE If the Restore CD is displayed, click Turn Off to turn it off your computer, save your computer. 2. Before turning off . In this case, the "Microsoft Windows Startup Menu" menu will load Microsoft ® Windows ®...
... the optical drive (D:) while your computer, follow these steps: 1. Turning On the Computer To turn off the monitor and any other peripheral devices. 2-4 Setting Up Your System Turn on the computer or to turn on the monitor, and any other peripheral devices connected to your information...Off Follow the instructions below to shut down the system. 4. NOTE If the Restore CD is displayed, click Turn Off to turn it off your computer, save your computer. 2. Before turning off . In this case, the "Microsoft Windows Startup Menu" menu will load Microsoft ® Windows ®...

User Guide
Page 15
...clicks into the drive, as OS/2 Warp or UNIX, see the manual that came with already installed on installation and use your computer, you turn off the computer. Using Your Computer 3-1 To install another operating system such as shown below. The procedures in this manual assume that system ...data. Using an Optional Floppy Disk Drive To use your floppy disk drive, insert the diskette with your computer. NOTE Never remove a disk or turn off the computer while a disk drive light is off, and then press the eject button. Eject button Metal shutter Chapter 1 Floppy disk When ...
...clicks into the drive, as OS/2 Warp or UNIX, see the manual that came with already installed on installation and use your computer, you turn off the computer. Using Your Computer 3-1 To install another operating system such as shown below. The procedures in this manual assume that system ...data. Using an Optional Floppy Disk Drive To use your floppy disk drive, insert the diskette with your computer. NOTE Never remove a disk or turn off the computer while a disk drive light is off, and then press the eject button. Eject button Metal shutter Chapter 1 Floppy disk When ...
User Guide
Page 17
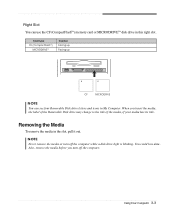
... the computer. Removing the Media To remove the media in this right slot. NOTE Never remove the media or turn off the computer while a disk drive light is blinking. Using Your Computer 3-3 Right Slot You can see four Removable Disk drive letters and icons in ...
... the computer. Removing the Media To remove the media in this right slot. NOTE Never remove the media or turn off the computer while a disk drive light is blinking. Using Your Computer 3-3 Right Slot You can see four Removable Disk drive letters and icons in ...
User Guide
Page 18
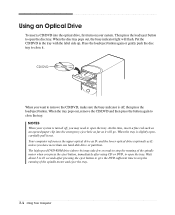
... remove the CD/DVD, make sure the busy indicator is off , you have more than one hard disk drive or partition. When the tray is turned off ; Wait about 5 to 10 seconds after pressing the eject button to give the DVD sufficient time to stop the running of the spindle motor... Computer Your computer references the upper optical drive as D: and the lower optical drive (optional) as an opened paper clip into the optical drive, first turn on your system is slightly open the disc tray. At this time, insert a fine rod such as E: unless you may take few seconds to close...
... remove the CD/DVD, make sure the busy indicator is off , you have more than one hard disk drive or partition. When the tray is turned off ; Wait about 5 to 10 seconds after pressing the eject button to give the DVD sufficient time to stop the running of the spindle motor... Computer Your computer references the upper optical drive as D: and the lower optical drive (optional) as an opened paper clip into the optical drive, first turn on your system is slightly open the disc tray. At this time, insert a fine rod such as E: unless you may take few seconds to close...
User Guide
Page 19
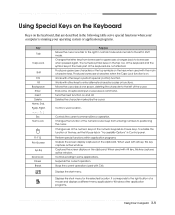
... and one space, deleting the character to uppercase; Changes use of keyboard input or executes a command. Ends a line of the numeric keys on and off. Turns the insert function on the numeric keypad as mouse keys. Stops the current operation (used with other keys to perform special (control) function. Works with...
... and one space, deleting the character to uppercase; Changes use of keyboard input or executes a command. Ends a line of the numeric keys on and off. Turns the insert function on the numeric keypad as mouse keys. Stops the current operation (used with other keys to perform special (control) function. Works with...
User Guide
Page 20
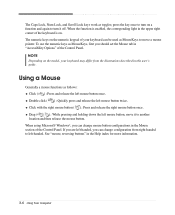
...174; Windows®, you should set the Mouse tab in the Help index for more information. 3-6 Using Your Computer press the key once to turn it to another location and then release the mouse button. Double click ( ) : Quickly press and release the left mouse button, move a mouse..." in "Accessibility Options" of your keyboard may differ from right-handed to left mouse button once. The numeric keys on a function and again to turn on the numeric keypad of the Control Panel. Using a Mouse Generally a mouse functions as MouseKeys, first you can be used as toggles; Drag (...
...174; Windows®, you should set the Mouse tab in the Help index for more information. 3-6 Using Your Computer press the key once to turn it to another location and then release the mouse button. Double click ( ) : Quickly press and release the left mouse button, move a mouse..." in "Accessibility Options" of your keyboard may differ from right-handed to left mouse button once. The numeric keys on a function and again to turn on the numeric keypad of the Control Panel. Using a Mouse Generally a mouse functions as MouseKeys, first you can be used as toggles; Drag (...

User Guide
Page 23
... This chapter describes how to install or remove system cover, optional drives, and optional cards in this chapter. NOTE Turn off the computer and peripheral devices including the monitor and printer. Turn off the computer. Then disconnect any of all, disconnect the power cable from the electrical outlet and from any telecommunications...
... This chapter describes how to install or remove system cover, optional drives, and optional cards in this chapter. NOTE Turn off the computer and peripheral devices including the monitor and printer. Turn off the computer. Then disconnect any of all, disconnect the power cable from the electrical outlet and from any telecommunications...
User Guide
Page 37
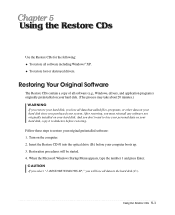
..., type the number 1 and press Enter. Using the Restore CDs Use the Restore CDs for the following: To restore all data in the hard disk (C:). Turn on your system. Restoration procedures will lose all software including Windows® XP. RESTORE WINDOWS XP," you purchased your hard disk. To restore lost or...
..., type the number 1 and press Enter. Using the Restore CDs Use the Restore CDs for the following: To restore all data in the hard disk (C:). Turn on your system. Restoration procedures will lose all software including Windows® XP. RESTORE WINDOWS XP," you purchased your hard disk. To restore lost or...

User Guide
Page 43
...Hard disk drive access indicator light stays on Solution The files stored on the computer, refer to the followings: Unplug the power cord to turn off your hard disk may be corrupted. Power Cause My computer doesn't work Chapter 1 Solution Computer is not working . Make sure ...disk may be fragmented. If it is not properly connected to see whether the wall outlet works, plug other wall outlet. When the computer turned down by running Disk Defragmenter. (For more information, refer to the Windows Help. Wall outlet is listed first, followed by running Disk Defragmenter...
...Hard disk drive access indicator light stays on Solution The files stored on the computer, refer to the followings: Unplug the power cord to turn off your hard disk may be corrupted. Power Cause My computer doesn't work Chapter 1 Solution Computer is not working . Make sure ...disk may be fragmented. If it is not properly connected to see whether the wall outlet works, plug other wall outlet. When the computer turned down by running Disk Defragmenter. (For more information, refer to the Windows Help. Wall outlet is listed first, followed by running Disk Defragmenter...
User Guide
Page 44
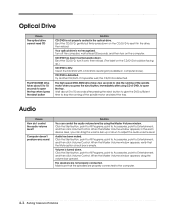
... Problems CD/DVD has been inserted upside down . CD/DVD is not recognized. Make sure that the Mute option check box is turned down . Eject the CD/DVD, turn on the CD/DVD should be facing up or down on the CD/DVD to open the tray. The high speed DVD-ROM... of the spindle motor when you can control the audio volume level by using CD or DVD, to the computer. Turn off the computer, wait at least 30 seconds, and then turn it operates well, the CD/DVD is dirty. When the Master Volume window appears, verify that the speakers are not...
... Problems CD/DVD has been inserted upside down . CD/DVD is not recognized. Make sure that the Mute option check box is turned down . Eject the CD/DVD, turn on the CD/DVD should be facing up or down on the CD/DVD to open the tray. The high speed DVD-ROM... of the spindle motor when you can control the audio volume level by using CD or DVD, to the computer. Turn off the computer, wait at least 30 seconds, and then turn it operates well, the CD/DVD is dirty. When the Master Volume window appears, verify that the speakers are not...

