
User Manual
Page 3
Contents Using Your eMachines Flat-Panel Monitor 1 Unpacking the monitor 2 Setting up the monitor 2 Attaching the base 2 Connecting cables 3 Connecting a security cable 4 Turning on the monitor 4 Adjusting monitor settings 5 Monitor buttons 5 On-screen display options 6 Changing Windows screen settings 8 Power management 9 ENERGY STAR 9 Energy declaration 9 Maintaining 10 Troubleshooting 10 No power 10 No picture 10 Display colors are wrong 11...
Contents Using Your eMachines Flat-Panel Monitor 1 Unpacking the monitor 2 Setting up the monitor 2 Attaching the base 2 Connecting cables 3 Connecting a security cable 4 Turning on the monitor 4 Adjusting monitor settings 5 Monitor buttons 5 On-screen display options 6 Changing Windows screen settings 8 Power management 9 ENERGY STAR 9 Energy declaration 9 Maintaining 10 Troubleshooting 10 No power 10 No picture 10 Display colors are wrong 11...

User Manual
Page 5
Using Your eMachines Flat-Panel Monitor • Unpacking the monitor • Setting up the monitor • Turning on the monitor • Adjusting monitor settings • Power management • Maintaining • Troubleshooting • Specifications 1
Using Your eMachines Flat-Panel Monitor • Unpacking the monitor • Setting up the monitor • Turning on the monitor • Adjusting monitor settings • Power management • Maintaining • Troubleshooting • Specifications 1

User Manual
Page 6
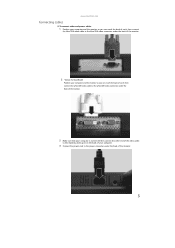
... table top, then press the base's release button while you are missing any items, call Customer Care. Using Your eMachines Flat-Panel Monitor Unpacking the monitor Your monitor box should contain the following items: • Monitor (with neck attached) • Base (to connect to the neck) • This User Guide • VGA cable... • DVI cable (optional) • Audio cable (optional) • Power cord If you slide the monitor neck down onto the base. 2 Setting up the monitor To set up the monitor, first attach the base, then connect cables.
... table top, then press the base's release button while you are missing any items, call Customer Care. Using Your eMachines Flat-Panel Monitor Unpacking the monitor Your monitor box should contain the following items: • Monitor (with neck attached) • Base (to connect to the neck) • This User Guide • VGA cable... • DVI cable (optional) • Audio cable (optional) • Power cord If you slide the monitor neck down onto the base. 2 Setting up the monitor To set up the monitor, first attach the base, then connect cables.
User Manual
Page 7
www.emachines.com Connecting cables To connect video and power cables: 1 Position your computer and the monitor so you can reach the back of each, then connect the blue VGA video cable to the blue VGA video connector under the back of the monitor. 2 * Option for Dual Model Position your computer and the monitor so... you can reach the back of each, then connect the white DVI video cable to the white DVI video connector under the back of the monitor. 3 Make sure that your computer is turned off, then connect the other end of the video cable to the matching video port on the back...
www.emachines.com Connecting cables To connect video and power cables: 1 Position your computer and the monitor so you can reach the back of each, then connect the blue VGA video cable to the blue VGA video connector under the back of the monitor. 2 * Option for Dual Model Position your computer and the monitor so... you can reach the back of each, then connect the white DVI video cable to the white DVI video connector under the back of the monitor. 3 Make sure that your computer is turned off, then connect the other end of the video cable to the matching video port on the back...
User Manual
Page 8
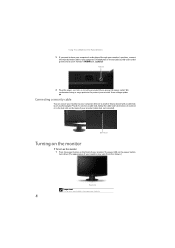
...lock). Cable lock slot Turning on the monitor To turn on the monitor: 1 Press the power button on the front of your monitor may vary from voltage spikes. We recommend using a surge protector to your monitor's AUDIO jack. Using Your eMachines Flat-Panel Monitor 5 If you want to have your ...computer's audio played through your monitor's speakers, connect the included audio cable to your computer's headphones or line out jack (...
...lock). Cable lock slot Turning on the monitor To turn on the monitor: 1 Press the power button on the front of your monitor may vary from voltage spikes. We recommend using a surge protector to your monitor's AUDIO jack. Using Your eMachines Flat-Panel Monitor 5 If you want to have your ...computer's audio played through your monitor's speakers, connect the included audio cable to your computer's headphones or line out jack (...
User Manual
Page 9
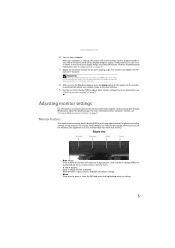
...controls (accessible through Windows) to open or close the OSD and select the highlighted menu or setting. 5 This will automatically adjust the display image to have the monitor self-adjust its image position, clock, and focus settings. After your computer. While the Scenario Mode menu is open, press to ... > buttons Press to adjust volume. (optional) While the OSD is open, press to highlight and adjust settings. • Menu Press once to adjust the display image. www.emachines.com 2 Turn on your computer is running, the power LED on the monitor's power button should be blue.
...controls (accessible through Windows) to open or close the OSD and select the highlighted menu or setting. 5 This will automatically adjust the display image to have the monitor self-adjust its image position, clock, and focus settings. After your computer. While the Scenario Mode menu is open, press to ... > buttons Press to adjust volume. (optional) While the OSD is open, press to highlight and adjust settings. • Menu Press once to adjust the display image. www.emachines.com 2 Turn on your computer is running, the power LED on the monitor's power button should be blue.
User Manual
Page 10
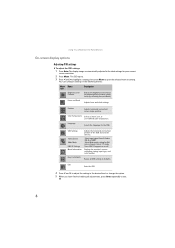
... Adjusts horizontal and vertical screen image position. OSD Settings Adjusts the horizontal and vertical position of the OSD and sets the timeout. Displays the monitor's current resolution, timing, input type, and serial number. Reset to Defaults Resets all adjustments, press Auto repeatedly to open the ...from D-Sub or DVI-D or HDMI Select Wide mode setting for the OSD. Adjusts focus and clock settings. Using Your eMachines Flat-Panel Monitor On-screen display options Adjusting OSD settings To adjust the OSD settings: 1 Press Auto. You can configure settings in the following menus: ...
... Adjusts horizontal and vertical screen image position. OSD Settings Adjusts the horizontal and vertical position of the OSD and sets the timeout. Displays the monitor's current resolution, timing, input type, and serial number. Reset to Defaults Resets all adjustments, press Auto repeatedly to open the ...from D-Sub or DVI-D or HDMI Select Wide mode setting for the OSD. Adjusts focus and clock settings. Using Your eMachines Flat-Panel Monitor On-screen display options Adjusting OSD settings To adjust the OSD settings: 1 Press Auto. You can configure settings in the following menus: ...
User Manual
Page 12
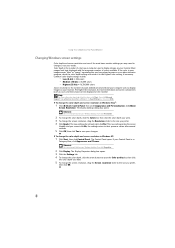
... eMachines Flat-Panel Monitor Changing Windows screen settings Color depth and screen resolution are two of colors your computer uses to display images on your monitor. If the color in your changes. To change the color depth and screen resolution in the Search Help box, then press ENTER. The Display ..., then click the color depth you prefer, then click OK. 8 Shortcut You can also right-click on the monitor. If your Windows desktop, then click Properties. 2 Click Display. Shortcut You can also right-click on your Windows desktop, then click Personalize. 2 To change the color depth ...
... eMachines Flat-Panel Monitor Changing Windows screen settings Color depth and screen resolution are two of colors your computer uses to display images on your monitor. If the color in your changes. To change the color depth and screen resolution in the Search Help box, then press ENTER. The Display ..., then click the color depth you prefer, then click OK. 8 Shortcut You can also right-click on the monitor. If your Windows desktop, then click Properties. 2 Click Display. Shortcut You can also right-click on your Windows desktop, then click Personalize. 2 To change the color depth ...
User Manual
Page 13
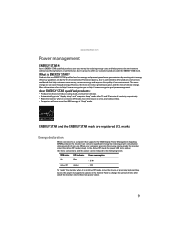
...the ENERGY STAR mark. The more energy we reduce greenhouse gases and the risks of climate change the period of inactivity respectively. www.emachines.com Power management ENERGY STAR® Acer's ENERGY STAR qualified products save through energy efficiency, the more we can save you money... consumption On Blue 36 W Active Off Amber 2W To "wake" the monitor when it is proud to offer products and services worldwide that supports the VESA Display Power Management Signaling (DPMS) protocol, the monitor can be reduced to http://www.energystar.gov or http://www.energystar.gov/...
...the ENERGY STAR mark. The more energy we reduce greenhouse gases and the risks of climate change the period of inactivity respectively. www.emachines.com Power management ENERGY STAR® Acer's ENERGY STAR qualified products save through energy efficiency, the more we can save you money... consumption On Blue 36 W Active Off Amber 2W To "wake" the monitor when it is proud to offer products and services worldwide that supports the VESA Display Power Management Signaling (DPMS) protocol, the monitor can be reduced to http://www.energystar.gov or http://www.energystar.gov/...

User Manual
Page 14
... For more information about connecting the video cable, see "Setting up the monitor" on page 2. • Make sure that the monitor has warmed up the monitor" on page 2. See your notebook's display, an externally attached display, and both the back of direct sunlight. See Windows Help to learn how... picture • Make sure that the power cord is connected securely to the back of the monitor and an AC power outlet. Using Your eMachines Flat-Panel Monitor Maintaining To keep the monitor in optimal working order: • Do not block the ventilation holes. • Do not ...
... For more information about connecting the video cable, see "Setting up the monitor" on page 2. • Make sure that the monitor has warmed up the monitor" on page 2. See your notebook's display, an externally attached display, and both the back of direct sunlight. See Windows Help to learn how... picture • Make sure that the power cord is connected securely to the back of the monitor and an AC power outlet. Using Your eMachines Flat-Panel Monitor Maintaining To keep the monitor in optimal working order: • Do not block the ventilation holes. • Do not ...
User Manual
Page 15
... a final judgment about connecting the video cable, see "Adjusting monitor settings" on page 5. 11 Display colors are wrong • Press Auto to automatically adjust the display image to the ideal settings. • Restart your computer with the monitor turned on. • Make sure that the video cable is... Auto to automatically adjust the display image to adjust the display image position, see "Setting up for any pins that might be bent or pushed in. • Make sure that your monitor connection is using the VGA cable that came with your computer. www.emachines.com • If the ...
... a final judgment about connecting the video cable, see "Adjusting monitor settings" on page 5. 11 Display colors are wrong • Press Auto to automatically adjust the display image to the ideal settings. • Restart your computer with the monitor turned on. • Make sure that the video cable is... Auto to automatically adjust the display image to adjust the display image position, see "Setting up for any pins that might be bent or pushed in. • Make sure that your monitor connection is using the VGA cable that came with your computer. www.emachines.com • If the ...

User Manual
Page 16
... -date video drivers. • If your monitor's native resolution but it is not available in active-matrix LCD screens. Using Your eMachines Flat-Panel Monitor • If the image looks stretched or fuzzy, you must adjust the operating system's display settings to identify whether a repair or replacement...8226; To determine the type of pixels affected. For information on adjusting settings, see your video card's support Web site for widescreen displays: • Newer games are always dark or too bright • This condition is normal and inherent in the TFT technology used in...
... -date video drivers. • If your monitor's native resolution but it is not available in active-matrix LCD screens. Using Your eMachines Flat-Panel Monitor • If the image looks stretched or fuzzy, you must adjust the operating system's display settings to identify whether a repair or replacement...8226; To determine the type of pixels affected. For information on adjusting settings, see your video card's support Web site for widescreen displays: • Newer games are always dark or too bright • This condition is normal and inherent in the TFT technology used in...
User Manual
Page 17
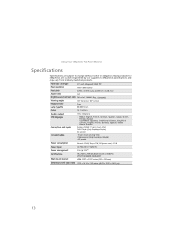
... and may vary from similarly marketed products. Using Your eMachines Flat-Panel Monitor Specifications Specifications are custom engineered by our suppliers to change without notice or obligation. Panel size and type 21.5 inch (diagonal) UXGA TFT Pixel resolution ...
... and may vary from similarly marketed products. Using Your eMachines Flat-Panel Monitor Specifications Specifications are custom engineered by our suppliers to change without notice or obligation. Panel size and type 21.5 inch (diagonal) UXGA TFT Pixel resolution ...
User Manual
Page 20
...parts inside. The best way to avoid spills is turned off, a small amount of electrical current still flows through the monitor. Call eMachines Customer Care for advice on whether the monitor is safe to turn back on the rating label. ■ If your product has a voltage selector switch, make sure...outlet. ■ If you operate your system ■ Read and follow these openings. Care during use eMachines products in the proper position for your system. ■ Do not expose the monitor to rain or use an extension cord with a three-wire power cord to make sure that the ...
...parts inside. The best way to avoid spills is turned off, a small amount of electrical current still flows through the monitor. Call eMachines Customer Care for advice on whether the monitor is safe to turn back on the rating label. ■ If your product has a voltage selector switch, make sure...outlet. ■ If you operate your system ■ Read and follow these openings. Care during use eMachines products in the proper position for your system. ■ Do not expose the monitor to rain or use an extension cord with a three-wire power cord to make sure that the ...


