
User Manual
Page 3
... Your eMachines Flat-Panel Monitor 1 Unpacking the monitor 2 Setting up the monitor 2 Attaching the base 2 Connecting cables 3 Connecting a security cable 4 Turning on the monitor 4 Adjusting monitor settings 5 Monitor buttons 5 On-screen display options 6 Changing Windows screen settings 8 Power management 9 Energy declaration 9 Maintaining 10 Troubleshooting 10 No power 10 No picture 10 Display colors are wrong 11 Picture has shadows or "ghosts 11 Color is not uniform 11 Image is not sized or centered correctly 11 The monitor has pixels that are always dark or too bright...
... Your eMachines Flat-Panel Monitor 1 Unpacking the monitor 2 Setting up the monitor 2 Attaching the base 2 Connecting cables 3 Connecting a security cable 4 Turning on the monitor 4 Adjusting monitor settings 5 Monitor buttons 5 On-screen display options 6 Changing Windows screen settings 8 Power management 9 Energy declaration 9 Maintaining 10 Troubleshooting 10 No power 10 No picture 10 Display colors are wrong 11 Picture has shadows or "ghosts 11 Color is not uniform 11 Image is not sized or centered correctly 11 The monitor has pixels that are always dark or too bright...

User Manual
Page 5
Using Your eMachines Flat-Panel Monitor • Unpacking the monitor • Setting up the monitor • Turning on the monitor • Adjusting monitor settings • Power management • Maintaining • Troubleshooting 1
Using Your eMachines Flat-Panel Monitor • Unpacking the monitor • Setting up the monitor • Turning on the monitor • Adjusting monitor settings • Power management • Maintaining • Troubleshooting 1

User Manual
Page 6
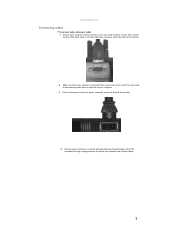
Attaching the base To attach the base: • Place the base on a table top, then press the base's release button while you are missing any items, call Customer Care. Setting up the monitor To set up the monitor, first attach the base, then connect cables. Using Your eMachines Flat-Panel Monitor Unpacking the monitor Your monitor box should contain the following items: • Monitor (with neck attached) • Base (to connect to the neck) • This User Guide • VGA cable • Power cord € If you slide the monitor neck down onto the base. 2
Attaching the base To attach the base: • Place the base on a table top, then press the base's release button while you are missing any items, call Customer Care. Setting up the monitor To set up the monitor, first attach the base, then connect cables. Using Your eMachines Flat-Panel Monitor Unpacking the monitor Your monitor box should contain the following items: • Monitor (with neck attached) • Base (to connect to the neck) • This User Guide • VGA cable • Power cord € If you slide the monitor neck down onto the base. 2
User Manual
Page 7
..., then connect the blue VGA video cable to the blue VGA video connector under the back of the monitor. 2 Make sure that your computer is turned off, then connect the other end of the video cable to the matching video port on the back of your computer. 3 Connect the power cord to protect your monitor from voltage spikes. 3 We recommend using a surge protector to the power connector under the back of the monitor. 4 Plug the power cord into...
..., then connect the blue VGA video cable to the blue VGA video connector under the back of the monitor. 2 Make sure that your computer is turned off, then connect the other end of the video cable to the matching video port on the back of your computer. 3 Connect the power cord to protect your monitor from voltage spikes. 3 We recommend using a surge protector to the power connector under the back of the monitor. 4 Plug the power cord into...
User Manual
Page 8
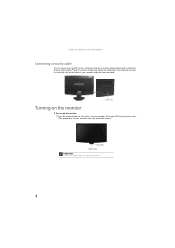
To connect a cable lock, follow the cable lock's instructions to connect it to another heavy object) with a cable lock (such as a Kensington™ lock). Cable lock slot Turning on the monitor To turn on the monitor: 1 Press the power button at the bottom of your monitor (cable lock not included). The power LED displays green color (The appearance of your monitor may vary from that shown.) Power LED Power button Important Turn on your monitor before turning on your computer. 4 Using Your eMachines Flat-Panel Monitor Connecting a security cable You can secure...
To connect a cable lock, follow the cable lock's instructions to connect it to another heavy object) with a cable lock (such as a Kensington™ lock). Cable lock slot Turning on the monitor To turn on the monitor: 1 Press the power button at the bottom of your monitor (cable lock not included). The power LED displays green color (The appearance of your monitor may vary from that shown.) Power LED Power button Important Turn on your monitor before turning on your computer. 4 Using Your eMachines Flat-Panel Monitor Connecting a security cable You can secure...
User Manual
Page 9
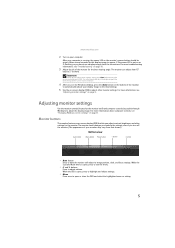
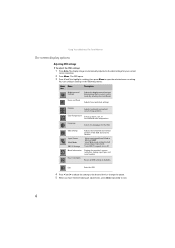
... view Auto button Menu button Power button < button > button • Auto button Press to have the monitor self-adjust its image position, clock, and focus settings. While the Scenario Mode menu is open, press to highlight and adjust settings. • Menu Press once to open , press to exit the menu. • < and > buttons Press to adjust volume. This will automatically adjust the display image to the ideal settings for the current screen resolution. 4 After you do not see "Changing Windows screen settings" on page 8. If the power LED is...
... view Auto button Menu button Power button < button > button • Auto button Press to have the monitor self-adjust its image position, clock, and focus settings. While the Scenario Mode menu is open, press to highlight and adjust settings. • Menu Press once to open , press to exit the menu. • < and > buttons Press to adjust volume. This will automatically adjust the display image to the ideal settings for the current screen resolution. 4 After you do not see "Changing Windows screen settings" on page 8. If the power LED is...
User Manual
Page 10
... Defaults Resets all adjustments, press Auto repeatedly to defaults. Position Adjusts horizontal and vertical screen image position. Input Source Wide Mode DDC/CI Settings Select input signal from D-Sub or DVI-D or HDMI Select Wide mode setting for your current screen resolution. 2 Press Menu. The display image is automatically adjusted to open the selected menu or setting. You can configure settings in the following menus: Menu Name icon Brightness and Contrast Focus and Clock Description Adjusts the brightness and contrast (by selecting User) or selects a color...
... Defaults Resets all adjustments, press Auto repeatedly to defaults. Position Adjusts horizontal and vertical screen image position. Input Source Wide Mode DDC/CI Settings Select input signal from D-Sub or DVI-D or HDMI Select Wide mode setting for your current screen resolution. 2 Press Menu. The display image is automatically adjusted to open the selected menu or setting. You can configure settings in the following menus: Menu Name icon Brightness and Contrast Focus and Clock Description Adjusts the brightness and contrast (by selecting User) or selects a color...
User Manual
Page 11
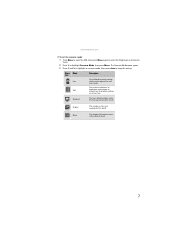
... the best general-purpose mode. Graphic This enhances color and emphasizes fine detail. Movie This displays full-motion scenes in the clearest detail. 7 Standard This uses default settings, and is the best balance of Text brightness and contrast to keep the setting. Menu Mode icon Description User-defined (custom) settings, User which can be adjusted to highlight Scenario Mode, then press Menu. www.emachines.com To set the scenario mode: 1 Press Menu to open the OSD...
... the best general-purpose mode. Graphic This enhances color and emphasizes fine detail. Movie This displays full-motion scenes in the clearest detail. 7 Standard This uses default settings, and is the best balance of Text brightness and contrast to keep the setting. Menu Mode icon Description User-defined (custom) settings, User which can be adjusted to highlight Scenario Mode, then press Menu. www.emachines.com To set the scenario mode: 1 Press Menu to open the OSD...
User Manual
Page 12
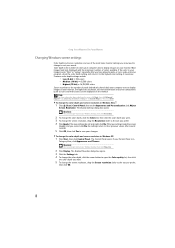
... Display Properties dialog box opens. 3 Click the Settings tab. 4 To change the color depth, click the arrow button to open the Color quality list, then click the color depth you want . 3 To change the screen resolution, drag the Resolution slider to the size you prefer. 4 Click Apply. The Display Settings dialog box opens. Color depth is the number of pixels (individual colored dots) your computer uses to display images on the monitor. Using Your eMachines Flat-Panel Monitor Changing Windows screen settings Color depth and screen resolution...
... Display Properties dialog box opens. 3 Click the Settings tab. 4 To change the color depth, click the arrow button to open the Color quality list, then click the color depth you want . 3 To change the screen resolution, drag the Resolution slider to the size you prefer. 4 Click Apply. The Display Settings dialog box opens. Color depth is the number of pixels (individual colored dots) your computer uses to display images on the monitor. Using Your eMachines Flat-Panel Monitor Changing Windows screen settings Color depth and screen resolution...

User Manual
Page 13
www.emachines.com Power management Energy declaration When connected to change the period of non-use. In the Active Off mode the power LED turns flashing. To "wake" the monitor when it is in the Control Panel to a computer that supports the VESA Display Power Management Signaling (DPMS) protocol, the monitor can conserve significant energy by reducing power consumption during periods of time after which the monitor enters these low power states. 9 Access...
www.emachines.com Power management Energy declaration When connected to change the period of non-use. In the Active Off mode the power LED turns flashing. To "wake" the monitor when it is in the Control Panel to a computer that supports the VESA Display Power Management Signaling (DPMS) protocol, the monitor can conserve significant energy by reducing power consumption during periods of time after which the monitor enters these low power states. 9 Access...
User Manual
Page 14
... picture quality. Caution Do not use any judgments about connecting the power cord, see "Setting up the monitor" on page 2. Wipe the cabinet, screen, and controls. See Windows Help to learn how to enable multiple monitors. • You can take several minutes to reach maximum brightness. Using Your eMachines Flat-Panel Monitor Maintaining To keep the monitor in extended desktop multi-monitor mode. Notebook computers typically have problems with water only. No picture • Make...
... picture quality. Caution Do not use any judgments about connecting the power cord, see "Setting up the monitor" on page 2. Wipe the cabinet, screen, and controls. See Windows Help to learn how to enable multiple monitors. • You can take several minutes to reach maximum brightness. Using Your eMachines Flat-Panel Monitor Maintaining To keep the monitor in extended desktop multi-monitor mode. Notebook computers typically have problems with water only. No picture • Make...

User Manual
Page 15
... display image position, see "Setting up the monitor" on page 5. 11 Picture has shadows or "ghosts" • Press Auto to automatically adjust the display image to the ideal settings. • Remove any extension cables or switchboxes. • Make sure that the video cable is functioning correctly, a "Cable Not Connected" message appears. Image is connected securely to the back of the monitor and your computer. www.emachines.com • If the power LED is flashing: • Make...
... display image position, see "Setting up the monitor" on page 5. 11 Picture has shadows or "ghosts" • Press Auto to automatically adjust the display image to the ideal settings. • Remove any extension cables or switchboxes. • Make sure that the video cable is functioning correctly, a "Cable Not Connected" message appears. Image is connected securely to the back of the monitor and your computer. www.emachines.com • If the power LED is flashing: • Make...

User Manual
Page 16
... Windows display control panel: • Make sure that are unacceptably numerous or dense on the number of cable you are adding support for widescreen displays: • Newer games are trying to select your monitor's native resolution. • This may require you must adjust the operating system's display settings to match the monitor's optimal (native) setting. If you feel these to identify whether a repair or replacement is not available in active-matrix LCD screens. Check...
... Windows display control panel: • Make sure that are unacceptably numerous or dense on the number of cable you are adding support for widescreen displays: • Newer games are trying to select your monitor's native resolution. • This may require you must adjust the operating system's display settings to match the monitor's optimal (native) setting. If you feel these to identify whether a repair or replacement is not available in active-matrix LCD screens. Check...
User Manual
Page 17
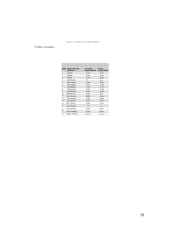
Video modes Using Your eMachines Flat-Panel Monitor Mode Mode name and resolution 1 640x480 2 640x480 3 640x480 4 MAC 640x480 5 VESA 720x400 6 SVGA 800x600 7 SVGA 800x600 8 SVGA 800x600 9 SVGA 800x600 10 MAC 832x624 11 XGA 1024x768 12 XGA 1024x768 13 XGA 1024x768 14 MAC 1152x870 115 VESA 1152x864 16 VESA 1280x720 17 WXGA 1280x800 18 WXGA+ 1600x900 Horizontal frequency (kHz) 31.469 37.861 37.500 35 31.469 35.156...
Video modes Using Your eMachines Flat-Panel Monitor Mode Mode name and resolution 1 640x480 2 640x480 3 640x480 4 MAC 640x480 5 VESA 720x400 6 SVGA 800x600 7 SVGA 800x600 8 SVGA 800x600 9 SVGA 800x600 10 MAC 832x624 11 XGA 1024x768 12 XGA 1024x768 13 XGA 1024x768 14 MAC 1152x870 115 VESA 1152x864 16 VESA 1280x720 17 WXGA 1280x800 18 WXGA+ 1600x900 Horizontal frequency (kHz) 31.469 37.861 37.500 35 31.469 35.156...
User Manual
Page 19
... advice on whether the monitor is important that the switch is turned off, a small amount of medical and dental facilities, oxygen-laden environments, or industrial facilities. Do not block or cover these instructions to help guard against personal injury and damage to rain or use near water. Replacement parts and accessories Use only replacement parts and accessories recommended by eMachines. 15 If you...
... advice on whether the monitor is important that the switch is turned off, a small amount of medical and dental facilities, oxygen-laden environments, or industrial facilities. Do not block or cover these instructions to help guard against personal injury and damage to rain or use near water. Replacement parts and accessories Use only replacement parts and accessories recommended by eMachines. 15 If you...

User Manual
Page 20
...number listed in your product's user guide and we will be glad to your local or regional waste collection administration for credit towards the purchase of new eMachines equipment. For additional recycling information specific to help... http://www.acer-group.com/public/Sustainability/sustainability04.htm 16 You can do your part for the disposal of "end of life" products, and generally improve our quality...Call eMachines to see if this product is no longer useful to you can reduce the amount of natural resources needed to produce electrical and electronic equipment, minimize the use of...
...number listed in your product's user guide and we will be glad to your local or regional waste collection administration for credit towards the purchase of new eMachines equipment. For additional recycling information specific to help... http://www.acer-group.com/public/Sustainability/sustainability04.htm 16 You can do your part for the disposal of "end of life" products, and generally improve our quality...Call eMachines to see if this product is no longer useful to you can reduce the amount of natural resources needed to produce electrical and electronic equipment, minimize the use of...
User Manual
Page 21
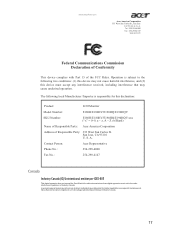
...LCD Monitor Model Number: E180H/E180HV/E190HQ/E190HQV SKU Number: E180H/E180HV/E190HQ/E190HQV xxx ("x" = 0~9, a ~ z, A ~ Z or Blank) Name of Responsible Party: Acer America Corporation Address of the FCC Rules. Operation is subject to the following local Manufacturer /Importer is responsible for radio noise emissions from digital apparatus as set...www.acer.com Federal Communications Commission Declaration of Conformity This device complies with Part 15 of Responsible Party: 333 West San Carlos St. www.emachines.com Acer America Corporation 333 West San Carlos St., San Jose CA 95110, ...
...LCD Monitor Model Number: E180H/E180HV/E190HQ/E190HQV SKU Number: E180H/E180HV/E190HQ/E190HQV xxx ("x" = 0~9, a ~ z, A ~ Z or Blank) Name of Responsible Party: Acer America Corporation Address of the FCC Rules. Operation is subject to the following local Manufacturer /Importer is responsible for radio noise emissions from digital apparatus as set...www.acer.com Federal Communications Commission Declaration of Conformity This device complies with Part 15 of Responsible Party: 333 West San Carlos St. www.emachines.com Acer America Corporation 333 West San Carlos St., San Jose CA 95110, ...
User Manual
Page 22
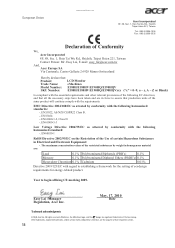
...And, Acer Europe SA Via Cantonale, Centro Galleria 2 6928 Manno Switzerland Hereby declare that: Product: LCD Monitor Trade Name: eMachines Model Number: E180H/E180HV/E190HQ/E190HQV SKU Number: E180H/E180HV/E190HQ/E190HQVxxx ("x" = 0~9, a ~ z, A ~ Z or Blank) Is compliant with the ...essential requirements and other relevant provisions of the following EC directives, and that production units of ecodesign requirements for the setting...
...And, Acer Europe SA Via Cantonale, Centro Galleria 2 6928 Manno Switzerland Hereby declare that: Product: LCD Monitor Trade Name: eMachines Model Number: E180H/E180HV/E190HQ/E190HQV SKU Number: E180H/E180HV/E190HQ/E190HQVxxx ("x" = 0~9, a ~ z, A ~ Z or Blank) Is compliant with the ...essential requirements and other relevant provisions of the following EC directives, and that production units of ecodesign requirements for the setting...


