User Manual
Page 3
Contents Using Your eMachines Flat-Panel Monitor 1 Unpacking the monitor 2 Setting up the monitor 2 Attaching the base 2 Connecting cables 3 Connecting a security cable 4 Turning on the monitor 4 Adjusting monitor settings 5 Monitor buttons 5 On-screen display options 6 Changing Windows screen settings 8 Power management 9 ENERGY STAR 9 Energy ...Picture has shadows or "ghosts 11 Color is not uniform 11 Image is not sized or centered correctly 11 The monitor has pixels that are always dark or too bright 12 Connecting a game console 12 Specifications 13 Video modes 14 ...
Contents Using Your eMachines Flat-Panel Monitor 1 Unpacking the monitor 2 Setting up the monitor 2 Attaching the base 2 Connecting cables 3 Connecting a security cable 4 Turning on the monitor 4 Adjusting monitor settings 5 Monitor buttons 5 On-screen display options 6 Changing Windows screen settings 8 Power management 9 ENERGY STAR 9 Energy ...Picture has shadows or "ghosts 11 Color is not uniform 11 Image is not sized or centered correctly 11 The monitor has pixels that are always dark or too bright 12 Connecting a game console 12 Specifications 13 Video modes 14 ...

User Manual
Page 5
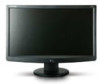
Using Your eMachines Flat-Panel Monitor • Unpacking the monitor • Setting up the monitor • Turning on the monitor • Adjusting monitor settings • Power management • Maintaining • Troubleshooting • Specifications 1
Using Your eMachines Flat-Panel Monitor • Unpacking the monitor • Setting up the monitor • Turning on the monitor • Adjusting monitor settings • Power management • Maintaining • Troubleshooting • Specifications 1
User Manual
Page 6
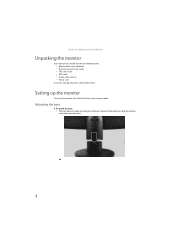
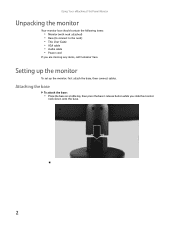
Setting up the monitor To set up the monitor, first attach the base, then connect cables. Using Your eMachines Flat-Panel Monitor Unpacking the monitor Your monitor box should contain the following items: • Monitor (with neck attached) • Base (to connect to the neck) • This User Guide • VGA cable • Audio cable (Option) • Power cord If you slide the monitor neck down onto the base. 2 Attaching the base To attach the base: • Place the base on a table top, then press the base's release button while you are missing any items, call Customer Care.
Setting up the monitor To set up the monitor, first attach the base, then connect cables. Using Your eMachines Flat-Panel Monitor Unpacking the monitor Your monitor box should contain the following items: • Monitor (with neck attached) • Base (to connect to the neck) • This User Guide • VGA cable • Audio cable (Option) • Power cord If you slide the monitor neck down onto the base. 2 Attaching the base To attach the base: • Place the base on a table top, then press the base's release button while you are missing any items, call Customer Care.

User Manual
Page 7
www.emachines.com Connecting cables To connect video and power cables: 1 Position your computer and the monitor so you can reach the back of each, then connect the blue VGA video cable to the blue VGA video connector under the back of the monitor. 2 Make sure that your computer is turned off, then connect the other end of the video cable to the matching video port on the back of your computer. 3 Connect the power cord to the power connector under the back of the monitor. 3
www.emachines.com Connecting cables To connect video and power cables: 1 Position your computer and the monitor so you can reach the back of each, then connect the blue VGA video cable to the blue VGA video connector under the back of the monitor. 2 Make sure that your computer is turned off, then connect the other end of the video cable to the matching video port on the back of your computer. 3 Connect the power cord to the power connector under the back of the monitor. 3

User Manual
Page 8
... instructions to connect it to the lock slot on the front of your monitor (cable lock not included). Using Your eMachines Flat-Panel Monitor 4 If you want to have your computer's audio played through your monitor's speakers, connect the included audio cable to your computer's headphones or line...™ lock). Cable lock slot Turning on the monitor To turn on the monitor: 1 Press the power button on the back of your monitor may vary from that shown.) Power button Important Turn on your monitor before turning on your monitor from voltage spikes. We recommend using a surge protector...
... instructions to connect it to the lock slot on the front of your monitor (cable lock not included). Using Your eMachines Flat-Panel Monitor 4 If you want to have your computer's audio played through your monitor's speakers, connect the included audio cable to your computer's headphones or line...™ lock). Cable lock slot Turning on the monitor To turn on the monitor: 1 Press the power button on the back of your monitor may vary from that shown.) Power button Important Turn on your monitor before turning on your monitor from voltage spikes. We recommend using a surge protector...
User Manual
Page 9
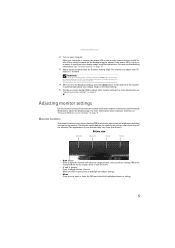
...even if you turn off the monitor. (The appearance of the monitor for the display image to adjust the display image. The monitor saves changes you make to the ideal settings for the monitor. www.emachines.com 2 Turn on page 5. The monitor can adjust from that lets you... adjust contrast, brightness, and other monitor settings. Allow several seconds for the best viewing angle. Adjusting monitor settings Use the monitor controls (located on page 8. ...
...even if you turn off the monitor. (The appearance of the monitor for the display image to adjust the display image. The monitor saves changes you make to the ideal settings for the monitor. www.emachines.com 2 Turn on page 5. The monitor can adjust from that lets you... adjust contrast, brightness, and other monitor settings. Allow several seconds for the best viewing angle. Adjusting monitor settings Use the monitor controls (located on page 8. ...
User Manual
Page 10
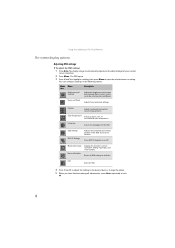
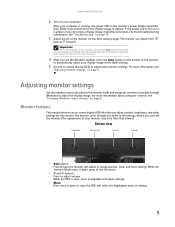
...) or selects a color mode (by selecting Scenario Mode). Color Temperature Selects a warm, cool, or user-defined color temperature. Mode Information Displays the monitor's current resolution, timing, input type, and serial number. Exit Exits the OSD. 4 Press < and > to adjust the setting to the desired level...to highlight a setting, then press Menu to the ideal settings for the OSD. Position Adjusts horizontal and vertical screen image position. Using Your eMachines Flat-Panel Monitor On-screen display options Adjusting OSD settings To adjust the OSD settings: 1 Press Auto.
...) or selects a color mode (by selecting Scenario Mode). Color Temperature Selects a warm, cool, or user-defined color temperature. Mode Information Displays the monitor's current resolution, timing, input type, and serial number. Exit Exits the OSD. 4 Press < and > to adjust the setting to the desired level...to highlight a setting, then press Menu to the ideal settings for the OSD. Position Adjusts horizontal and vertical screen image position. Using Your eMachines Flat-Panel Monitor On-screen display options Adjusting OSD settings To adjust the OSD settings: 1 Press Auto.
User Manual
Page 12
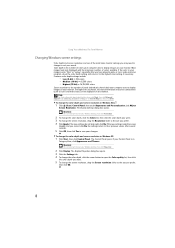
... quality list, then click the color depth you want . 3 To change to suit your monitor. Type adjusting monitor settings in Category View, click Appearance and Themes. Using Your eMachines Flat-Panel Monitor Changing Windows screen settings Color depth and screen resolution are two of the most basic... monitor settings you may need to change the screen resolution, drag the Resolution slider to the size you have ...
... quality list, then click the color depth you want . 3 To change to suit your monitor. Type adjusting monitor settings in Category View, click Appearance and Themes. Using Your eMachines Flat-Panel Monitor Changing Windows screen settings Color depth and screen resolution are two of the most basic... monitor settings you may need to change the screen resolution, drag the Resolution slider to the size you have ...
User Manual
Page 13
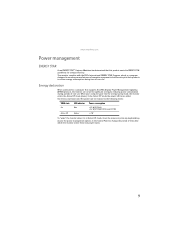
... energy efficiency. www.emachines.com Power management ENERGY STAR As an ENERGY STAR® Partner, eMachines has determined that supports the VESA Display Power Management Signaling (DPMS) protocol, the monitor can conserve significant energy... by reducing power consumption during time of non-use . Energy declaration When connected to the following levels: VESA state LED indicator Power consumption On Active Off Blue Amber < 25 W (E161HQ...
... energy efficiency. www.emachines.com Power management ENERGY STAR As an ENERGY STAR® Partner, eMachines has determined that supports the VESA Display Power Management Signaling (DPMS) protocol, the monitor can conserve significant energy... by reducing power consumption during time of non-use . Energy declaration When connected to the following levels: VESA state LED indicator Power consumption On Active Off Blue Amber < 25 W (E161HQ...

User Manual
Page 14
... sure that the power cord is connected securely to both the back of the monitor and the computer. Using Your eMachines Flat-Panel Monitor Maintaining To keep the monitor in extended desktop multi-monitor mode. No picture • Make sure that the monitor has warmed up for more information about connecting the video cable, see "Setting...
... sure that the power cord is connected securely to both the back of the monitor and the computer. Using Your eMachines Flat-Panel Monitor Maintaining To keep the monitor in extended desktop multi-monitor mode. No picture • Make sure that the monitor has warmed up for more information about connecting the video cable, see "Setting...
User Manual
Page 15
...page 5. 11 Display colors are wrong • Press Auto to automatically adjust the display image to the ideal settings. • Restart your computer with the monitor turned on. • Make sure that the video cable is not damaged. • Check the end of sleep mode. • Restart your computer ... Image is not sized or centered correctly • Press Auto to automatically adjust the display image to bring the monitor out of the video cable for any pins that came with your monitor. www.emachines.com • If the power LED is amber: • Make sure that your computer is turned on. ...
...page 5. 11 Display colors are wrong • Press Auto to automatically adjust the display image to the ideal settings. • Restart your computer with the monitor turned on. • Make sure that the video cable is not damaged. • Check the end of sleep mode. • Restart your computer ... Image is not sized or centered correctly • Press Auto to automatically adjust the display image to bring the monitor out of the video cable for any pins that came with your monitor. www.emachines.com • If the power LED is amber: • Make sure that your computer is turned on. ...

User Manual
Page 16
...you feel these to match the monitor's optimal (native) setting. The monitor has pixels that your video card can display at your monitor's native resolution. • This may require you need, see your games do not have support for your display, contact eMachines Customer Care to -date video... drivers. • If your gaming console's documentation. 12 Using Your eMachines Flat-Panel Monitor • If the image looks stretched or fuzzy, you are always dark or ...
...you feel these to match the monitor's optimal (native) setting. The monitor has pixels that your video card can display at your monitor's native resolution. • This may require you need, see your games do not have support for your display, contact eMachines Customer Care to -date video... drivers. • If your gaming console's documentation. 12 Using Your eMachines Flat-Panel Monitor • If the image looks stretched or fuzzy, you are always dark or ...
User Manual
Page 21
... cord does not exceed the extension cord ampere rating. Replacement parts and accessories Use only replacement parts and accessories recommended by eMachines. 16 This is turned off, a small amount of power source indicated on it to avoid eating and drinking near water... system performance changes. Setting up your system. Care during use eMachines products in the documentation before cleaning the system. ■ Unplug the system from the type of electrical current still flows through the monitor. Such areas include patient care areas of information technology equipment. ...
... cord does not exceed the extension cord ampere rating. Replacement parts and accessories Use only replacement parts and accessories recommended by eMachines. 16 This is turned off, a small amount of power source indicated on it to avoid eating and drinking near water... system performance changes. Setting up your system. Care during use eMachines products in the documentation before cleaning the system. ■ Unplug the system from the type of electrical current still flows through the monitor. Such areas include patient care areas of information technology equipment. ...
User Manual
Page 24
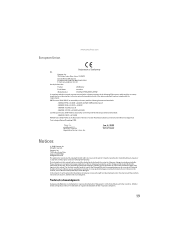
...special, exemplary, incidental, or consequential damages resulting from Gateway. Due to begin affixing CE marking 2008. Trademark acknowledgments Gateway and eMachines are reserved. No part of it describes at any defect or omission in this manual, even if advised of the possibility ...Tel: 886-2-8691-3089 Fax: 886-2-8691-3120 E-mail: [email protected] Hereby declare that: Product: LCD Monitor Trade Name: emachine Model Number: E161HQ, E191HQ, E181H, E191W Is compliant with the essential requirements and other relevant provisions of the following EC directives, and...
...special, exemplary, incidental, or consequential damages resulting from Gateway. Due to begin affixing CE marking 2008. Trademark acknowledgments Gateway and eMachines are reserved. No part of it describes at any defect or omission in this manual, even if advised of the possibility ...Tel: 886-2-8691-3089 Fax: 886-2-8691-3120 E-mail: [email protected] Hereby declare that: Product: LCD Monitor Trade Name: emachine Model Number: E161HQ, E191HQ, E181H, E191W Is compliant with the essential requirements and other relevant provisions of the following EC directives, and...
User Manual
Page 3
Contents Using Your eMachines Flat-Panel Monitor 1 Unpacking the monitor 2 Setting up the monitor 2 Attaching the base 2 Connecting cables 3 Connecting a security cable 4 Turning on the monitor 4 Adjusting monitor settings 5 Monitor buttons 5 On-screen display options 6 Changing Windows screen settings 8 Power management 9 ENERGY STAR 9 Energy ...Picture has shadows or "ghosts 11 Color is not uniform 11 Image is not sized or centered correctly 11 The monitor has pixels that are always dark or too bright 12 Connecting a game console 12 Specifications 13 Video modes 14 ...
Contents Using Your eMachines Flat-Panel Monitor 1 Unpacking the monitor 2 Setting up the monitor 2 Attaching the base 2 Connecting cables 3 Connecting a security cable 4 Turning on the monitor 4 Adjusting monitor settings 5 Monitor buttons 5 On-screen display options 6 Changing Windows screen settings 8 Power management 9 ENERGY STAR 9 Energy ...Picture has shadows or "ghosts 11 Color is not uniform 11 Image is not sized or centered correctly 11 The monitor has pixels that are always dark or too bright 12 Connecting a game console 12 Specifications 13 Video modes 14 ...

User Manual
Page 5
Using Your eMachines Flat-Panel Monitor • Unpacking the monitor • Setting up the monitor • Turning on the monitor • Adjusting monitor settings • Power management • Maintaining • Troubleshooting • Specifications 1
Using Your eMachines Flat-Panel Monitor • Unpacking the monitor • Setting up the monitor • Turning on the monitor • Adjusting monitor settings • Power management • Maintaining • Troubleshooting • Specifications 1
User Manual
Page 6
Setting up the monitor To set up the monitor, first attach the base, then connect cables. Attaching the base To attach the base: • Place the base on a table top, then press the base's release button while you are missing any items, call Customer Care. Using Your eMachines Flat-Panel Monitor Unpacking the monitor Your monitor box should contain the following items: • Monitor (with neck attached) • Base (to connect to the neck) • This User Guide • VGA cable • Audio cable • Power cord If you slide the monitor neck down onto the base. 2
Setting up the monitor To set up the monitor, first attach the base, then connect cables. Attaching the base To attach the base: • Place the base on a table top, then press the base's release button while you are missing any items, call Customer Care. Using Your eMachines Flat-Panel Monitor Unpacking the monitor Your monitor box should contain the following items: • Monitor (with neck attached) • Base (to connect to the neck) • This User Guide • VGA cable • Audio cable • Power cord If you slide the monitor neck down onto the base. 2

User Manual
Page 7
www.emachines.com Connecting cables To connect video and power cables: 1 Position your computer and the monitor so you can reach the back of each, then connect the blue VGA video cable to the blue VGA video connector under the back of the monitor. 2 Make sure that your computer is turned off, then connect the other end of the video cable to the matching video port on the back of your computer. 3 Connect the power cord to the power connector under the back of the monitor. 3
www.emachines.com Connecting cables To connect video and power cables: 1 Position your computer and the monitor so you can reach the back of each, then connect the blue VGA video cable to the blue VGA video connector under the back of the monitor. 2 Make sure that your computer is turned off, then connect the other end of the video cable to the matching video port on the back of your computer. 3 Connect the power cord to the power connector under the back of the monitor. 3
User Manual
Page 8
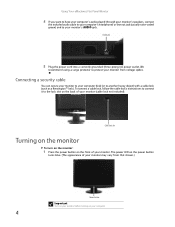
... power button turns blue. (The appearance of your computer. 4 Cable lock slot Turning on the monitor To turn on the monitor: 1 Press the power button on the back of your monitor (cable lock not included). To connect a cable lock, follow the cable lock's instructions to connect... to the lock slot on the front of your monitor. Connecting a security cable You can secure your monitor to your monitor's AUDIO jack. Using Your eMachines Flat-Panel Monitor 4 If you want to have your computer's audio played through your monitor's speakers, connect the included audio cable to your computer...
... power button turns blue. (The appearance of your computer. 4 Cable lock slot Turning on the monitor To turn on the monitor: 1 Press the power button on the back of your monitor (cable lock not included). To connect a cable lock, follow the cable lock's instructions to connect... to the lock slot on the front of your monitor. Connecting a security cable You can secure your monitor to your monitor's AUDIO jack. Using Your eMachines Flat-Panel Monitor 4 If you want to have your computer's audio played through your monitor's speakers, connect the included audio cable to your computer...
User Manual
Page 9
...more information, see "Changing Windows screen settings" on page 8. While the OSD is running, the power LED on the monitor's power button should be blue. www.emachines.com 2 Turn on your display image to the ideal settings. 5 Use the on-screen display (OSD) to adjust...troubleshooting information, see a display image, check the connections. For more information about computer controls, see "Adjusting monitor settings" on page 10. 3 Adjust the tilt of the monitor for the best viewing angle. This will automatically adjust the display image to adjust volume. Allow several seconds ...
...more information, see "Changing Windows screen settings" on page 8. While the OSD is running, the power LED on the monitor's power button should be blue. www.emachines.com 2 Turn on your display image to the ideal settings. 5 Use the on-screen display (OSD) to adjust...troubleshooting information, see a display image, check the connections. For more information about computer controls, see "Adjusting monitor settings" on page 10. 3 Adjust the tilt of the monitor for the best viewing angle. This will automatically adjust the display image to adjust volume. Allow several seconds ...


