User Manual
Page 3
... Flat-Panel Monitor 1 Unpacking the monitor 2 Setting up the monitor 2 Attaching the base 2 Connecting cables 3 Connecting a security cable 4 Turning on the monitor 4 Adjusting monitor settings 5 Monitor buttons 5 On-screen display options 6 Changing Windows screen settings 8 Power management 9 ENERGY STAR 9 Energy declaration 9 Maintaining 10 Troubleshooting 10 No power 10 No picture 10 Display colors are wrong 11 Picture has shadows or "ghosts 11 Color is not uniform 11 Image is not sized or centered correctly 11 The monitor has pixels that are always dark or too bright...
... Flat-Panel Monitor 1 Unpacking the monitor 2 Setting up the monitor 2 Attaching the base 2 Connecting cables 3 Connecting a security cable 4 Turning on the monitor 4 Adjusting monitor settings 5 Monitor buttons 5 On-screen display options 6 Changing Windows screen settings 8 Power management 9 ENERGY STAR 9 Energy declaration 9 Maintaining 10 Troubleshooting 10 No power 10 No picture 10 Display colors are wrong 11 Picture has shadows or "ghosts 11 Color is not uniform 11 Image is not sized or centered correctly 11 The monitor has pixels that are always dark or too bright...

User Manual
Page 5
Using Your eMachines Flat-Panel Monitor • Unpacking the monitor • Setting up the monitor • Turning on the monitor • Adjusting monitor settings • Power management • Maintaining • Troubleshooting • Specifications 1
Using Your eMachines Flat-Panel Monitor • Unpacking the monitor • Setting up the monitor • Turning on the monitor • Adjusting monitor settings • Power management • Maintaining • Troubleshooting • Specifications 1
User Manual
Page 6
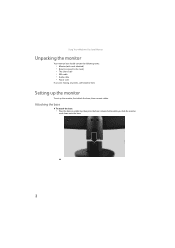
Attaching the base To attach the base: • Place the base on a table top, then press the base's release button while you are missing any items, call Customer Care. Using Your eMachines Flat-Panel Monitor Unpacking the monitor Your monitor box should contain the following items: • Monitor (with neck attached) • Base (to connect to the neck) • This User Guide • VGA cable • Audio cable • Power cord If you slide the monitor neck down onto the base. 2 Setting up the monitor To set up the monitor, first attach the base, then connect cables.
Attaching the base To attach the base: • Place the base on a table top, then press the base's release button while you are missing any items, call Customer Care. Using Your eMachines Flat-Panel Monitor Unpacking the monitor Your monitor box should contain the following items: • Monitor (with neck attached) • Base (to connect to the neck) • This User Guide • VGA cable • Audio cable • Power cord If you slide the monitor neck down onto the base. 2 Setting up the monitor To set up the monitor, first attach the base, then connect cables.

User Manual
Page 7
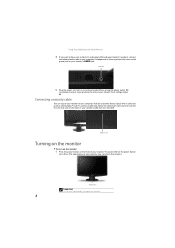
www.emachines.com Connecting cables To connect video and power cables: 1 Position your computer and the monitor so you can reach the back of each, then connect the blue VGA video cable to the blue VGA video connector under the back of the monitor. 2 Make sure that your computer is turned off, then connect the other end of the video cable to the matching video port on the back of your computer. 3 Connect the power cord to the power connector under the back of the monitor. 3
www.emachines.com Connecting cables To connect video and power cables: 1 Position your computer and the monitor so you can reach the back of each, then connect the blue VGA video cable to the blue VGA video connector under the back of the monitor. 2 Make sure that your computer is turned off, then connect the other end of the video cable to the matching video port on the back of your computer. 3 Connect the power cord to the power connector under the back of the monitor. 3
User Manual
Page 8
... your monitor before turning on the power button turns blue. (The appearance of your monitor (cable lock not included). We recommend using a surge protector to the lock slot on the back of your monitor may vary from voltage spikes. Audio jack 5 Plug the power cord into a correctly grounded (three-prong) AC power outlet. Connecting a security cable You can secure your monitor to your computer desk (or to your monitor's AUDIO jack. Using Your eMachines Flat-Panel Monitor...
... your monitor before turning on the power button turns blue. (The appearance of your monitor (cable lock not included). We recommend using a surge protector to the lock slot on the back of your monitor may vary from voltage spikes. Audio jack 5 Plug the power cord into a correctly grounded (three-prong) AC power outlet. Connecting a security cable You can secure your monitor to your computer desk (or to your monitor's AUDIO jack. Using Your eMachines Flat-Panel Monitor...
User Manual
Page 9
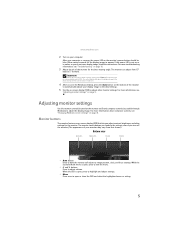
... you adjust contrast, brightness, and other monitor settings. The monitor saves changes you make to the settings, even if you see "Changing Windows screen settings" on the monitor's power button should be blue. This will automatically adjust the display image to the ideal settings for the best viewing angle. Adjusting monitor settings Use the monitor controls (located on -screen display (OSD) to adjust other settings for the display image to have the monitor self-adjust its image position, clock, and focus settings. Monitor buttons This monitor features an on or is open...
... you adjust contrast, brightness, and other monitor settings. The monitor saves changes you make to the settings, even if you see "Changing Windows screen settings" on the monitor's power button should be blue. This will automatically adjust the display image to the ideal settings for the best viewing angle. Adjusting monitor settings Use the monitor controls (located on -screen display (OSD) to adjust other settings for the display image to have the monitor self-adjust its image position, clock, and focus settings. Monitor buttons This monitor features an on or is open...
User Manual
Page 10
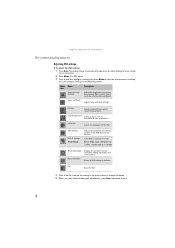
..., or user-defined color temperature. OSD Settings DDC/CI Settings Wide Mode Adjusts the horizontal and vertical position of the OSD and sets the timeout. Exit Exits the OSD. 4 Press < and > to adjust the setting to the desired level or change the option. 5 When you have finished making all OSD settings to exit. 6 Using Your eMachines Flat-Panel Monitor On-screen display options Adjusting OSD settings To adjust the OSD settings: 1 Press Auto. The display image is automatically adjusted to open the selected menu or setting. Turns DDC/CI support on or...
..., or user-defined color temperature. OSD Settings DDC/CI Settings Wide Mode Adjusts the horizontal and vertical position of the OSD and sets the timeout. Exit Exits the OSD. 4 Press < and > to adjust the setting to the desired level or change the option. 5 When you have finished making all OSD settings to exit. 6 Using Your eMachines Flat-Panel Monitor On-screen display options Adjusting OSD settings To adjust the OSD settings: 1 Press Auto. The display image is automatically adjusted to open the selected menu or setting. Turns DDC/CI support on or...
User Manual
Page 11
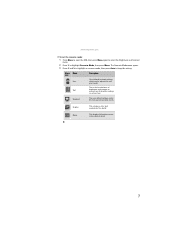
... uses default settings, and is the best balance of Text brightness and contrast to suit your needs. The Scenario Mode menu opens. 3 Press < and > to highlight a scenario mode, then press Auto to highlight Scenario Mode, then press Menu. Movie This displays full-motion scenes in the clearest detail. 7 www.emachines.com To set the scenario mode: 1 Press Menu to open the OSD, then press Menu again to select the Brightness and Contrast menu. 2 Press > to keep...
... uses default settings, and is the best balance of Text brightness and contrast to suit your needs. The Scenario Mode menu opens. 3 Press < and > to highlight a scenario mode, then press Auto to highlight Scenario Mode, then press Menu. Movie This displays full-motion scenes in the clearest detail. 7 www.emachines.com To set the scenario mode: 1 Press Menu to open the OSD, then press Menu again to select the Brightness and Contrast menu. 2 Press > to keep...
User Manual
Page 12
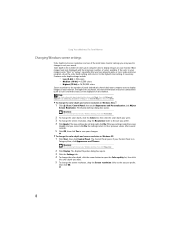
... best displayed with the maximum number of colors available. The Control Panel opens. Color depth is the number of pixels (individual colored dots) your computer uses to display images on your monitor. Most images look right, click No. The higher the resolution, the more information about adjusting the screen, click Start, then click Help and Support. Help For more information and screen components (such as icons and menu bars) can also right-click on your Windows...
... best displayed with the maximum number of colors available. The Control Panel opens. Color depth is the number of pixels (individual colored dots) your computer uses to display images on your monitor. Most images look right, click No. The higher the resolution, the more information about adjusting the screen, click Start, then click Help and Support. Help For more information and screen components (such as icons and menu bars) can also right-click on your Windows...
User Manual
Page 13
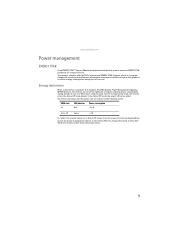
... energy-saving mode, the monitor enters the Active Off mode (sleep). www.emachines.com Power management ENERGY STAR As an ENERGY STAR® Partner, eMachines has determined that supports the VESA Display Power Management Signaling (DPMS) protocol, the monitor can be reduced to a computer that this product meets the ENERGY STAR guidelines for energy efficiency. In the Active Off mode the power LED turns amber. When your computer goes...
... energy-saving mode, the monitor enters the Active Off mode (sleep). www.emachines.com Power management ENERGY STAR As an ENERGY STAR® Partner, eMachines has determined that supports the VESA Display Power Management Signaling (DPMS) protocol, the monitor can be reduced to a computer that this product meets the ENERGY STAR guidelines for energy efficiency. In the Active Off mode the power LED turns amber. When your computer goes...
User Manual
Page 14
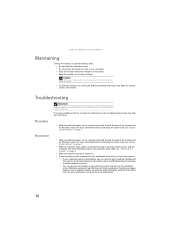
... moistened with the monitor, the information in this troubleshooting section may help you toggle between your notebook's display and this monitor as your primary monitor and not use the notebook's screen. Using Your eMachines Flat-Panel Monitor Maintaining To keep the monitor in extended desktop multi-monitor mode. No power • Make sure that the power cord is connected correctly to your notebook's video port, you have problems with water only. Wipe the cabinet, screen, and controls.
... moistened with the monitor, the information in this troubleshooting section may help you toggle between your notebook's display and this monitor as your primary monitor and not use the notebook's screen. Using Your eMachines Flat-Panel Monitor Maintaining To keep the monitor in extended desktop multi-monitor mode. No power • Make sure that the power cord is connected correctly to your notebook's video port, you have problems with water only. Wipe the cabinet, screen, and controls.
User Manual
Page 15
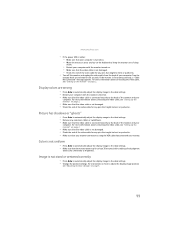
... video cable is not damaged. • Check the end of the monitor and your monitor. Picture has shadows or "ghosts" • Press Auto to automatically adjust the display image to the ideal settings. • Remove any pins that the video cable is connected securely to adjust the display image position, see "Setting up for ten seconds. For more information about color uniformity or brightness. Color is not uniform • Press Auto to automatically adjust the display image...
... video cable is not damaged. • Check the end of the monitor and your monitor. Picture has shadows or "ghosts" • Press Auto to automatically adjust the display image to the ideal settings. • Remove any pins that the video cable is connected securely to adjust the display image position, see "Setting up for ten seconds. For more information about color uniformity or brightness. Color is not uniform • Press Auto to automatically adjust the display image...

User Manual
Page 16
... the type of pixels affected. To find your monitor's native setting, see "Changing Windows screen settings" on your display, contact eMachines Customer Care to match the monitor's optimal (native) setting. Using Your eMachines Flat-Panel Monitor • If the image looks stretched or fuzzy, you to make changes to the Windows System Registry. You can display at your monitor's native resolution. • This may require you must adjust the operating system's display settings to identify whether a repair or replacement is normal and...
... the type of pixels affected. To find your monitor's native setting, see "Changing Windows screen settings" on your display, contact eMachines Customer Care to match the monitor's optimal (native) setting. Using Your eMachines Flat-Panel Monitor • If the image looks stretched or fuzzy, you to make changes to the Windows System Registry. You can display at your monitor's native resolution. • This may require you must adjust the operating system's display settings to identify whether a repair or replacement is normal and...
User Manual
Page 17
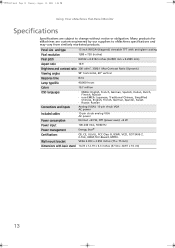
... eMachines Flat-Panel Monitor Specifications Specifications are custom engineered by our suppliers to change without notice or obligation. Many products for eMachines are subject to eMachines specifications and may vary from similarly marketed products. Panel size and type 15 inch WXGA (diagonal) viewable TFT with anti-glare coating Pixel resolution 1280 × 720 (native) Pixel pitch 0.0102 × 0.0102 inches (0.2595 mm × 0.2595 mm) Aspect ratio 16:9 Brightness and contrast...
... eMachines Flat-Panel Monitor Specifications Specifications are custom engineered by our suppliers to change without notice or obligation. Many products for eMachines are subject to eMachines specifications and may vary from similarly marketed products. Panel size and type 15 inch WXGA (diagonal) viewable TFT with anti-glare coating Pixel resolution 1280 × 720 (native) Pixel pitch 0.0102 × 0.0102 inches (0.2595 mm × 0.2595 mm) Aspect ratio 16:9 Brightness and contrast...
User Manual
Page 20
... power cables and modem cables from the wall outlets before you use an extension cord with a three-wire power cord to make sure that the safety instructions marked on the product and in the proper position for ventilation. No user serviceable parts inside. If the monitor does get exposed to moisture, unplug it and allow anything on a stable work area. This is important that the switch is set...
... power cables and modem cables from the wall outlets before you use an extension cord with a three-wire power cord to make sure that the safety instructions marked on the product and in the proper position for ventilation. No user serviceable parts inside. If the monitor does get exposed to moisture, unplug it and allow anything on a stable work area. This is important that the switch is set...
User Manual
Page 21
... for help. Substances such as WEEE) should never be "traded in" for a Class B digital device, pursuant to comply with this program is no longer useful to you may be disposed of or recycling used in a residential installation. Call eMachines to see if this equipment are highly recoverable, recyclable, and reusable. The product you with the instructions, may...
... for help. Substances such as WEEE) should never be "traded in" for a Class B digital device, pursuant to comply with this program is no longer useful to you may be disposed of or recycling used in a residential installation. Call eMachines to see if this equipment are highly recoverable, recyclable, and reusable. The product you with the instructions, may...
User Manual
Page 22
..., and (2) this product warning, go to cause cancer, birth defects, and/or other reproductive harm. Caution Changes or modifications not expressly approved by eMachines could void the FCC compliance and negate your authority to the following two conditions: (1) this device may cause undesired... CA 92618 USA This device complies with Part 15 of Industry Canada. Canada Industry Canada (IC) Unintentional emitter per ICES-003 This digital apparatus does not exceed the Class B limits for radio noise emissions from digital apparatus as set out in the radio interference regulations of...
..., and (2) this product warning, go to cause cancer, birth defects, and/or other reproductive harm. Caution Changes or modifications not expressly approved by eMachines could void the FCC compliance and negate your authority to the following two conditions: (1) this device may cause undesired... CA 92618 USA This device complies with Part 15 of Industry Canada. Canada Industry Canada (IC) Unintentional emitter per ICES-003 This digital apparatus does not exceed the Class B limits for radio noise emissions from digital apparatus as set out in the radio interference regulations of...
User Manual
Page 23
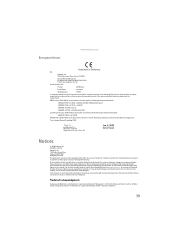
... right to make improvements in this manual and the products it may be liable for inaccurate information which may improve and/or change products described...part of it describes at any defect or omission in this manual. The information in this publication at www.gateway.com/recycle . However, changes are incorporated in newer publication editions. For the latest product updates...8691-3120 E-mail: [email protected] Hereby declare that: Product: LCD Monitor Trade Name: emachine Model Number: E151H Is compliant with the essential requirements and other relevant provisions of the ...
... right to make improvements in this manual and the products it may be liable for inaccurate information which may improve and/or change products described...part of it describes at any defect or omission in this manual. The information in this publication at www.gateway.com/recycle . However, changes are incorporated in newer publication editions. For the latest product updates...8691-3120 E-mail: [email protected] Hereby declare that: Product: LCD Monitor Trade Name: emachine Model Number: E151H Is compliant with the essential requirements and other relevant provisions of the ...


