User Guide
Page 3
... operator as disconnecting device Observe the following guidelines when connecting and disconnecting power to the power supply unit: Install the power supply unit before cleaning Unplug this document for Accessibility Be sure that the power outlet you need to disconnect power to the equipment, be sure to the AC power outlet. CAUTION for bundled dummy cards (only for use liquid cleaners or aerosol cleaners. Turning...
... operator as disconnecting device Observe the following guidelines when connecting and disconnecting power to the power supply unit: Install the power supply unit before cleaning Unplug this document for Accessibility Be sure that the power outlet you need to disconnect power to the equipment, be sure to the AC power outlet. CAUTION for bundled dummy cards (only for use liquid cleaners or aerosol cleaners. Turning...
User Guide
Page 5
... other nearby electrical devices that are covered by a qualified technician to restore the product to qualified service personnel. The grounding pin is not properly grounded may result in damage and will often require extensive work by the operating instructions, since improper adjustment of voltages; 100 to 120 or 220 to qualified service personnel when: • the power cord or plug...
... other nearby electrical devices that are covered by a qualified technician to restore the product to qualified service personnel. The grounding pin is not properly grounded may result in damage and will often require extensive work by the operating instructions, since improper adjustment of voltages; 100 to 120 or 220 to qualified service personnel when: • the power cord or plug...
User Guide
Page 6
Do not pierce, open or disassemble the battery. The battery can occur when a metallic object such as a coin, clip or pen causes direct connection of the positive (+) and negative (-) terminals of the battery, charging will not occur at temperatures below freezing. When the operation time becomes noticeably shorter than normal, buy a new battery. Never use it in a pressurized container, and do not...
Do not pierce, open or disassemble the battery. The battery can occur when a metallic object such as a coin, clip or pen causes direct connection of the positive (+) and negative (-) terminals of the battery, charging will not occur at temperatures below freezing. When the operation time becomes noticeably shorter than normal, buy a new battery. Never use it in a pressurized container, and do not...
User Guide
Page 7
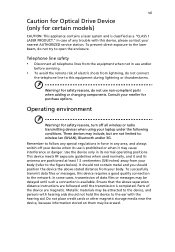
Operating environment Warning! For safety reasons, turn off your laptop under the following conditions. Do not place credit cards or other magnetic storage media near the device, because information stored on them may be delayed until the transmission is available. Telephone line safety • Disconnect all wireless or radio transmitting devices when using your device when its use is classified as a "CLASS...
Operating environment Warning! For safety reasons, turn off your laptop under the following conditions. Do not place credit cards or other magnetic storage media near the device, because information stored on them may be delayed until the transmission is available. Telephone line safety • Disconnect all wireless or radio transmitting devices when using your device when its use is classified as a "CLASS...
User Guide
Page 13
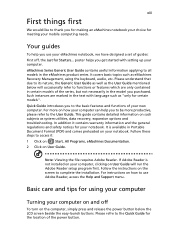
... power button. It covers basic topics such as system utilities, data recovery, expansion options and troubleshooting. If Adobe Reader is available in the model you for making an eMachines notebook your choice for using the keyboard, audio, etc. For more productive, please refer to complete the installation. Follow these steps to use your new computer. Quick Guide introduces you to the Quick Guide for the location of your eMachines notebook, we have designed a set of the series...
... power button. It covers basic topics such as system utilities, data recovery, expansion options and troubleshooting. If Adobe Reader is available in the model you for making an eMachines notebook your choice for using the keyboard, audio, etc. For more productive, please refer to complete the installation. Follow these steps to use your new computer. Quick Guide introduces you to the Quick Guide for the location of your eMachines notebook, we have designed a set of the series...
User Guide
Page 17
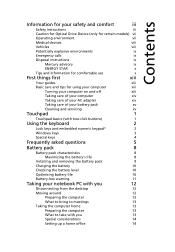
... your AC adapter xiv Taking care of your battery pack xv Cleaning and servicing xv Touchpad 1 Touchpad basics (with two-click buttons) 1 Using the keyboard 2 Lock keys and embedded numeric keypad* 2 Windows keys 3 Special keys 4 Frequently asked questions 5 Battery pack 8 Battery pack characteristics 8 Maximizing the battery's life 8 Installing and removing the battery pack 9 Charging the battery 10 Checking the battery level 10 Optimising battery life 10 Battery-low warning 11 Taking your notebook PC with...
... your AC adapter xiv Taking care of your battery pack xv Cleaning and servicing xv Touchpad 1 Touchpad basics (with two-click buttons) 1 Using the keyboard 2 Lock keys and embedded numeric keypad* 2 Windows keys 3 Special keys 4 Frequently asked questions 5 Battery pack 8 Battery pack characteristics 8 Maximizing the battery's life 8 Installing and removing the battery pack 9 Charging the battery 10 Checking the battery level 10 Optimising battery life 10 Battery-low warning 11 Taking your notebook PC with...

User Guide
Page 18
... options 18 Connectivity options 18 Built-in network feature 18 Universal Serial Bus (USB) 18 Installing memory 19 BIOS utility 20 Boot sequence 20 Enable disk-to RF fields (RSS-102) 36 LCD panel ergonomic specifications 36 Low-power license-exempt radio communication devices (RSS-210) 36 Exposure of humans to -disk recovery 20 Password 20 Using software 21 Playing DVD movies 21 Power management 22 eMachines Recovery Management 23 Burn backup discs 24 Restore 25 Restore Windows from backup discs 26 Troubleshooting 29 Troubleshooting tips 29 Error...
... options 18 Connectivity options 18 Built-in network feature 18 Universal Serial Bus (USB) 18 Installing memory 19 BIOS utility 20 Boot sequence 20 Enable disk-to RF fields (RSS-102) 36 LCD panel ergonomic specifications 36 Low-power license-exempt radio communication devices (RSS-210) 36 Exposure of humans to -disk recovery 20 Password 20 Using software 21 Playing DVD movies 21 Power management 22 eMachines Recovery Management 23 Burn backup discs 24 Restore 25 Restore Windows from backup discs 26 Troubleshooting 29 Troubleshooting tips 29 Error...
User Guide
Page 19
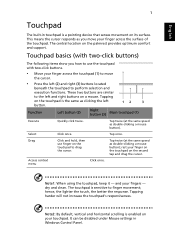
... left (2) and right (3) buttons located beneath the touchpad to perform selection and execution functions. Tap twice (at the same speed as double-clicking a mouse button); Note1: When using the touchpad, keep it - Note2: By default, vertical and horizontal scrolling is the same as you how to the left button. 12 3 Function Left button (2) Right button (3) Main touchpad (1) Execute Select Drag Access context menu Quickly click twice. Tap twice...
... left (2) and right (3) buttons located beneath the touchpad to perform selection and execution functions. Tap twice (at the same speed as double-clicking a mouse button); Note1: When using the touchpad, keep it - Note2: By default, vertical and horizontal scrolling is the same as you how to the left button. 12 3 Function Left button (2) Right button (3) Main touchpad (1) Execute Select Drag Access context menu Quickly click twice. Tap twice...
User Guide
Page 20
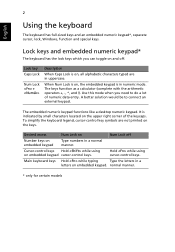
... using cursor-control keys. Lock keys and embedded numeric keypad* The keyboard has the lock keys which you need to connect an external keypad. To simplify the keyboard legend, cursor-control key symbols are in a letters on embedded keypad cursor-control keys. Hold while using on embedded keypad. The embedded numeric keypad functions like a desktop numeric keypad. It is indicated by small characters located on embedded keypad Type numbers in numeric mode. Use this mode...
... using cursor-control keys. Lock keys and embedded numeric keypad* The keyboard has the lock keys which you need to connect an external keypad. To simplify the keyboard legend, cursor-control key symbols are in a letters on embedded keypad cursor-control keys. Hold while using on embedded keypad. The embedded numeric keypad functions like a desktop numeric keypad. It is indicated by small characters located on embedded keypad Type numbers in numeric mode. Use this mode...
User Guide
Page 21
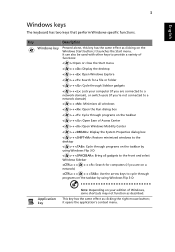
... used with other keys to provide a variety of functions: < >: Open or close the Start menu < > + : Display the desktop < > + : Open Windows Explore < > + : Search for a file or folder < > + : Cycle through Sidebar gadgets < > + : Lock your computer (if you are connected to a network domain), or switch users (if you're not connected to a network domain) < > + : Minimizes all windows < > + : Open the Run dialog box < > + : Cycle through programs on the taskbar < > + : Open Ease of Access Center < > + : Open Windows...
... used with other keys to provide a variety of functions: < >: Open or close the Start menu < > + : Display the desktop < > + : Open Windows Explore < > + : Search for a file or folder < > + : Cycle through Sidebar gadgets < > + : Lock your computer (if you are connected to a network domain), or switch users (if you're not connected to a network domain) < > + : Minimizes all windows < > + : Open the Run dialog box < > + : Cycle through programs on the taskbar < > + : Open Ease of Access Center < > + : Open Windows...
User Guide
Page 23
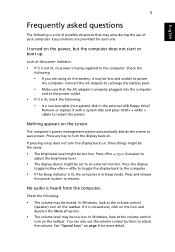
...; The brightness level might be set to restart the system. Remove or replace it with a system disk and press + + to an external monitor. If pressing a key does not turn the display back on the icon and deselect the Mute all option. • The volume level may arise during the use the volume control buttons to adjust the volume. No audio is heard from the computer. In Windows, look at the power indicator...
...; The brightness level might be set to restart the system. Remove or replace it with a system disk and press + + to an external monitor. If pressing a key does not turn the display back on the icon and deselect the Mute all option. • The volume level may arise during the use the volume control buttons to adjust the volume. No audio is heard from the computer. In Windows, look at the power indicator...
User Guide
Page 24
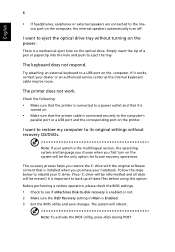
... service center as the internal keyboard cable may be the only option for future recovery operations. The system will be loose. This recovery process helps you restore the C: drive with the original software content that the printer cable is connected securely to a power outlet and that it works, contact your system is installed when you first turn off. Before performing a restore operation, please check the BIOS settings. 1 Check to see if eMachines Disk...
... service center as the internal keyboard cable may be the only option for future recovery operations. The system will be loose. This recovery process helps you restore the C: drive with the original software content that the printer cable is connected securely to a power outlet and that it works, contact your system is installed when you first turn off. Before performing a restore operation, please check the BIOS settings. 1 Check to see if eMachines Disk...
User Guide
Page 29
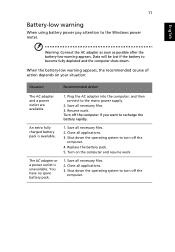
... the computer and resume work . Resume work . You have no spare battery pack. 1. Turn off the computer. 4. Close all applications. 3. Shut down the operating system to recharge the battery rapidly. The AC adapter or a power outlet is available. 1. Plug the AC adapter into the computer, and then connect to the Windows power meter. English 11 Battery-low warning When using battery power pay attention to the...
... the computer and resume work . Resume work . You have no spare battery pack. 1. Turn off the computer. 4. Close all applications. 3. Shut down the operating system to recharge the battery rapidly. The AC adapter or a power outlet is available. 1. Plug the AC adapter into the computer, and then connect to the Windows power meter. English 11 Battery-low warning When using battery power pay attention to the...
User Guide
Page 30
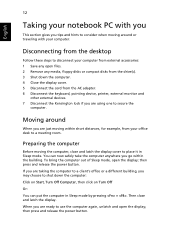
...: 1 Save any open files. 2 Remove any media, floppy disks or compact disks from the drive(s). 3 Shut down the computer: Click on Start, Turn Off Computer, then click on Turn Off Or: You can now safely take the computer anywhere you go within short distances, for example, from the AC adapter. 6 Disconnect the keyboard, pointing device, printer, external monitor and other external devices. 7 Disconnect the Kensington lock if you...
...: 1 Save any open files. 2 Remove any media, floppy disks or compact disks from the drive(s). 3 Shut down the computer: Click on Start, Turn Off Computer, then click on Turn Off Or: You can now safely take the computer anywhere you go within short distances, for example, from the AC adapter. 6 Disconnect the keyboard, pointing device, printer, external monitor and other external devices. 7 Disconnect the Kensington lock if you...
User Guide
Page 31
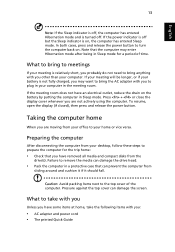
... to the top cover of time. If the power indicator is off . Press + or close the display cover whenever you are not actively using the computer. English 13 Note: If the Sleep indicator is off, the computer has entered Hibernation mode and is turned off but the Sleep indicator is on, the computer has entered Sleep mode. To resume, open the display (if closed), then press and release the power button.
... to the top cover of time. If the power indicator is off . Press + or close the display cover whenever you are not actively using the computer. English 13 Note: If the Sleep indicator is off, the computer has entered Hibernation mode and is turned off but the Sleep indicator is on, the computer has entered Sleep mode. To resume, open the display (if closed), then press and release the power button.
User Guide
Page 34
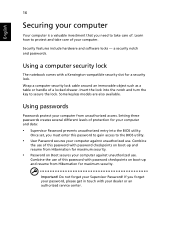
.... Once set, you must enter this password with a Kensington-compatible security slot for a security lock. Learn how to secure the lock. Insert the lock into the BIOS utility. Important! If you need to the BIOS utility. • User Password secures your computer against unauthorized use . Combine the use of your computer. a security notch and passwords. Using passwords Passwords protect your Supervisor Password! Using a computer security lock The notebook comes with password checkpoints on Boot secures your...
.... Once set, you must enter this password with a Kensington-compatible security slot for a security lock. Learn how to secure the lock. Insert the lock into the BIOS utility. Important! If you need to the BIOS utility. • User Password secures your computer against unauthorized use . Combine the use of your computer. a security notch and passwords. Using passwords Passwords protect your Supervisor Password! Using a computer security lock The notebook comes with password checkpoints on Boot secures your...
User Guide
Page 35
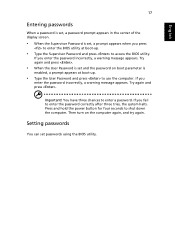
... access the BIOS utility. Try again and press . Then turn on boot parameter is enabled, a prompt appears at boot-up . • Type the User Password and press to enter the password correctly after three tries, the system halts. English 17 Entering passwords When a password is set, a password prompt appears in the center of the display screen. • When the Supervisor Password is set, a prompt appears when you press to enter the BIOS utility at boot...
... access the BIOS utility. Try again and press . Then turn on boot parameter is enabled, a prompt appears at boot-up . • Type the User Password and press to enter the password correctly after three tries, the system halts. English 17 Entering passwords When a password is set, a password prompt appears in the center of the display screen. • When the Supervisor Password is set, a prompt appears when you press to enter the BIOS utility at boot...
User Guide
Page 36
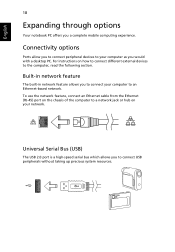
... would with a desktop PC. Connectivity options Ports allow you to connect peripheral devices to your computer as you to connect your network. To use the network feature, connect an Ethernet cable from the Ethernet (RJ-45) port on the chassis of the computer to a network jack or hub on how to connect different external devices to the computer, read the following section. For instructions on your computer to...
... would with a desktop PC. Connectivity options Ports allow you to connect peripheral devices to your computer as you to connect your network. To use the network feature, connect an Ethernet cable from the Ethernet (RJ-45) port on the chassis of the computer to a network jack or hub on how to connect different external devices to the computer, read the following section. For instructions on your computer to...
User Guide
Page 38
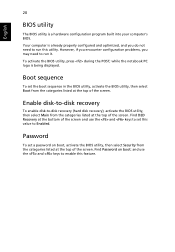
However, if you encounter configuration problems, you do not need to run this utility. while the notebook PC logo is a hardware configuration program built into your computer's BIOS. Enable disk-to-disk recovery To enable disk-to Enabled. Password To set the boot sequence in the BIOS utility, activate the BIOS utility, then select Boot from the categories listed at the top of the screen and use the and keys to enable this value to -disk recovery (hard disk recovery), activate the BIOS utility, then select Main from...
However, if you encounter configuration problems, you do not need to run this utility. while the notebook PC logo is a hardware configuration program built into your computer's BIOS. Enable disk-to-disk recovery To enable disk-to Enabled. Password To set the boot sequence in the BIOS utility, activate the BIOS utility, then select Boot from the categories listed at the top of the screen and use the and keys to enable this value to -disk recovery (hard disk recovery), activate the BIOS utility, then select Main from...

User Guide
Page 52
... wireless LAN and/or Bluetooth modules). Radio device regulatory notice Note: Below regulatory information is for products with the essential requirements and other relevant provisions of pulse dialing, when this notebook PC series is in which it has been approved for emergency use . Declaration of Conformity for EU countries Hereby, Acer, declares that this equipment is available for wireless use . LCD...
... wireless LAN and/or Bluetooth modules). Radio device regulatory notice Note: Below regulatory information is for products with the essential requirements and other relevant provisions of pulse dialing, when this notebook PC series is in which it has been approved for emergency use . Declaration of Conformity for EU countries Hereby, Acer, declares that this equipment is available for wireless use . LCD...


