

User Guide
Page 8
Approval Statements Battery Warning Instruction B-1 Fuse Warning Instruction B-1 Laser Product ...B-2 viii Chapter 4 Installing and Removing Drives Removing the Cover 4-1 Replacing the Cover 4-3 Installing an Expansion Card 4-4 Installing an Additional Hard Disk Drive 4-6 Installing the 5.25-inch Device in the Peripheral Bay 4-9 Chapter 5 Using the Restore CDs Restoring Your Original Software 5-1 Chapter 6 Using the PowerDVD...
Approval Statements Battery Warning Instruction B-1 Fuse Warning Instruction B-1 Laser Product ...B-2 viii Chapter 4 Installing and Removing Drives Removing the Cover 4-1 Replacing the Cover 4-3 Installing an Expansion Card 4-4 Installing an Additional Hard Disk Drive 4-6 Installing the 5.25-inch Device in the Peripheral Bay 4-9 Chapter 5 Using the Restore CDs Restoring Your Original Software 5-1 Chapter 6 Using the PowerDVD...

User Guide
Page 9
Introduction 1-1 Introduction System Overview Optical drive Optical drive (optional) USB connector (optional) Power button Emergency eject hole Load/Eject button Floppy disk drive(optional) Media reader slots(optional) Power indicator Hard disk drive access indicator IEEE 1394 connectors (optional) USB 2.0 connectors (optional) Headphone jack Microphone jack USB 2.0 connectors (optional) NOTE Chapter 1 Your optical drives may differ from the illustrations described in this user's guide.
Introduction 1-1 Introduction System Overview Optical drive Optical drive (optional) USB connector (optional) Power button Emergency eject hole Load/Eject button Floppy disk drive(optional) Media reader slots(optional) Power indicator Hard disk drive access indicator IEEE 1394 connectors (optional) USB 2.0 connectors (optional) Headphone jack Microphone jack USB 2.0 connectors (optional) NOTE Chapter 1 Your optical drives may differ from the illustrations described in this user's guide.
User Guide
Page 18
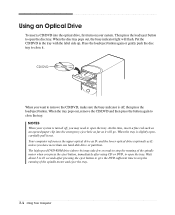
... tray pops out, remove the CD/DVD and then press the button again to close the tray. Your computer references the upper optical drive as D: and the lower optical drive (optional) as E: unless you want to remove the CD/DVD, make sure the busy indicator is off , you press the eject button... in the tray with the label side up. CD/DVD When you have more than one hard disk drive or partition. At this time, insert a fine rod such as an opened paper clip into the optical drive, first turn on your system is slightly open the disc tray. Then press the load/eject...
... tray pops out, remove the CD/DVD and then press the button again to close the tray. Your computer references the upper optical drive as D: and the lower optical drive (optional) as E: unless you want to remove the CD/DVD, make sure the busy indicator is off , you press the eject button... in the tray with the label side up. CD/DVD When you have more than one hard disk drive or partition. At this time, insert a fine rod such as an opened paper clip into the optical drive, first turn on your system is slightly open the disc tray. Then press the load/eject...
User Guide
Page 28
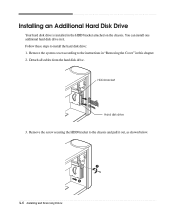
Detach all cables from the hard disk drive. You can install one additional hard disk drive in this chapter. 2. Follow these steps to the chassis and pull it . Remove the screw securing the HDD bracket to install the hard disk drive: 1. Remove the system cover according to the instructions in "Removing the Cover" in it out, as shown below. 4-6 Installing and Removing Drives HDD bracket Hard disk drive 3. Installing an Additional Hard Disk Drive Your hard disk drive is installed in the HDD bracket attached on the chassis.
Detach all cables from the hard disk drive. You can install one additional hard disk drive in this chapter. 2. Follow these steps to the chassis and pull it . Remove the screw securing the HDD bracket to install the hard disk drive: 1. Remove the system cover according to the instructions in "Removing the Cover" in it out, as shown below. 4-6 Installing and Removing Drives HDD bracket Hard disk drive 3. Installing an Additional Hard Disk Drive Your hard disk drive is installed in the HDD bracket attached on the chassis.

User Guide
Page 29
With using the screws, secure the hard disk drive to CS (Cable Select). 5. 4. Installing and Removing Drives 4-7 Set the jumper of the new hard disk drive to the HDD bracket. Slide the hard disk drive into the HDD bracket. 6.
With using the screws, secure the hard disk drive to CS (Cable Select). 5. 4. Installing and Removing Drives 4-7 Set the jumper of the new hard disk drive to the HDD bracket. Slide the hard disk drive into the HDD bracket. 6.

User Guide
Page 30
7. Slide the HDD bracket into the chassis and secure it .) 9. Replace the system cover according to your hard disk drive. (If you removed the hard disk drive cable from the motherboard, replace it with the retaining screw, as shown below. 8. Connect the power and hard disk drive cable to the instructions in "Replacing the Cover" in this chapter. 4-8 Installing and Removing Drives
7. Slide the HDD bracket into the chassis and secure it .) 9. Replace the system cover according to your hard disk drive. (If you removed the hard disk drive cable from the motherboard, replace it with the retaining screw, as shown below. 8. Connect the power and hard disk drive cable to the instructions in "Replacing the Cover" in this chapter. 4-8 Installing and Removing Drives
User Guide
Page 31
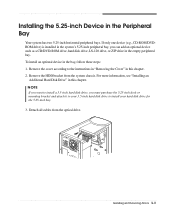
... the system chassis. Remove the HDD bracket from the optical drive. Installing and Removing Drives 4-9 For more information, see "Installing an Additional Hard Disk Drive" in this chapter. Remove the cover according to install your 3.5-inch hard disk drive to the instructions in "Removing the Cover" in this chapter.... 2. NOTE If you want to install a 3.5-inch hard disk drive, you can add an optional device such as a CD/DVD-ROM drive, hard disk drive, LS-120 drive, or ZIP drive in the system's 5.25-inch peripheral bay, you must purchase the 5.25-inch...
... the system chassis. Remove the HDD bracket from the optical drive. Installing and Removing Drives 4-9 For more information, see "Installing an Additional Hard Disk Drive" in this chapter. Remove the cover according to install your 3.5-inch hard disk drive to the instructions in "Removing the Cover" in this chapter.... 2. NOTE If you want to install a 3.5-inch hard disk drive, you can add an optional device such as a CD/DVD-ROM drive, hard disk drive, LS-120 drive, or ZIP drive in the system's 5.25-inch peripheral bay, you must purchase the 5.25-inch...

User Guide
Page 33
...device in the empty bay below the optical drive, you want to new device. You must be set to CS (Cable Select). If there is set for the drive to work properly with your optional device to CS (Cable Select). NOTES Like a hard disk drive, most optional devices have jumpers that covers the... 5.25-inch drive bay you can use the spare connector of the front panel using a ...
...device in the empty bay below the optical drive, you want to new device. You must be set to CS (Cable Select). If there is set for the drive to work properly with your optional device to CS (Cable Select). NOTES Like a hard disk drive, most optional devices have jumpers that covers the... 5.25-inch drive bay you can use the spare connector of the front panel using a ...
User Guide
Page 37
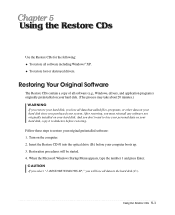
...the Restore CDs Use the Restore CDs for the following: To restore all data in the hard disk (C:). To restore lost or destroyed drivers. Insert the Restore CD #1 into the optical drive (D:) before restoring. After restoring, you must reinstall any software not originally installed on your... original preinstalled software: 1. Turn on your hard disk, copy it to restore your hard disk since you will be started. 4. And you...
...the Restore CDs Use the Restore CDs for the following: To restore all data in the hard disk (C:). To restore lost or destroyed drivers. Insert the Restore CD #1 into the optical drive (D:) before restoring. After restoring, you must reinstall any software not originally installed on your... original preinstalled software: 1. Turn on your hard disk, copy it to restore your hard disk since you will be started. 4. And you...
User Guide
Page 38
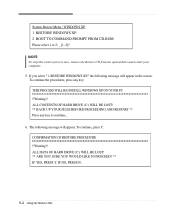
To continue, press Y. RESTORE WINDOWS XP," the following message will appear in the screen. ALL CONTENTS OF HARD DRIVE (C:) WILL BE LOST! ** BACK UP YOUR FILES BEFORE PROCEEDING AND RESTART ** Press any key. The following message will appear. If you select "1. CONFIRMATION ...PROMPT FROM CD-ROM Please select 1 or 2: _ [1, 2]? NOTE To stop this restore process now, remove the Restore CD from the optical drive and restart your computer. 5. ALL DATA OF HARD DRIVE (C:) WILL BE LOST! ** ARE YOU SURE YOU WOULD LIKE TO PROCEED? ** IF YES, PRESS Y. To continue the procedures, press any key...
To continue, press Y. RESTORE WINDOWS XP," the following message will appear in the screen. ALL CONTENTS OF HARD DRIVE (C:) WILL BE LOST! ** BACK UP YOUR FILES BEFORE PROCEEDING AND RESTART ** Press any key. The following message will appear. If you select "1. CONFIRMATION ...PROMPT FROM CD-ROM Please select 1 or 2: _ [1, 2]? NOTE To stop this restore process now, remove the Restore CD from the optical drive and restart your computer. 5. ALL DATA OF HARD DRIVE (C:) WILL BE LOST! ** ARE YOU SURE YOU WOULD LIKE TO PROCEED? ** IF YES, PRESS Y. To continue the procedures, press any key...

User Guide
Page 39
...the computer will be booted with #2 in the Drivers folder of you lose drivers, install these by using your system are in the optical drive. The restoration process will appear. message appears, replace the Restore CD #2 with Microsoft for using the Restore CDs. Press Enter to continue..."... starts and the registration program runs. 14. And press Enter to your optical drive and restart the computer. 13. If you Restore CDs. After the restoration process is completed, remove the Restore CD from your hard disk. 8. All data in the Restore CD #1 will be copied to continue...
...the computer will be booted with #2 in the Drivers folder of you lose drivers, install these by using your system are in the optical drive. The restoration process will appear. message appears, replace the Restore CD #2 with Microsoft for using the Restore CDs. Press Enter to continue..."... starts and the registration program runs. 14. And press Enter to your optical drive and restart the computer. 13. If you Restore CDs. After the restoration process is completed, remove the Restore CD from your hard disk. 8. All data in the Restore CD #1 will be copied to continue...

User Guide
Page 43
Hard Disk Drive Cause Hard disk drive operation seems slow Hard disk drive access indicator... light stays on Solution The files stored on your computer and wait about 10 seconds for complete discharge and re-plug the power cord. To open Windows Help, click the Start button, and then click Help and Support.) Solving Common Problems A-1 To turn off your hard...(For more information,refer to deal with the problems you might experience when using your hard disk may be fragmented. Solving Common Problems This chapter instructs you how to the Windows...
Hard Disk Drive Cause Hard disk drive operation seems slow Hard disk drive access indicator... light stays on Solution The files stored on your computer and wait about 10 seconds for complete discharge and re-plug the power cord. To open Windows Help, click the Start button, and then click Help and Support.) Solving Common Problems A-1 To turn off your hard...(For more information,refer to deal with the problems you might experience when using your hard disk may be fragmented. Solving Common Problems This chapter instructs you how to the Windows...


