
User Guide
Page 8
PL-100 User's Guide Chapter 4 Using the Configuration Utility 27 4.1 Configuration Utility Main Screen 27 4.2 Privacy Screen 30 4.3 Diagnostics Screen 31 4.4 About Screen ...33 Chapter 5 Troubleshooting ...35 5.1 Using LEDs to Diagnose a Problem 35 5.1.1 PWR LED is Off 35 5.1.2 LINK LED is Off 35 5.1.3 ETHN LED is Off 35 Appendix A PL-100 Specifications 37 Appendix B Setting up Your Computer's IP Address 39 Index...51 8 Table of Contents
PL-100 User's Guide Chapter 4 Using the Configuration Utility 27 4.1 Configuration Utility Main Screen 27 4.2 Privacy Screen 30 4.3 Diagnostics Screen 31 4.4 About Screen ...33 Chapter 5 Troubleshooting ...35 5.1 Using LEDs to Diagnose a Problem 35 5.1.1 PWR LED is Off 35 5.1.2 LINK LED is Off 35 5.1.3 ETHN LED is Off 35 Appendix A PL-100 Specifications 37 Appendix B Setting up Your Computer's IP Address 39 Index...51 8 Table of Contents
User Guide
Page 9
... Figure 6 Install Destination Folder 24 Figure 7 Install Begin Screen 25 Figure 8 Install Process Screen 25 Figure 9 Installation Confirmation Screen 26 Figure 10 PL-100 Configuration Utility Main 27 Figure 11 Add Device ...29 Figure 12 Naming and Passwords 29 Figure 13 Privacy Screen ...30 Figure 14 Diagnostics Screen 31 Figure 15... About Screen ...33 Figure 16 WIndows 95/98/Me: Network: Configuration 40 Figure 17 Windows 95/98/Me: TCP/IP Properties: IP Address 41 Figure 18 Windows 95/98/Me: TCP/IP Properties: DNS...
... Figure 6 Install Destination Folder 24 Figure 7 Install Begin Screen 25 Figure 8 Install Process Screen 25 Figure 9 Installation Confirmation Screen 26 Figure 10 PL-100 Configuration Utility Main 27 Figure 11 Add Device ...29 Figure 12 Naming and Passwords 29 Figure 13 Privacy Screen ...30 Figure 14 Diagnostics Screen 31 Figure 15... About Screen ...33 Figure 16 WIndows 95/98/Me: Network: Configuration 40 Figure 17 Windows 95/98/Me: TCP/IP Properties: IP Address 41 Figure 18 Windows 95/98/Me: TCP/IP Properties: DNS...

User Guide
Page 23
Figure 4 InstallShield Wizard Start Screen Chapter 3 Installing the PL-100 Software 23 PL-100 User's Guide CHAPTER 3 Installing the PL-100 Software 3.1 Installation of the Utility Please verify that no other utilities are installed before installing this software. To install the PL-100 Configuration Utility, please follow the steps below. 1 Insert the ZyXEL Windows OS Configuration Utility Setup utility CD-ROM into the computer's CD-ROM drive...
Figure 4 InstallShield Wizard Start Screen Chapter 3 Installing the PL-100 Software 23 PL-100 User's Guide CHAPTER 3 Installing the PL-100 Software 3.1 Installation of the Utility Please verify that no other utilities are installed before installing this software. To install the PL-100 Configuration Utility, please follow the steps below. 1 Insert the ZyXEL Windows OS Configuration Utility Setup utility CD-ROM into the computer's CD-ROM drive...
User Guide
Page 25
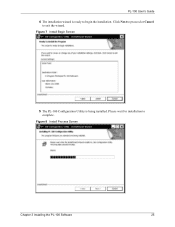
Please wait for installation to exit the wizard. Figure 7 Install Begin Screen 5 The PL-100 Configuration Utility is ready to begin the installation. Figure 8 Install Process Screen Chapter 3 Installing the PL-100 Software 25 Click Next to proceed or Cancel to complete. PL-100 User's Guide 4 The installation wizard is being installed.
Please wait for installation to exit the wizard. Figure 7 Install Begin Screen 5 The PL-100 Configuration Utility is ready to begin the installation. Figure 8 Install Process Screen Chapter 3 Installing the PL-100 Software 25 Click Next to proceed or Cancel to complete. PL-100 User's Guide 4 The installation wizard is being installed.
User Guide
Page 26
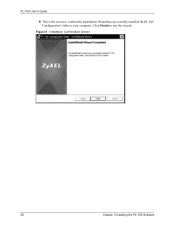
PL-100 User's Guide 6 This is the screen to confirm the Installation Wizard has successfully installed the PL-100 Configuration Utility to exit the wizard. Figure 9 Installation Confirmation Screen 26 Chapter 3 Installing the PL-100 Software Click Finish to your computer.
PL-100 User's Guide 6 This is the screen to confirm the Installation Wizard has successfully installed the PL-100 Configuration Utility to exit the wizard. Figure 9 Installation Confirmation Screen 26 Chapter 3 Installing the PL-100 Software Click Finish to your computer.

User Guide
Page 27
... and adjust your network. Figure 10 PL-100 Configuration Utility Main Chapter 4 Using the Configuration Utility 27 Figure 10 on PL-100 Configuration Utility. In order to the computer where the utility is running. To do this, click Start, Programs and Zyxel Software and click on page 27 below shows the main screen of the configuration utility. 4.1 Configuration Utility Main Screen The Main screen essentially provides...
... and adjust your network. Figure 10 PL-100 Configuration Utility Main Chapter 4 Using the Configuration Utility 27 Figure 10 on PL-100 Configuration Utility. In order to the computer where the utility is running. To do this, click Start, Programs and Zyxel Software and click on page 27 below shows the main screen of the configuration utility. 4.1 Configuration Utility Main Screen The Main screen essentially provides...

User Guide
Page 28
...the password. You are discovered, the status area above this way. By default the utility automatically scans every few seconds and updates the display. 28 Chapter 4 Using the Configuration Utility If no local HomePlug devices are advised to locate the passwords for all devices you ... password. For example, a device currently on another logical network See Figure 11 on page 29,can be presented. PL-100 User's Guide Table 2 Utility Main Window Descriptions LABEL DESCRIPTION Top Panel This shows all the HomePlug devices discovered on the current logical network (remote devices...
...the password. You are discovered, the status area above this way. By default the utility automatically scans every few seconds and updates the display. 28 Chapter 4 Using the Configuration Utility If no local HomePlug devices are advised to locate the passwords for all devices you ... password. For example, a device currently on another logical network See Figure 11 on page 29,can be presented. PL-100 User's Guide Table 2 Utility Main Window Descriptions LABEL DESCRIPTION Top Panel This shows all the HomePlug devices discovered on the current logical network (remote devices...
User Guide
Page 29
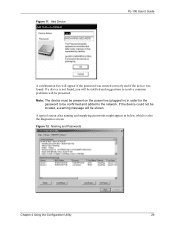
Figure 11 Add Device PL-100 User's Guide A confirmation box will appear if the password was entered correctly and if the device was found , you will be shown. Note: The device ... the network. A typical screen after naming and supplying passwords might appear as below, which is not found . Figure 12 Naming and Passwords Chapter 4 Using the Configuration Utility 29 If the device could not be located, a warning message will be presented. If a device is also the diagnostics screen.
Figure 11 Add Device PL-100 User's Guide A confirmation box will appear if the password was entered correctly and if the device was found , you will be shown. Note: The device ... the network. A typical screen after naming and supplying passwords might appear as below, which is not found . Figure 12 Naming and Passwords Chapter 4 Using the Configuration Utility 29 If the device could not be located, a warning message will be presented. If a device is also the diagnostics screen.

User Guide
Page 30
... (network password) for managing the local network and providing additional security. PL-100 User's Guide 4.2 Privacy Screen The Privacy dialog screen provides a means for the local device only. You can always reset a HomePlug network to this operation. 30 Chapter 4 Using the Configuration Utility Devices previously set it to change the logical network of devices...
... (network password) for managing the local network and providing additional security. PL-100 User's Guide 4.2 Privacy Screen The Privacy dialog screen provides a means for the local device only. You can always reset a HomePlug network to this operation. 30 Chapter 4 Using the Configuration Utility Devices previously set it to change the logical network of devices...
User Guide
Page 31
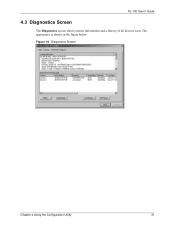
Figure 14 Diagnostics Screen Chapter 4 Using the Configuration Utility 31 PL-100 User's Guide 4.3 Diagnostics Screen The Diagnostics screen shows system information and a history of all devices seen. The appearance is shown in the figure below.
Figure 14 Diagnostics Screen Chapter 4 Using the Configuration Utility 31 PL-100 User's Guide 4.3 Diagnostics Screen The Diagnostics screen shows system information and a history of all devices seen. The appearance is shown in the figure below.
User Guide
Page 32
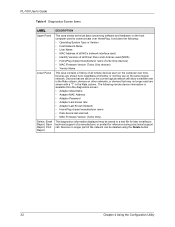
... are shown here regardless of whether or not they are shown with a "?" Devices that may be deleted using the Delete button. 32 Chapter 4 Using the Configuration Utility PL-100 User's Guide Table 4 Diagnostics Screen Items LABEL DESCRIPTION Upper Panel Lower Panel Delete, Email Report, Save Report, Print Report This area shows technical data concerning...
... are shown here regardless of whether or not they are shown with a "?" Devices that may be deleted using the Delete button. 32 Chapter 4 Using the Configuration Utility PL-100 User's Guide Table 4 Diagnostics Screen Items LABEL DESCRIPTION Upper Panel Lower Panel Delete, Email Report, Save Report, Print Report This area shows technical data concerning...
User Guide
Page 33
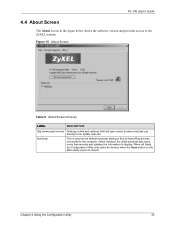
AutoScan This is clicked. PL-100 User's Guide 4.4 About Screen The About screen in the figure below shows the software version and provides access to the computer. When left blank, the Configuration Utility only scans for devices when the Scan button on this web address ...zyxel.com.tw Clicking on the Main utility screen is used as the default Autoscan setting to find all HomePlug devices connected to the ZyXEL website. When checked, the utility automatically scans every few seconds and updates the information to the ZyXEL web site. Chapter 4 Using the Configuration Utility...
AutoScan This is clicked. PL-100 User's Guide 4.4 About Screen The About screen in the figure below shows the software version and provides access to the computer. When left blank, the Configuration Utility only scans for devices when the Scan button on this web address ...zyxel.com.tw Clicking on the Main utility screen is used as the default Autoscan setting to find all HomePlug devices connected to the ZyXEL website. When checked, the utility automatically scans every few seconds and updates the information to the ZyXEL web site. Chapter 4 Using the Configuration Utility...

User Guide
Page 34
PL-100 User's Guide 34 Chapter 4 Using the Configuration Utility
PL-100 User's Guide 34 Chapter 4 Using the Configuration Utility

User Guide
Page 35
...LINK LED STEPS 1 2 CORRECTIVE ACTION Use the PL-100 Configuration Utility to an Ethernent switch or router, make sure it's enabled and working by plugging another electric device into an adjacent socket (to a power outlet. If it . If the PL-100 LED still does not light, contact our technical ... to help you are securely connected at all other Homeplug devices on your PL-100) and see if the lights light up. Make sure the outlet is working and configured correctly as well. PL-100 User's Guide CHAPTER 5 Troubleshooting This chapter covers potential problems and possible remedies...
...LINK LED STEPS 1 2 CORRECTIVE ACTION Use the PL-100 Configuration Utility to an Ethernent switch or router, make sure it's enabled and working by plugging another electric device into an adjacent socket (to a power outlet. If it . If the PL-100 LED still does not light, contact our technical ... to help you are securely connected at all other Homeplug devices on your PL-100) and see if the lights light up. Make sure the outlet is working and configured correctly as well. PL-100 User's Guide CHAPTER 5 Troubleshooting This chapter covers potential problems and possible remedies...

User Guide
Page 51
Numerics 10/100 Mbps 16 110V AC 4 230V AC 4 56-bit DES 15 85 Mbps 15 A Abnormal Working Conditions 5 About Screen 33 AC 4 Accessories 4 Acts of God 5 Adapter ... 15 Broadband over Power Lines 15 C Cables, Connecting 4 Cabling Type 37 CE 37 Certifications 37 certifications notices 3 viewing 3 Charge 5 Index PL-100 User's Guide Index Components 5 Condition 5 Configuration Utility 27 Connecting Cables 4 Connecting the PL-100 19 Consequential Damages 5 Copyright 2 Corrosive Liquids 4 Covers 4 Customer Information 24 D Dampness 4 Danger 4 Default Logical Network 30 Defective 5 Delete 32 Destination...
Numerics 10/100 Mbps 16 110V AC 4 230V AC 4 56-bit DES 15 85 Mbps 15 A Abnormal Working Conditions 5 About Screen 33 AC 4 Accessories 4 Acts of God 5 Adapter ... 15 Broadband over Power Lines 15 C Cables, Connecting 4 Cabling Type 37 CE 37 Certifications 37 certifications notices 3 viewing 3 Charge 5 Index PL-100 User's Guide Index Components 5 Condition 5 Configuration Utility 27 Connecting Cables 4 Connecting the PL-100 19 Consequential Damages 5 Copyright 2 Corrosive Liquids 4 Covers 4 Customer Information 24 D Dampness 4 Danger 4 Default Logical Network 30 Defective 5 Delete 32 Destination...
User Guide
Page 52
... Points 4 HomePlug 1.0 16 HomePlug chipset manufacturer name 32 HomePlug Powerline Alliance 16 Host Network Name 32 Humidity 37 I Indirect Damages 5 Installation Confirmation 26 Installing the PL-100 19 InstallShield Wizard 23 Insurance 5 Interference Statement 3 L Labor 5 LED Status 22 LED status 22 Legal Rights 5 52 Liability 2 License 2 Lightning 4 Liquids, Corrosive 4 M... 4 Operating Condition 5 Operating System Type/Version 32 Operating Temp 37 Organization 24 Out-dated Warranty 5 P Parts 5 Password 28 Patent 2 Permission 2 Photocopying 2 Pipes 4 PL-100 Configuration Utility 27 Index
... Points 4 HomePlug 1.0 16 HomePlug chipset manufacturer name 32 HomePlug Powerline Alliance 16 Host Network Name 32 Humidity 37 I Indirect Damages 5 Installation Confirmation 26 Installing the PL-100 19 InstallShield Wizard 23 Insurance 5 Interference Statement 3 L Labor 5 LED Status 22 LED status 22 Legal Rights 5 52 Liability 2 License 2 Lightning 4 Liquids, Corrosive 4 M... 4 Operating Condition 5 Operating System Type/Version 32 Operating Temp 37 Organization 24 Out-dated Warranty 5 P Parts 5 Password 28 Patent 2 Permission 2 Photocopying 2 Pipes 4 PL-100 Configuration Utility 27 Index
Quick Start Guide
Page 3
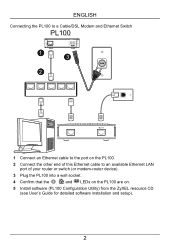
ENGLISH Connecting the PL100 to a Cable/DSL Modem and Ethernet Switch PPLL1-10000 1 13 12 1 Connect an Ethernet cable to the port on the PL100. 2 Connect the other end of this Ethernet cable to an available Ethernet LAN port of your router or switch (or modem-router device). 3 Plug the PL100 into a wall socket. 4 Confirm that the , and LEDs on the PL100 are on. 5 Install software (PL100 Configuration Utility) from the ZyXEL resource CD (see User's Guide for detailed software installation and setup). 2
ENGLISH Connecting the PL100 to a Cable/DSL Modem and Ethernet Switch PPLL1-10000 1 13 12 1 Connect an Ethernet cable to the port on the PL100. 2 Connect the other end of this Ethernet cable to an available Ethernet LAN port of your router or switch (or modem-router device). 3 Plug the PL100 into a wall socket. 4 Confirm that the , and LEDs on the PL100 are on. 5 Install software (PL100 Configuration Utility) from the ZyXEL resource CD (see User's Guide for detailed software installation and setup). 2

Quick Start Guide
Page 5
... cables are securely connected at all other Homeplug devices on your computer and make sure it's enabled and working properly. ENGLISH • Use the PL100 Configuration Utility to your PL100) and see if the lights light up. Try plugging a second Homeplug device into an adjacent socket (to detect all ports and are...
... cables are securely connected at all other Homeplug devices on your computer and make sure it's enabled and working properly. ENGLISH • Use the PL100 Configuration Utility to your PL100) and see if the lights light up. Try plugging a second Homeplug device into an adjacent socket (to detect all ports and are...


