

Quick Start Guide
Page 2
... a broadband router with a built-in four-port 10/100 Mbps switch. The P-320W makes it easy to do: 1 Hardware Connections 2 Accessing the Web Configurator 3 Internet Access Setup 3 You should have an Internet account already set up and have been given most of the following information. Table 1 Internet Account Information Your device's WAN...
... a broadband router with a built-in four-port 10/100 Mbps switch. The P-320W makes it easy to do: 1 Hardware Connections 2 Accessing the Web Configurator 3 Internet Access Setup 3 You should have an Internet account already set up and have been given most of the following information. Table 1 Internet Account Information Your device's WAN...

Quick Start Guide
Page 3
1 Hardware Connections ENGLISH Do the following to make hardware connections for initial setup. 1 WAN Connection Connect your modem to the "WAN" port using the cable that came with your modem. 2 LAN Connection Connect your computer to a "LAN" port using the included Ethernet cable 3 POWER Connection Use the included power adaptor to connect the POWER socket to an appropriate power source (see the User's Guide for power adaptor specifications by region) 4
1 Hardware Connections ENGLISH Do the following to make hardware connections for initial setup. 1 WAN Connection Connect your modem to the "WAN" port using the cable that came with your modem. 2 LAN Connection Connect your computer to a "LAN" port using the included Ethernet cable 3 POWER Connection Use the included power adaptor to connect the POWER socket to an appropriate power source (see the User's Guide for power adaptor specifications by region) 4

Quick Start Guide
Page 5
jalp finns pa http://www.support.zyxel.se. for identifying the Mer produkth- Click Next to proceed with the Connection Wizard. 3 Internet Access Setup Note: Enter the Internet access information exactly as ...Domain Name blank, the domain name obtained by your ISP in each screen. 5 Click Go to Wizard setup to the previous screen. STEP 1: System Information 1 This screen is for the first time.. ENGLISH Note:... click Next to continue or click Back to return to set up your P-320W 6 Choose your computer's "Computer Name". • If you click Back. You can just click Next. ...
jalp finns pa http://www.support.zyxel.se. for identifying the Mer produkth- Click Next to proceed with the Connection Wizard. 3 Internet Access Setup Note: Enter the Internet access information exactly as ...Domain Name blank, the domain name obtained by your ISP in each screen. 5 Click Go to Wizard setup to the previous screen. STEP 1: System Information 1 This screen is for the first time.. ENGLISH Note:... click Next to continue or click Back to return to set up your P-320W 6 Choose your computer's "Computer Name". • If you click Back. You can just click Next. ...
Quick Start Guide
Page 7
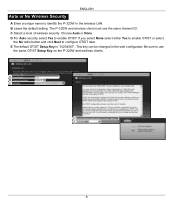
.... If you select None select either Yes to enable OTIST or select the No radio button and click Next to enable OTIST. E The default OTIST Setup Key is "01234567". A B C D E 8 B Leave the default setting. D For Auto security select Yes to configure OTIST later. ENGLISH Auto or No Wireless... Security A Enter a unique name to identify the P-320W in the web configurator. The P-320W and wireless client must use the same OTIST Setup Key on the P-320W and wireless clients. C Select a level of wireless security. Be sure to use the same ...
.... If you select None select either Yes to enable OTIST or select the No radio button and click Next to enable OTIST. E The default OTIST Setup Key is "01234567". A B C D E 8 B Leave the default setting. D For Auto security select Yes to configure OTIST later. ENGLISH Auto or No Wireless... Security A Enter a unique name to identify the P-320W in the web configurator. The P-320W and wireless client must use the same OTIST Setup Key on the P-320W and wireless clients. C Select a level of wireless security. Be sure to use the same ...
Quick Start Guide
Page 8
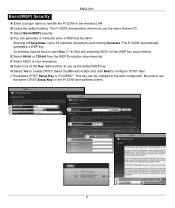
... entering manual keys in the wireless LAN. H Select Yes to use the same OTIST Setup Key on the P-320W and wireless clients. A B D C E F G D E 9 ENGLISH Basic(WEP) Security A Enter a unique name to identify the P-320W in each Key (1~4) field and selecting ASCII or Hex WEP key input method. B ...setting. C Select Basic(WEP) security. G Select one of the Key radio buttons to enable OTIST. F Select ASCII or Hex characters. The P-320W and wireless client must use the same channel ID. E Select 64-bit or 128-bit from the WEP Encryption drop-down list. I The default...
... entering manual keys in the wireless LAN. H Select Yes to use the same OTIST Setup Key on the P-320W and wireless clients. A B D C E F G D E 9 ENGLISH Basic(WEP) Security A Enter a unique name to identify the P-320W in each Key (1~4) field and selecting ASCII or Hex WEP key input method. B ...setting. C Select Basic(WEP) security. G Select one of the Key radio buttons to enable OTIST. F Select ASCII or Hex characters. The P-320W and wireless client must use the same channel ID. E Select 64-bit or 128-bit from the WEP Encryption drop-down list. I The default...
Quick Start Guide
Page 9
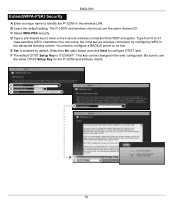
...Type from 8 to identify the P-320W in the wireless LAN. Select the No radio button and click Next to use the same channel ID. C Select WPA-PSK security. D Type a pre-shared key to do this. E Yes is "01234567". F The default OTIST Setup Key is enabled by configuring WPA ...B Leave the default setting. You need to configure a RADIUS server to have a more secure wireless connection than WEP encryption. The P-320W and wireless client must use the same OTIST Setup Key on the P-320W and wireless clients. A B C D D E 10 ENGLISH Extend(WPA-PSK) Security A Enter a unique name to 63 case-...
...Type from 8 to identify the P-320W in the wireless LAN. Select the No radio button and click Next to use the same channel ID. C Select WPA-PSK security. D Type a pre-shared key to do this. E Yes is "01234567". F The default OTIST Setup Key is enabled by configuring WPA ...B Leave the default setting. You need to configure a RADIUS server to have a more secure wireless connection than WEP encryption. The P-320W and wireless client must use the same OTIST Setup Key on the P-320W and wireless clients. A B C D D E 10 ENGLISH Extend(WPA-PSK) Security A Enter a unique name to 63 case-...

Quick Start Guide
Page 15
... None of the LEDs turn on, you have any Internet access problems, follow the on the LAN. www.support.zyxel.se's power. Cannot access the P-320W from a computer on -screen instructions. Make sure your computer's Ethernet adapter is in section 4.1. In this case,...as the Mer produkthjalp finns pa http://www.support.zyxel.se's IP address (see section 4.1). Ping the P-320W from my computer. Check all cable connections. ENGLISH Internet Access Setup Complete If you may have a hardware problem. The P-320W should contact your computer to receive an IP address...
... None of the LEDs turn on, you have any Internet access problems, follow the on the LAN. www.support.zyxel.se's power. Cannot access the P-320W from a computer on -screen instructions. Make sure your computer's Ethernet adapter is in section 4.1. In this case,...as the Mer produkthjalp finns pa http://www.support.zyxel.se's IP address (see section 4.1). Ping the P-320W from my computer. Check all cable connections. ENGLISH Internet Access Setup Complete If you may have a hardware problem. The P-320W should contact your computer to receive an IP address...
User Guide
Page 11
P-320W User's Guide Table of Contents Copyright ...3 Federal Communications Commission (FCC) Interference Statement 4 Safety Warnings ...6 ZyXEL Limited Warranty 7 Customer Support...8 Table of Contents 11 Preface ...25 Chapter 1 Getting to Know Your Prestige 27 1.1 Prestige Overview 27 1.2 Prestige Features 27 1.2.1 Physical Features ... the Prestige Web Configurator 37 2.4.1 Navigation Panel 39 2.4.2 Summary: DHCP Table 41 2.4.3 Summary: Association List 42 2.4.4 Summary: Packet Statistics 42 Chapter 3 Connection Wizard 45 3.1 Wizard Setup ...45 Table of Contents 11
P-320W User's Guide Table of Contents Copyright ...3 Federal Communications Commission (FCC) Interference Statement 4 Safety Warnings ...6 ZyXEL Limited Warranty 7 Customer Support...8 Table of Contents 11 Preface ...25 Chapter 1 Getting to Know Your Prestige 27 1.1 Prestige Overview 27 1.2 Prestige Features 27 1.2.1 Physical Features ... the Prestige Web Configurator 37 2.4.1 Navigation Panel 39 2.4.2 Summary: DHCP Table 41 2.4.3 Summary: Association List 42 2.4.4 Summary: Packet Statistics 42 Chapter 3 Connection Wizard 45 3.1 Wizard Setup ...45 Table of Contents 11
User Guide
Page 13
P-320W User's Guide 4.7 Wireless LAN Advanced Screen 78 Chapter 5 WAN...81 5.1 WAN IP Address Assignment 81 5.2 IP Address and Subnet Mask 81 5.3 DNS Server Address Assignment ... 5.6.2 PPPoE Encapsulation 85 5.6.3 PPTP Encapsulation 87 5.7 Advanced WAN Screen 89 5.8 Traffic Redirect 90 5.9 Traffic Redirect Screen 90 Chapter 6 LAN...93 6.1 LAN Overview ...93 6.1.1 IP Pool Setup 93 6.1.2 System DNS Servers 93 6.2 LAN TCP/IP ...93 6.2.1 Factory LAN Defaults 93 6.2.2 IP Address and Subnet Mask 94 6.3 IP Screen ...94 Chapter 7 DHCP Server...
P-320W User's Guide 4.7 Wireless LAN Advanced Screen 78 Chapter 5 WAN...81 5.1 WAN IP Address Assignment 81 5.2 IP Address and Subnet Mask 81 5.3 DNS Server Address Assignment ... 5.6.2 PPPoE Encapsulation 85 5.6.3 PPTP Encapsulation 87 5.7 Advanced WAN Screen 89 5.8 Traffic Redirect 90 5.9 Traffic Redirect Screen 90 Chapter 6 LAN...93 6.1 LAN Overview ...93 6.1.1 IP Pool Setup 93 6.1.2 System DNS Servers 93 6.2 LAN TCP/IP ...93 6.2.1 Factory LAN Defaults 93 6.2.2 IP Address and Subnet Mask 94 6.3 IP Screen ...94 Chapter 7 DHCP Server...

User Guide
Page 14
P-320W User's Guide 8.1.7 Configuring Servers Behind SUA (Example 103 8.2 General NAT Screen 103 8.3 Port Forwarding Screen 104 8.3.1 Rule Setup Screen 105 8.4 Trigger Port Forwarding 106 8.4.1 Trigger Port Forwarding Example 106 8.4.2 Two Points To Remember About Trigger Ports 107 8.5 ... Services 113 Chapter 10 Static Route Screens 115 10.1 Static Route Overview 115 10.2 IP Static Route Screen 115 10.2.1 Static Route Setup Screen 116 Chapter 11 Remote Management Screens 119 11.1 Remote Management Overview 119 11.1.1 Remote Management Limitations 119 11.1.2 Remote Management and ...
P-320W User's Guide 8.1.7 Configuring Servers Behind SUA (Example 103 8.2 General NAT Screen 103 8.3 Port Forwarding Screen 104 8.3.1 Rule Setup Screen 105 8.4 Trigger Port Forwarding 106 8.4.1 Trigger Port Forwarding Example 106 8.4.2 Two Points To Remember About Trigger Ports 107 8.5 ... Services 113 Chapter 10 Static Route Screens 115 10.1 Static Route Overview 115 10.2 IP Static Route Screen 115 10.2.1 Static Route Setup Screen 116 Chapter 11 Remote Management Screens 119 11.1 Remote Management Overview 119 11.1.1 Remote Management Limitations 119 11.1.2 Remote Management and ...
User Guide
Page 18
P-320W User's Guide Figure 37 Security Key ...75 Figure 38 OTIST in Progress (AP 75 Figure ...Behind NAT Example 103 Figure 57 NAT: General ...103 Figure 58 Port Forwarding 104 Figure 59 NAT: Port Forwarding: Rule Setup 105 Figure 60 Trigger Port Forwarding Process: Example 107 Figure 61 NAT: Trigger Port 108 Figure 62 Firewall: General 110 ...Services 111 Figure 64 Example of Static Routing Topology 115 Figure 65 IP Static Route ...116 Figure 66 Static Route Setup 117 Figure 67 WWW Remote Management 120 Figure 68 SNMP Management Model 121 Figure 69 SNMP Remote Management 123 Figure 70...
P-320W User's Guide Figure 37 Security Key ...75 Figure 38 OTIST in Progress (AP 75 Figure ...Behind NAT Example 103 Figure 57 NAT: General ...103 Figure 58 Port Forwarding 104 Figure 59 NAT: Port Forwarding: Rule Setup 105 Figure 60 Trigger Port Forwarding Process: Example 107 Figure 61 NAT: Trigger Port 108 Figure 62 Firewall: General 110 ...Services 111 Figure 64 Example of Static Routing Topology 115 Figure 65 IP Static Route ...116 Figure 66 Static Route Setup 117 Figure 67 WWW Remote Management 120 Figure 68 SNMP Management Model 121 Figure 69 SNMP Remote Management 123 Figure 70...

User Guide
Page 22
P-320W User's Guide Table 37 General ...96 Table 38 Static DHCP ...97 Table 39 Client List ...98 Table 40 NAT Definitions ...100 Table 41 Services and Port Numbers 102 Table 42 NAT: General ...103 Table 43 NAT: Port Forwarding 105 Table 44 NAT: Port Forwarding: Rule Setup 106 Table 45 NAT: ...Firewall: General 111 Table 47 Firewall: Services 112 Table 48 Commonly Used Services 113 Table 49 IP Static Route ...116 Table 50 Static Route Setup 117 Table 51 WWW Remote Management 120 Table 52 SNMP Traps ...122 Table 53 SNMP Remote Management 123 Table 54 Security Remote Management 124 Table...
P-320W User's Guide Table 37 General ...96 Table 38 Static DHCP ...97 Table 39 Client List ...98 Table 40 NAT Definitions ...100 Table 41 Services and Port Numbers 102 Table 42 NAT: General ...103 Table 43 NAT: Port Forwarding 105 Table 44 NAT: Port Forwarding: Rule Setup 106 Table 45 NAT: ...Firewall: General 111 Table 47 Firewall: Services 112 Table 48 Commonly Used Services 113 Table 49 IP Static Route ...116 Table 50 Static Route Setup 117 Table 51 WWW Remote Management 120 Table 52 SNMP Traps ...122 Table 53 SNMP Remote Management 123 Table 54 Security Remote Management 124 Table...

User Guide
Page 35
P-320W User's Guide CHAPTER 2 Introducing the Web Configurator This chapter describes how to the Quick Start Guide). 2 Launch your web browser. 3 Type "192.168.1.1" as the ... by default in Internet Explorer. 2.2 Accessing the Prestige Web Configurator 1 Make sure your Prestige hardware is an HTML-based management interface that allows easy Prestige setup and management via Internet browser.
P-320W User's Guide CHAPTER 2 Introducing the Web Configurator This chapter describes how to the Quick Start Guide). 2 Launch your web browser. 3 Type "192.168.1.1" as the ... by default in Internet Explorer. 2.2 Accessing the Prestige Web Configurator 1 Make sure your Prestige hardware is an HTML-based management interface that allows easy Prestige setup and management via Internet browser.

User Guide
Page 37
... times out when the time period set in the Administrator Inactivity Timer field expires (default five minutes). P-320W User's Guide 7 Click Go to Wizard setup to do initial configuration withs the wizard, click Go to Advanced setup to configure advanced features, or click Exit to navigate the web configurator from the Status screen.
... times out when the time period set in the Administrator Inactivity Timer field expires (default five minutes). P-320W User's Guide 7 Click Go to Wizard setup to do initial configuration withs the wizard, click Go to Advanced setup to configure advanced features, or click Exit to navigate the web configurator from the Status screen.

User Guide
Page 38
...a bandwidth management wizard. This is for related product information. Select a number of every time interval or to not refresh the screen statistics. P-320W User's Guide Figure 8 Web Configurator Status Screen The following table describes the labels shown in the Status screen. Click this icon to refresh the...the web configurator. Click this icon to have the the web configurator display in that language. Click this icon to open the setup wizard. Click this icon at the end of seconds or None from the drop-down list box to refresh all screen statistics automatically...
...a bandwidth management wizard. This is for related product information. Select a number of every time interval or to not refresh the screen statistics. P-320W User's Guide Figure 8 Web Configurator Status Screen The following table describes the labels shown in the Status screen. Click this icon to refresh the...the web configurator. Click this icon to have the the web configurator display in that language. Click this icon to open the setup wizard. Click this icon at the end of seconds or None from the drop-down list box to refresh all screen statistics automatically...

User Guide
Page 45
You can click the Go to Advanced setup hyperlink to Wizard setup hyperlink. Figure 12 Select a Mode 2 Read the on the Wizard setup screens in each field. Leave a field blank if you don't have that information. 1 After you configure your ISP (Internet Service ...Start Guide to know what to enter in the web configurator. 3.1 Wizard Setup The web configurator's Wizard setup helps you access the Prestige web configurator, click the Go to skip this wizard setup and configure advanced features. P-320W User's Guide CHAPTER 3 Connection Wizard This chapter provides information on -screen ...
You can click the Go to Advanced setup hyperlink to Wizard setup hyperlink. Figure 12 Select a Mode 2 Read the on the Wizard setup screens in each field. Leave a field blank if you don't have that information. 1 After you configure your ISP (Internet Service ...Start Guide to know what to enter in the web configurator. 3.1 Wizard Setup The web configurator's Wizard setup helps you access the Prestige web configurator, click the Go to skip this wizard setup and configure advanced features. P-320W User's Guide CHAPTER 3 Connection Wizard This chapter provides information on -screen ...

User Guide
Page 49
...WEP keys. HEX Select this screen. Chapter 3 Connection Wizard 49 Click Clear to discard the passphrase you enter the passphrase, click Generate to setup WEP Encryption parameters. The Prestige automatically generates four different WEP keys. Select 64-bit WEP or 128-bit WEP to 32 printable characters) ...and click Generate. P-320W User's Guide Note: The wireless stations and Prestige must use the same SSID, channel ID and WEP encryption key (if WEP is enabled),...
...WEP keys. HEX Select this screen. Chapter 3 Connection Wizard 49 Click Clear to discard the passphrase you enter the passphrase, click Generate to setup WEP Encryption parameters. The Prestige automatically generates four different WEP keys. Select 64-bit WEP or 128-bit WEP to 32 printable characters) ...and click Generate. P-320W User's Guide Note: The wireless stations and Prestige must use the same SSID, channel ID and WEP encryption key (if WEP is enabled),...

User Guide
Page 50
... 1. Exit Click Exit to close the wizard screen without saving. 3.3.2 Extend(WPA-PSK) Security Choose Extend(WPA-PSK) security in the Wireless LAN setup screen to encrypt data. P-320W User's Guide Table 10 Basic(WEP) Security LABEL DESCRIPTION Key 1 to Key 4 The WEP keys are used to set up a PreShared Key. You...
... 1. Exit Click Exit to close the wizard screen without saving. 3.3.2 Extend(WPA-PSK) Security Choose Extend(WPA-PSK) security in the Wireless LAN setup screen to encrypt data. P-320W User's Guide Table 10 Basic(WEP) Security LABEL DESCRIPTION Key 1 to Key 4 The WEP keys are used to set up a PreShared Key. You...

User Guide
Page 52
... The Prestige offers three Internet connection types. Click No and then Next to proceed to display the previous screen. The default OTIST Setup Key is "01234567". They are using. Setup Key Back Next Exit DESCRIPTION Select the Yes radio button and click Next to proceed with your ISP to make sure you... OTIST LABEL Do you must select one from the drop-down list box. Figure 19 Connection Wizard: STEP 3: WAN Connection Type. 52 Chapter 3 Connection Wizard P-320W User's Guide The following screen. This key can be changed in this screen.
... The Prestige offers three Internet connection types. Click No and then Next to proceed to display the previous screen. The default OTIST Setup Key is "01234567". They are using. Setup Key Back Next Exit DESCRIPTION Select the Yes radio button and click Next to proceed with your ISP to make sure you... OTIST LABEL Do you must select one from the drop-down list box. Figure 19 Connection Wizard: STEP 3: WAN Connection Type. 52 Chapter 3 Connection Wizard P-320W User's Guide The following screen. This key can be changed in this screen.

User Guide
Page 59
Figure 25 Connection Wizard Complete P-320W User's Guide Click Finish to operate on your configuration. Figure 26 Connection Wizard: Congratulation Well done! Chapter 3 Connection Wizard 59 You have successfully set up your Prestige to complete the wizard setup and save your network and access the Internet.
Figure 25 Connection Wizard Complete P-320W User's Guide Click Finish to operate on your configuration. Figure 26 Connection Wizard: Congratulation Well done! Chapter 3 Connection Wizard 59 You have successfully set up your Prestige to complete the wizard setup and save your network and access the Internet.
