User Guide
Page 50
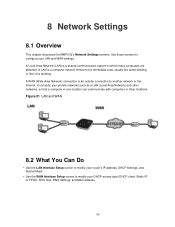
..., usually the same building or floor of a building. Use these screens to modify your DHCP access type (DHCP client, Static IP, or PPoE), MTU Size, DNS Settings, and MAC address. 50 Figure 21 LAN and WAN 8.2 What You Can Do • Use the LAN Interface Setup screen to modify your router.... A LAN is an outside connection to which many computers are attached. It connects your LAN and WAN settings. 8 Network Settings 8.1 Overview This chapter discusses the MWR102's Network Settings screens.
..., usually the same building or floor of a building. Use these screens to modify your DHCP access type (DHCP client, Static IP, or PPoE), MTU Size, DNS Settings, and MAC address. 50 Figure 21 LAN and WAN 8.2 What You Can Do • Use the LAN Interface Setup screen to modify your router.... A LAN is an outside connection to which many computers are attached. It connects your LAN and WAN settings. 8 Network Settings 8.1 Overview This chapter discusses the MWR102's Network Settings screens.

User Guide
Page 51
...ports. These parameters should work for your WAN and LAN connections. 8.3.1 Configuring Your Internet Connection The actual physical connection determines whether the MWR102 ports are two separate IP networks, one inside the LAN network and the other outside the WAN network as shown next. Choose ...Clone the computer's MAC address - Once it is recommended that you explicit DNS server address(es), read the embedded Web-Based Management Interface help you configure the screens for the majority of the MWR102 are preset in this section can help regarding what fields need to be copied...
...ports. These parameters should work for your WAN and LAN connections. 8.3.1 Configuring Your Internet Connection The actual physical connection determines whether the MWR102 ports are two separate IP networks, one inside the LAN network and the other outside the WAN network as shown next. Choose ...Clone the computer's MAC address - Once it is recommended that you explicit DNS server address(es), read the embedded Web-Based Management Interface help you configure the screens for the majority of the MWR102 are preset in this section can help regarding what fields need to be copied...
User Guide
Page 83
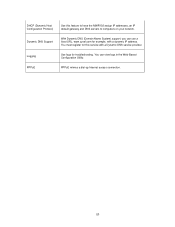
DHCP (Dynamic Host Configuration Protocol) Use this service with a dynamic IP address. Logging Use logs for this feature to have the MWR102 assign IP addresses, an IP default gateway and DNS servers to computers on your network. Dynamic DNS Support With Dynamic DNS (Domain Name System) support, you can view logs in the Web-Based Configuration Utility. You can use a fixed URL, www.zyxel.com for example, with a Dynamic DNS service provider. You must register for troubleshooting. PPPoE PPPoE mimics a dial-up Internet access connection. 83
DHCP (Dynamic Host Configuration Protocol) Use this service with a dynamic IP address. Logging Use logs for this feature to have the MWR102 assign IP addresses, an IP default gateway and DNS servers to computers on your network. Dynamic DNS Support With Dynamic DNS (Domain Name System) support, you can view logs in the Web-Based Configuration Utility. You can use a fixed URL, www.zyxel.com for example, with a Dynamic DNS service provider. You must register for troubleshooting. PPPoE PPPoE mimics a dial-up Internet access connection. 83
User Guide
Page 108
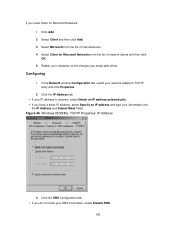
.... 4 Select Client for Microsoft Networks from the list of network clients and then click OK. 5 Restart your DNS information, select Disable DNS. 108 Figure 46 Windows 95/98/Me: TCP/IP Properties: IP Address 3 Click the DNS Configuration tab. • If you do not know your computer so the changes you have a static...
.... 4 Select Client for Microsoft Networks from the list of network clients and then click OK. 5 Restart your DNS information, select Disable DNS. 108 Figure 46 Windows 95/98/Me: TCP/IP Properties: IP Address 3 Click the DNS Configuration tab. • If you do not know your computer so the changes you have a static...

User Guide
Page 109
• If you know your DNS information, select Enable DNS and type the information in the fields below (you may not need to fill them all in). 109
• If you know your DNS information, select Enable DNS and type the information in the fields below (you may not need to fill them all in). 109
User Guide
Page 110
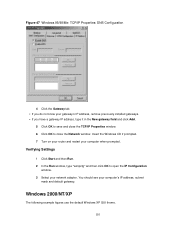
.... Windows 2000/NT/XP The following example figures use the default Windows XP GUI theme. 110 Figure 47 Windows 95/98/Me: TCP/IP Properties: DNS Configuration 4 Click the Gateway tab. • If you do not know your computer's IP address, subnet mask and default gateway.
.... Windows 2000/NT/XP The following example figures use the default Windows XP GUI theme. 110 Figure 47 Windows 95/98/Me: TCP/IP Properties: DNS Configuration 4 Click the Gateway tab. • If you do not know your computer's IP address, subnet mask and default gateway.
User Guide
Page 114
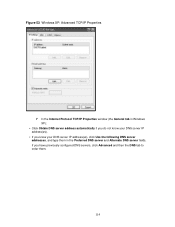
Figure 53 Windows XP: Advanced TCP/IP Properties 7 In the Internet Protocol TCP/IP Properties window (the General tab in Windows XP): • Click Obtain DNS server address automatically if you do not know your DNS server IP address(es). • If you have previously configured DNS servers, click Advanced and then the DNS tab to order them in the Preferred DNS server and Alternate DNS server fields. If you know your DNS server IP address(es), click Use the following DNS server addresses, and type them . 114
Figure 53 Windows XP: Advanced TCP/IP Properties 7 In the Internet Protocol TCP/IP Properties window (the General tab in Windows XP): • Click Obtain DNS server address automatically if you do not know your DNS server IP address(es). • If you have previously configured DNS servers, click Advanced and then the DNS tab to order them in the Preferred DNS server and Alternate DNS server fields. If you know your DNS server IP address(es), click Use the following DNS server addresses, and type them . 114
User Guide
Page 118
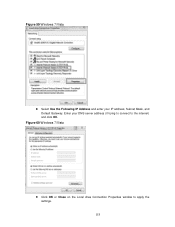
Figure 59 Windows 7/Vista 8 Select Use the Following IP Address and enter your DNS server address (if trying to connect to apply the settings. 118 Enter your IP address, Subnet Mask, and Default Gateway. Figure 60 Windows 7/Vista 9 Click OK or Close on the Local Area Connection Properties window to the internet) and click OK.
Figure 59 Windows 7/Vista 8 Select Use the Following IP Address and enter your DNS server address (if trying to connect to apply the settings. 118 Enter your IP address, Subnet Mask, and Default Gateway. Figure 60 Windows 7/Vista 9 Click OK or Close on the Local Area Connection Properties window to the internet) and click OK.
User Guide
Page 124
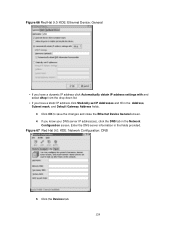
Figure 67 Red Hat 9.0: KDE: Network Configuration: DNS 5 Click the Devices tab. 124 Figure 66 Red Hat 9.0: KDE: Ethernet Device: General • If you have a dynamic IP address click Automatically obtain IP address ... Address, Subnet mask, and Default Gateway Address fields. 3 Click OK to save the changes and close the Ethernet Device General screen. 4 If you know your DNS server IP address(es), click the DNS tab in the fields provided. Enter the DNS server information in the Network Configuration screen.
Figure 67 Red Hat 9.0: KDE: Network Configuration: DNS 5 Click the Devices tab. 124 Figure 66 Red Hat 9.0: KDE: Ethernet Device: General • If you have a dynamic IP address click Automatically obtain IP address ... Address, Subnet mask, and Default Gateway Address fields. 3 Click OK to save the changes and close the Ethernet Device General screen. 4 If you know your DNS server IP address(es), click the DNS tab in the fields provided. Enter the DNS server information in the Network Configuration screen.
User Guide
Page 126
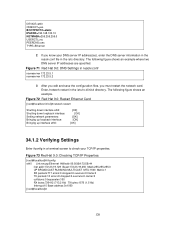
...interface eth0: [OK] [OK] [OK] [OK] [OK] 34.1.2 Verifying Settings Enter ifconfig in a terminal screen to check your DNS server IP address(es), enter the DNS server information in the resolv.conf file in the /etc directory. Figure 73 Red Hat 9.0: Checking TCP/IP Properties [root@localhost]# ifconfig...:100 RX bytes:730412 (713.2 Kb) TX bytes:1570 (1.5 Kb) Interrupt:10 Base address:0x1000 [root@localhost]# 126 Figure 71 Red Hat 9.0: DNS Settings in the /etc/rc.d/init.d directory. DEVICE=eth0 ONBOOT=yes BOOTPROTO=static IPADDR=192.168.100.10 NETMASK=255.255.255.0 USERCTL=no PEERDNS...
...interface eth0: [OK] [OK] [OK] [OK] [OK] 34.1.2 Verifying Settings Enter ifconfig in a terminal screen to check your DNS server IP address(es), enter the DNS server information in the resolv.conf file in the /etc directory. Figure 73 Red Hat 9.0: Checking TCP/IP Properties [root@localhost]# ifconfig...:100 RX bytes:730412 (713.2 Kb) TX bytes:1570 (1.5 Kb) Interrupt:10 Base address:0x1000 [root@localhost]# 126 Figure 71 Red Hat 9.0: DNS Settings in the /etc/rc.d/init.d directory. DEVICE=eth0 ONBOOT=yes BOOTPROTO=static IPADDR=192.168.100.10 NETMASK=255.255.255.0 USERCTL=no PEERDNS...

User Guide
Page 142
... the world wide web. 443 HTTPS is a secured http session often used in e-commerce. 1 Internet Control Message Protocol is often used for example http://us.zyxel.com) to find out if a user is a popular Internet chat program. 142 BGP TCP BOOTP_CLIENT UDP BOOTP_SERVER UDP CU-SEEME TCP UDP... DNS TCP/UDP ESP User-Defined (IPSEC_TUNNEL) FINGER TCP FTP H.323 HTTP TCP TCP TCP TCP HTTPS ICMP ICQ TCP User-Defined UDP 179 Border Gateway ...
... the world wide web. 443 HTTPS is a secured http session often used in e-commerce. 1 Internet Control Message Protocol is often used for example http://us.zyxel.com) to find out if a user is a popular Internet chat program. 142 BGP TCP BOOTP_CLIENT UDP BOOTP_SERVER UDP CU-SEEME TCP UDP... DNS TCP/UDP ESP User-Defined (IPSEC_TUNNEL) FINGER TCP FTP H.323 HTTP TCP TCP TCP TCP HTTPS ICMP ICQ TCP User-Defined UDP 179 Border Gateway ...