
User Guide
Page 3
...MES3500-24/24F User's Guide 3 READ CAREFULLY BEFORE USE. Related Documentation • Web Configurator Online Help The embedded Web Help contains descriptions of individual screens and supplementary information. • Command Reference Guide The Command Reference Guide explains how to use the web configurator to configure the Switch.... • Support Disc Refer to configure the Switch. Intended Audience This manual is recommended you use the Command-Line Interface (CLI) and ...
...MES3500-24/24F User's Guide 3 READ CAREFULLY BEFORE USE. Related Documentation • Web Configurator Online Help The embedded Web Help contains descriptions of individual screens and supplementary information. • Command Reference Guide The Command Reference Guide explains how to use the web configurator to configure the Switch.... • Support Disc Refer to configure the Switch. Intended Audience This manual is recommended you use the Command-Line Interface (CLI) and ...

User Guide
Page 4
... field choices are shown in this User's Guide may use one or more characters and then press the [ENTER] key. The Switch Computer Notebook computer Server DSLAM Firewall Telephone Switch Router 4 MES3500-24/24F User's Guide Document Conventions Document Conventions Warnings and Notes These are how warnings and notes are all in the navigation panel...
... field choices are shown in this User's Guide may use one or more characters and then press the [ENTER] key. The Switch Computer Notebook computer Server DSLAM Firewall Telephone Switch Router 4 MES3500-24/24F User's Guide Document Conventions Document Conventions Warnings and Notes These are how warnings and notes are all in the navigation panel...

User Guide
Page 7
Contents Overview Contents Overview User's Guide ...21 Getting to Know Your Switch ...23 Hardware Installation and Connection 27 Hardware Overview ...30 The Web Configurator ...39 Initial Setup Example ...49 Tutorials ...53 Technical Reference ...79 System Status and ... Guard ...233 VLAN Mapping ...237 Layer 2 Protocol Tunneling ...241 sFlow ...245 PPPoE ...249 Error Disable ...257 Private VLAN ...262 Static Route ...265 Differentiated Services ...268 MES3500-24/24F User's Guide 7
Contents Overview Contents Overview User's Guide ...21 Getting to Know Your Switch ...23 Hardware Installation and Connection 27 Hardware Overview ...30 The Web Configurator ...39 Initial Setup Example ...49 Tutorials ...53 Technical Reference ...79 System Status and ... Guard ...233 VLAN Mapping ...237 Layer 2 Protocol Tunneling ...241 sFlow ...245 PPPoE ...249 Error Disable ...257 Private VLAN ...262 Static Route ...265 Differentiated Services ...268 MES3500-24/24F User's Guide 7
User Guide
Page 9
...I: User's Guide 21 Chapter 1 Getting to Know Your Switch 23 1.1 Introduction ...23 1.1.1 Backbone Application 23 1.1.2 Bridging Example ...24 1.1.3 High Performance Switching Example 24 1.1.4 IEEE 802.1Q VLAN Application Examples 25 1.1.5 IPv6 ...Switch on a Rack 27 2.3.1 Rack-mounted Installation Requirements 27 2.3.2 Attaching the Mounting Brackets to the Switch 28 2.3.3 Mounting the Switch on a Rack 29 Chapter 3 Hardware Overview ...30 3.1 Front Panel ...30 3.1.1 Console Port ...31 3.1.2 Ethernet Ports ...32 3.1.3 Transceiver Slots ...32 3.1.4 Power Connector ...34 MES3500-24/24F...
...I: User's Guide 21 Chapter 1 Getting to Know Your Switch 23 1.1 Introduction ...23 1.1.1 Backbone Application 23 1.1.2 Bridging Example ...24 1.1.3 High Performance Switching Example 24 1.1.4 IEEE 802.1Q VLAN Application Examples 25 1.1.5 IPv6 ...Switch on a Rack 27 2.3.1 Rack-mounted Installation Requirements 27 2.3.2 Attaching the Mounting Brackets to the Switch 28 2.3.3 Mounting the Switch on a Rack 29 Chapter 3 Hardware Overview ...30 3.1 Front Panel ...30 3.1.1 Console Port ...31 3.1.2 Ethernet Ports ...32 3.1.3 Transceiver Slots ...32 3.1.4 Power Connector ...34 MES3500-24/24F...
User Guide
Page 10
... 4.3 The Web Configurator Layout 40 4.3.1 Change Your Password 44 4.4 Saving Your Configuration 44 4.5 Switch Lockout ...44 4.6 Resetting the Switch ...45 4.6.1 Reload the Configuration File 45 4.7 Logging Out of the Web Configurator 46 4.8 Help...Switch B 63 6.4 How to Use Error Disable and Recovery on the Switch 66 6.5 How to Set Up a Guest VLAN 68 6.5.1 Creating a Guest VLAN 68 6.5.2 Enabling IEEE 802.1x Port Authentication 71 6.5.3 Enabling Guest VLAN 72 6.6 How to Do Port Isolation in a VLAN 73 6.6.1 Creating a VLAN ...74 6.6.2 Creating a Private VLAN Rule 76 10 MES3500-24/24F...
... 4.3 The Web Configurator Layout 40 4.3.1 Change Your Password 44 4.4 Saving Your Configuration 44 4.5 Switch Lockout ...44 4.6 Resetting the Switch ...45 4.6.1 Reload the Configuration File 45 4.7 Logging Out of the Web Configurator 46 4.8 Help...Switch B 63 6.4 How to Use Error Disable and Recovery on the Switch 66 6.5 How to Set Up a Guest VLAN 68 6.5.1 Creating a Guest VLAN 68 6.5.2 Enabling IEEE 802.1x Port Authentication 71 6.5.3 Enabling Guest VLAN 72 6.6 How to Do Port Isolation in a VLAN 73 6.6.1 Creating a VLAN ...74 6.6.2 Creating a Private VLAN Rule 76 10 MES3500-24/24F...
User Guide
Page 11
... Summary ...81 7.2.1 Status: Port Details 83 Chapter 8 Basic Setting ...86 8.1 Overview ...86 8.2 System Information ...86 8.3 General Setup ...88 8.4 Introduction to VLANs ...89 8.4.1 Smart Isolation ...90 8.5 Switch Setup ...91 8.6 IP Setup ...93 8.6.1 Management IP Addresses 93 8.7 Port Setup ...95 Chapter 9 VLAN ...97 9.1 Introduction to IEEE 802.1Q Tagged VLANs 97 9.1.1 Forwarding Tagged... 9.9 Configuring Protocol Based VLAN 108 9.10 Create an IP-based VLAN Example 109 9.11 Port-based VLAN Setup 110 9.11.1 Configure a Port-based VLAN 111 MES3500-24/24F User's Guide 11
... Summary ...81 7.2.1 Status: Port Details 83 Chapter 8 Basic Setting ...86 8.1 Overview ...86 8.2 System Information ...86 8.3 General Setup ...88 8.4 Introduction to VLANs ...89 8.4.1 Smart Isolation ...90 8.5 Switch Setup ...91 8.6 IP Setup ...93 8.6.1 Management IP Addresses 93 8.7 Port Setup ...95 Chapter 9 VLAN ...97 9.1 Introduction to IEEE 802.1Q Tagged VLANs 97 9.1.1 Forwarding Tagged... 9.9 Configuring Protocol Based VLAN 108 9.10 Create an IP-based VLAN Example 109 9.11 Port-based VLAN Setup 110 9.11.1 Configure a Port-based VLAN 111 MES3500-24/24F User's Guide 11

User Guide
Page 18
... 298 38.4 Setting Up Login Accounts 299 38.5 SSH Overview ...301 38.6 How SSH works ...302 38.7 SSH Implementation on the Switch 303 38.7.1 Requirements for Using SSH 303 38.8 Introduction to HTTPS ...303 38.9 HTTPS Example ...304 38.9.1 Internet Explorer Warning Messages ... Cluster Management ...316 41.1 Cluster Management Status Overview 316 41.2 Cluster Management Status 317 41.2.1 Cluster Member Switch Management 318 41.3 Clustering Management Configuration 320 Chapter 42 MAC Table ...322 42.1 MAC Table Overview ...322 42.2 Viewing the MAC Table 323 18 MES3500-24/24F User's Guide
... 298 38.4 Setting Up Login Accounts 299 38.5 SSH Overview ...301 38.6 How SSH works ...302 38.7 SSH Implementation on the Switch 303 38.7.1 Requirements for Using SSH 303 38.8 Introduction to HTTPS ...303 38.9 HTTPS Example ...304 38.9.1 Internet Explorer Warning Messages ... Cluster Management ...316 41.1 Cluster Management Status Overview 316 41.2 Cluster Management Status 317 41.2.1 Cluster Member Switch Management 318 41.3 Clustering Management Configuration 320 Chapter 42 MAC Table ...322 42.1 MAC Table Overview ...322 42.2 Viewing the MAC Table 323 18 MES3500-24/24F User's Guide
User Guide
Page 19
Table of Contents Chapter 43 ARP Table ...325 43.1 ARP Table Overview ...325 43.1.1 How ARP Works ...325 43.2 The ARP Table Screen ...326 Chapter 44 Configure Clone...327 44.1 Configure Clone ...327 Chapter 45 Troubleshooting...329 45.1 Power, Hardware Connections, and LEDs 329 45.2 Switch Access and Login 330 45.3 Switch Configuration ...332 Appendix A Common Services 333 Appendix B Legal Information 337 Index ...341 MES3500-24/24F User's Guide 19
Table of Contents Chapter 43 ARP Table ...325 43.1 ARP Table Overview ...325 43.1.1 How ARP Works ...325 43.2 The ARP Table Screen ...326 Chapter 44 Configure Clone...327 44.1 Configure Clone ...327 Chapter 45 Troubleshooting...329 45.1 Power, Hardware Connections, and LEDs 329 45.2 Switch Access and Login 330 45.3 Switch Configuration ...332 Appendix A Common Services 333 Appendix B Legal Information 337 Index ...341 MES3500-24/24F User's Guide 19
User Guide
Page 23
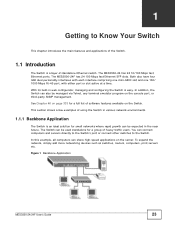
... features and applications of the Switch. 1.1 Introduction The Switch is easy. The Switch can be expected in various network environments. 1.1.1 Backbone Application The Switch is an ideal solution for a group of heavy traffic users. Figure 1 Backbone Application MES3500-24/24F User's Guide 23 The MES3500-24 has 24 10/100 Mbps fast Ethernet ports. The MES3500-24F has 24 100 Mbps fast Ethernet...
... features and applications of the Switch. 1.1 Introduction The Switch is easy. The Switch can be expected in various network environments. 1.1.1 Backbone Application The Switch is an ideal solution for a group of heavy traffic users. Figure 1 Backbone Application MES3500-24/24F User's Guide 23 The MES3500-24 has 24 10/100 Mbps fast Ethernet ports. The MES3500-24F has 24 100 Mbps fast Ethernet...
User Guide
Page 24
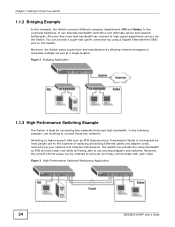
... connection by allowing network managers to connect these two networks. In the following example, use existing adapters and switches. Figure 3 High Performance Switched Workgroup Application 24 MES3500-24/24F User's Guide Figure 2 Bridging Application 1.1.3 High Performance Switching Example The Switch is not feasible for connecting two networks that need high bandwidth. Moreover, the current LAN structure can freely...
... connection by allowing network managers to connect these two networks. In the following example, use existing adapters and switches. Figure 3 High Performance Switched Workgroup Application 24 MES3500-24/24F User's Guide Figure 2 Bridging Application 1.1.3 High Performance Switching Example The Switch is not feasible for connecting two networks that need high bandwidth. Moreover, the current LAN structure can freely...

User Guide
Page 25
...Switch supports the following figure only ports that are not in IPv6 address size to 128 bits (from stations that need access to the server need to be used to discover other VLAN groups too. At the time of VLAN 1. Ports can be partitioned into multiple logical networks. MES3500-24/24F...8226; ICMPv6 to report errors encountered in packet processing and perform diagnostic functions, such as the server. Chapter 1 Getting to Know Your Switch 1.1.4 IEEE 802.1Q VLAN Application Examples A VLAN (Virtual Local Area Network) allows a physical network to be modified at the same time...
...Switch supports the following figure only ports that are not in IPv6 address size to 128 bits (from stations that need access to the server need to be used to discover other VLAN groups too. At the time of VLAN 1. Ports can be partitioned into multiple logical networks. MES3500-24/24F...8226; ICMPv6 to report errors encountered in packet processing and perform diagnostic functions, such as the server. Chapter 1 Getting to Know Your Switch 1.1.4 IEEE 802.1Q VLAN Application Examples A VLAN (Virtual Local Area Network) allows a physical network to be modified at the same time...
User Guide
Page 26
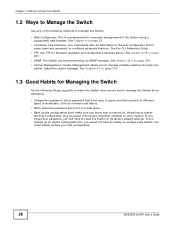
...configuration. 26 MES3500-24/24F User's Guide Cluster Management allows you to its factory default settings. Restoring an earlier working configuration may be monitored by an SNMP manager. If you backed up the configuration (and make the Switch more secure and to manage the Switch more effectively.... Section 37.8 on page 39. • Command Line Interface. See Section 38.3 on page 316. 1.3 Good Habits for Managing the Switch Do the following methods to configure advanced features. See Chapter 41 on page 290. • Cluster Management. You could simply restore your ...
...configuration. 26 MES3500-24/24F User's Guide Cluster Management allows you to its factory default settings. Restoring an earlier working configuration may be monitored by an SNMP manager. If you backed up the configuration (and make the Switch more secure and to manage the Switch more effectively.... Section 37.8 on page 39. • Command Line Interface. See Section 38.3 on page 316. 1.3 Good Habits for Managing the Switch Do the following methods to configure advanced features. See Chapter 41 on page 290. • Cluster Management. You could simply restore your ...
User Guide
Page 27
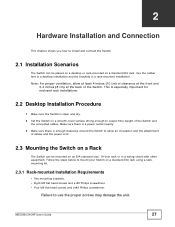
... a #2 Philips screwdriver. • Four M5 flat head screws and a #2 Philips screwdriver. MES3500-24/24F User's Guide 27 Make sure there is a power outlet nearby. 3 Make sure there is clean and dry. 2 Set the Switch on a smooth, level surface strong enough to mount your Switch on an EIA standard size, 19-inch rack or in a rack...
... a #2 Philips screwdriver. • Four M5 flat head screws and a #2 Philips screwdriver. MES3500-24/24F User's Guide 27 Make sure there is a power outlet nearby. 3 Make sure there is clean and dry. 2 Set the Switch on a smooth, level surface strong enough to mount your Switch on an EIA standard size, 19-inch rack or in a rack...
User Guide
Page 28
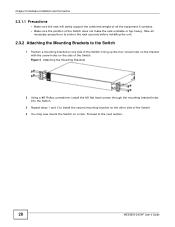
... the M3 flat head screws through the mounting bracket holes into the Switch. 3 Repeat steps 1 and 2 to the next section. 28 MES3500-24/24F User's Guide Take all the equipment it contains. • Make sure the position of the Switch does not make the rack unstable or top-heavy. Proceed to install... the second mounting bracket on the other side of the Switch. 4 You may now mount the Switch on the side...
... the M3 flat head screws through the mounting bracket holes into the Switch. 3 Repeat steps 1 and 2 to the next section. 28 MES3500-24/24F User's Guide Take all the equipment it contains. • Make sure the position of the Switch does not make the rack unstable or top-heavy. Proceed to install... the second mounting bracket on the other side of the Switch. 4 You may now mount the Switch on the side...
User Guide
Page 29
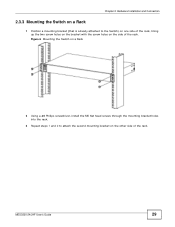
Figure 6 Mounting the Switch on a Rack 2 Using a #2 Philips screwdriver, install the M5 flat head screws through the mounting bracket holes into the rack. 3 Repeat steps 1 and 2 to the Switch) on one side of the rack, lining up the two screw holes on the bracket with the screw holes on the other side of the rack. MES3500-24/24F User's Guide 29 Chapter 2 Hardware Installation and Connection 2.3.3 Mounting the Switch on a Rack 1 Position a mounting bracket (that is already attached to attach the second mounting bracket on the side of the rack.
Figure 6 Mounting the Switch on a Rack 2 Using a #2 Philips screwdriver, install the M5 flat head screws through the mounting bracket holes into the rack. 3 Repeat steps 1 and 2 to the Switch) on one side of the rack, lining up the two screw holes on the bracket with the screw holes on the other side of the rack. MES3500-24/24F User's Guide 29 Chapter 2 Hardware Installation and Connection 2.3.3 Mounting the Switch on a Rack 1 Position a mounting bracket (that is already attached to attach the second mounting bracket on the side of the rack.
User Guide
Page 30
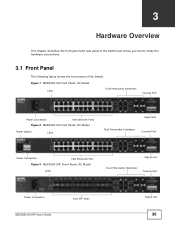
... Interfaces Console Port Power Connection Fast Ethernet Ports Figure 8 MES3500-24 Front Panel: DC Model Power Switch LEDs Signal slot Dual Personality Interfaces Console Port Power Connection Fast Ethernet Ports Figure 9 MES3500-24F Front Panel: AC Model LEDs Signal slot Dual Personality Interfaces Console Port Power Connection MES3500-24/24F User's Guide Fast SFP Slots Signal slot 30
... Interfaces Console Port Power Connection Fast Ethernet Ports Figure 8 MES3500-24 Front Panel: DC Model Power Switch LEDs Signal slot Dual Personality Interfaces Console Port Power Connection Fast Ethernet Ports Figure 9 MES3500-24F Front Panel: AC Model LEDs Signal slot Dual Personality Interfaces Console Port Power Connection MES3500-24/24F User's Guide Fast SFP Slots Signal slot 30

User Guide
Page 31
...; 9600 bps • No parity, 8 data bits, 1 stop bit • No flow control MES3500-24/24F User's Guide 31 Table 1 Front Panel Connections LABEL Power Switch Power Connection 24 10/100 Mbps RJ-45 Fast Ethernet Ports (MES3500-24) 24 100 Mbps Fast SFP Slots (MES3500-24F) Four Dual Personality Interfaces Console Port Signal slot DESCRIPTION This is for fiber...
...; 9600 bps • No parity, 8 data bits, 1 stop bit • No flow control MES3500-24/24F User's Guide 31 Table 1 Front Panel Connections LABEL Power Switch Power Connection 24 10/100 Mbps RJ-45 Fast Ethernet Ports (MES3500-24) 24 100 Mbps Fast SFP Slots (MES3500-24F) Four Dual Personality Interfaces Console Port Signal slot DESCRIPTION This is for fiber...
User Guide
Page 32
... a serial port (COM1, COM2 or other COM port) of your computer. 3.1.2 Ethernet Ports The Switch has 24 10/100 Mbps auto-negotiating, auto-crossover Ethernet ports. An auto-crossover (auto-MDI/MDI-X) port ...for mini-GBIC (Gigabit Interface Converter) transceivers or 100 Mbps Small Formfactor Pluggable (SFP) transceivers. The Switch has four 1000Base-T Ethernet ports, which are paired with a mini-GBIC slot to determine the connection speed... duplex mode can connect both computers and switches/hubs. 3.1.3 Transceiver Slots These are slots for details. 32 MES3500-24/24F User's Guide
... a serial port (COM1, COM2 or other COM port) of your computer. 3.1.2 Ethernet Ports The Switch has 24 10/100 Mbps auto-negotiating, auto-crossover Ethernet ports. An auto-crossover (auto-MDI/MDI-X) port ...for mini-GBIC (Gigabit Interface Converter) transceivers or 100 Mbps Small Formfactor Pluggable (SFP) transceivers. The Switch has four 1000Base-T Ethernet ports, which are paired with a mini-GBIC slot to determine the connection speed... duplex mode can connect both computers and switches/hubs. 3.1.3 Transceiver Slots These are slots for details. 32 MES3500-24/24F User's Guide

User Guide
Page 33
... transceiver (SFP module). 1 Remove the fiber optic cables from the transceiver. 2 Open the transceiver's latch (latch styles vary). MES3500-24/24F User's Guide 33 Chapter 3 Hardware Overview You can use different transceivers to connect to the transceiver. To avoid possible eye injury,... Transceiver Installation Use the following steps to install a mini-GBIC transceiver (SFP module). 1 Insert the transceiver into place. 3 The Switch automatically detects the installed transceiver. Check the LEDs to verify that it clicks into the slot with different types of PCB board facing down...
... transceiver (SFP module). 1 Remove the fiber optic cables from the transceiver. 2 Open the transceiver's latch (latch styles vary). MES3500-24/24F User's Guide 33 Chapter 3 Hardware Overview You can use different transceivers to connect to the transceiver. To avoid possible eye injury,... Transceiver Installation Use the following steps to install a mini-GBIC transceiver (SFP module). 1 Insert the transceiver into place. 3 The Switch automatically detects the installed transceiver. Check the LEDs to verify that it clicks into the slot with different types of PCB board facing down...

User Guide
Page 292
...with "1.3.6.1.4.1.890.1.5.8" is sent when the temperature returns to the normal operating range. 292 MES3500-24/24F User's Guide The Switch supports the following tables outline the SNMP traps by category. The OIDs beginning with "1.3.6.1.4.1.890.1.5.8.57"... collect statistics and monitor status and performance. The OIDs beginning with "1.3.6.1.4.1.890.1.5.8.68" are specific to the MES3500-24 switch. Table 120 SNMP System Traps OPTION OBJECT LABEL coldstart coldStart warmstart warmStart temperature TemperatureEventOn TemperatureEventClear voltage VoltageEventOn VoltageEventClear ...
...with "1.3.6.1.4.1.890.1.5.8" is sent when the temperature returns to the normal operating range. 292 MES3500-24/24F User's Guide The Switch supports the following tables outline the SNMP traps by category. The OIDs beginning with "1.3.6.1.4.1.890.1.5.8.57"... collect statistics and monitor status and performance. The OIDs beginning with "1.3.6.1.4.1.890.1.5.8.68" are specific to the MES3500-24 switch. Table 120 SNMP System Traps OPTION OBJECT LABEL coldstart coldStart warmstart warmStart temperature TemperatureEventOn TemperatureEventClear voltage VoltageEventOn VoltageEventClear ...