
User Guide
Page 12
...4 The Web Configurator ...39 4.1 Overview ...39 4.2 System Login ...39 4.3 The Status Screen ...40 4.3.1 Change Your Password ...44 4.4 Saving Your Configuration ...44 4.5 Switch Lockout ...44 4.6 Resetting the Switch ...45 4.6.1 Reload the Configuration File 45 4.7 Logging Out of the Web Configurator 46 4.8 Help ...46 Chapter 5 Initial Setup Example...47 5.1 Overview ...47 5.1.1 Creating... ...59 Chapter 7 System Status and Port Statistics...60 7.1 Overview ...60 7.1.1 What You Can Do ...60 7.2 Port Status Summary ...61 7.2.1 Status: Port Details ...63 12 GS2200-8/24 User's Guide
...4 The Web Configurator ...39 4.1 Overview ...39 4.2 System Login ...39 4.3 The Status Screen ...40 4.3.1 Change Your Password ...44 4.4 Saving Your Configuration ...44 4.5 Switch Lockout ...44 4.6 Resetting the Switch ...45 4.6.1 Reload the Configuration File 45 4.7 Logging Out of the Web Configurator 46 4.8 Help ...46 Chapter 5 Initial Setup Example...47 5.1 Overview ...47 5.1.1 Creating... ...59 Chapter 7 System Status and Port Statistics...60 7.1 Overview ...60 7.1.1 What You Can Do ...60 7.2 Port Status Summary ...61 7.2.1 Status: Port Details ...63 12 GS2200-8/24 User's Guide
User Guide
Page 26
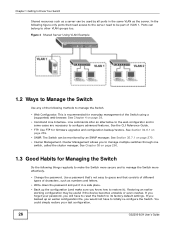
... and to manage the Switch more effectively. • Change the password. If you forget your last configuration. 26 GS2200-8/24 User's Guide You could simply restore your password, you would not have to reset the Switch to its factory default settings. In the following methods to manage the Switch. • Web Configurator...
... and to manage the Switch more effectively. • Change the password. If you forget your last configuration. 26 GS2200-8/24 User's Guide You could simply restore your password, you would not have to reset the Switch to its factory default settings. In the following methods to manage the Switch. • Web Configurator...
User Guide
Page 45
...previous configurations and the speed of the console port will need to reload the factory-default configuration file or reset the Switch back to the factory defaults. 4.6.1 Reload the Configuration File Uploading the factory-default configuration file...to the console port using a computer with a default configuration file including the default password of the Switch. 4.6 Resetting the Switch If you lock yourself (and others out of "1234". The Switch is the management port of ... software. 2 Disconnect and reconnect the Switch's power to restart the Switch. GS2200-8/24 User's Guide 45
...previous configurations and the speed of the console port will need to reload the factory-default configuration file or reset the Switch back to the factory defaults. 4.6.1 Reload the Configuration File Uploading the factory-default configuration file...to the console port using a computer with a default configuration file including the default password of the Switch. 4.6 Resetting the Switch If you lock yourself (and others out of "1234". The Switch is the management port of ... software. 2 Disconnect and reconnect the Switch's power to restart the Switch. GS2200-8/24 User's Guide 45
User Guide
Page 64
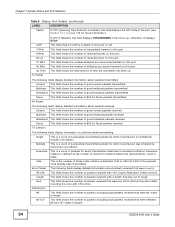
... fields display information on this port. TX Collision The following fields display detailed information about packets received that were in length. 64 GS2200-8/24 User's Guide Single This is a count of successfully transmitted packets for which transmission was out of range. Excessive This is...ones with CRC (Cyclic Redundant Check) error(s). Multicast This field shows the number of maximum collisions before the retransmission count is reset. Broadcast This field shows the number of 802.3x Pause packets received. Pause This field shows the number of good broadcast packets...
... fields display information on this port. TX Collision The following fields display detailed information about packets received that were in length. 64 GS2200-8/24 User's Guide Single This is a count of successfully transmitted packets for which transmission was out of range. Excessive This is...ones with CRC (Cyclic Redundant Check) error(s). Multicast This field shows the number of maximum collisions before the retransmission count is reset. Broadcast This field shows the number of 802.3x Pause packets received. Pause This field shows the number of good broadcast packets...
User Guide
Page 69
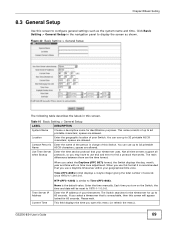
...spaces are the time format. When you turn on the Switch, the time and date will appear locked for identification purposes. Please wait. GS2200-8/24 User's Guide 69 spaces are allowed. Enter the time service protocol that is similar to Time (RFC-868). You can use up... of your geographical time zone. Enter the geographic location of your timeserver uses. NTP (RFC-1305) is unreachable, then this screen will be reset to 1970-1-1 0:0:0. Chapter 8 Basic Setting 8.3 General Setup Use this screen to configure general settings such as shown. If you may have to...
...spaces are the time format. When you turn on the Switch, the time and date will appear locked for identification purposes. Please wait. GS2200-8/24 User's Guide 69 spaces are allowed. Enter the time service protocol that is similar to Time (RFC-868). You can use up... of your geographical time zone. Enter the geographic location of your timeserver uses. NTP (RFC-1305) is unreachable, then this screen will be reset to 1970-1-1 0:0:0. Chapter 8 Basic Setting 8.3 General Setup Use this screen to configure general settings such as shown. If you may have to...
User Guide
Page 72
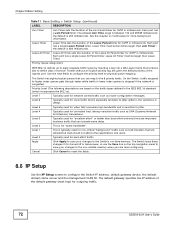
... to define class of service. Each port has a single Leave All Period timer. Level 5 Typically used for outgoing traffic. 72 GS2200-8/24 User's Guide Level 4 Typically used for non-critical "background" traffic such as SNA (Systems Network Architecture) transactions. Cancel Click Cancel to... reset the fields. 8.6 IP Setup Use the IP Setup screen to -physical queue mapping. The default gateway specifies the IP address of the...
... to define class of service. Each port has a single Leave All Period timer. Level 5 Typically used for outgoing traffic. 72 GS2200-8/24 User's Guide Level 4 Typically used for non-critical "background" traffic such as SNA (Systems Network Architecture) transactions. Cancel Click Cancel to... reset the fields. 8.6 IP Setup Use the IP Setup screen to -physical queue mapping. The default gateway specifies the IP address of the...
User Guide
Page 74
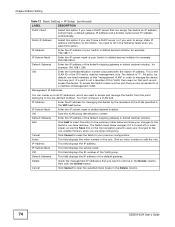
... specified in the VID field below and save your changes to the non-volatile memory when you want to remove in the Delete column. 74 GS2200-8/24 User's Guide You must configure a VLAN first. Management IP Addresses You can assign the Switch an IP address, subnet mask, a default gateway IP address... dotted decimal notation, for managing the Switch by default, are done configuring. This is "1". VID Type the VLAN group identification number. Cancel Click Cancel to reset the fields to the Switch. VID This field displays the ID number of the rule.
... specified in the VID field below and save your changes to the non-volatile memory when you want to remove in the Delete column. 74 GS2200-8/24 User's Guide You must configure a VLAN first. Management IP Addresses You can assign the Switch an IP address, subnet mask, a default gateway IP address... dotted decimal notation, for managing the Switch by default, are done configuring. This is "1". VID Type the VLAN group identification number. Cancel Click Cancel to reset the fields to the Switch. VID This field displays the ID number of the rule.
User Guide
Page 102
... panel to the Switch's run-time memory. Click Delete to clear the Delete check boxes. 102 GS2200-8/24 User's Guide Click Cancel to remove the selected entry from the summary table. Click Cancel to reset the fields to which the MAC address belongs. MAC Address Enter the MAC address in valid MAC...
... panel to the Switch's run-time memory. Click Delete to clear the Delete check boxes. 102 GS2200-8/24 User's Guide Click Cancel to remove the selected entry from the summary table. Click Cancel to reset the fields to which the MAC address belongs. MAC Address Enter the MAC address in valid MAC...
User Guide
Page 105
... so 01:00:5e:00:00:0A and 03:00:5e:00:00:27 are valid multicast MAC addresses. Cancel Click Cancel to reset the fields to display the configuration screen as shown. MAC Address This field displays the multicast MAC address that matched the entry above are... frames with matching destination MAC address to save your changes to modify a static multicast MAC address rule for a static multicast MAC address-forwarding rule. GS2200-8/24 User's Guide 105 Name Type a descriptive name (up to which identifies the multicast group. The last binary bit of a VLAN group to ...
... so 01:00:5e:00:00:0A and 03:00:5e:00:00:27 are valid multicast MAC addresses. Cancel Click Cancel to reset the fields to display the configuration screen as shown. MAC Address This field displays the multicast MAC address that matched the entry above are... frames with matching destination MAC address to save your changes to modify a static multicast MAC address rule for a static multicast MAC address-forwarding rule. GS2200-8/24 User's Guide 105 Name Type a descriptive name (up to which identifies the multicast group. The last binary bit of a VLAN group to ...
User Guide
Page 108
...Discard source to the destination MAC address (specified in the MAC field). Type a MAC address in this check box. Click Cancel to reset the fields to change the settings. This field displays the descriptive name for the MAC address. Select Discard destination to drop the frames... to drop the frames from the MAC address specified in the Delete column. 108 GS2200-8/24 User's Guide Type a descriptive name (up to activate your previous configuration. Chapter 12 Filtering The following table describes the related ...
...Discard source to the destination MAC address (specified in the MAC field). Type a MAC address in this check box. Click Cancel to reset the fields to change the settings. This field displays the descriptive name for the MAC address. Select Discard destination to drop the frames... to drop the frames from the MAC address specified in the Delete column. 108 GS2200-8/24 User's Guide Type a descriptive name (up to activate your previous configuration. Chapter 12 Filtering The following table describes the related ...
User Guide
Page 131
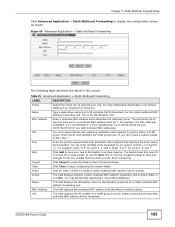
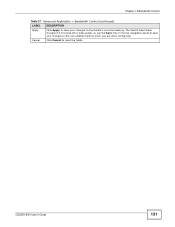
GS2200-8/24 User's Guide 131 Chapter 14 Bandwidth Control Table 37 Advanced Application > Bandwidth Control (continued) LABEL DESCRIPTION Apply Click Apply to save your changes to reset the fields. Cancel Click Cancel to the Switch's run-time memory. The Switch loses these changes if it is turned off or loses power, so use the Save link on the top navigation panel to save your changes to the non-volatile memory when you are done configuring.
GS2200-8/24 User's Guide 131 Chapter 14 Bandwidth Control Table 37 Advanced Application > Bandwidth Control (continued) LABEL DESCRIPTION Apply Click Apply to save your changes to reset the fields. Cancel Click Cancel to the Switch's run-time memory. The Switch loses these changes if it is turned off or loses power, so use the Save link on the top navigation panel to save your changes to the non-volatile memory when you are done configuring.
User Guide
Page 133
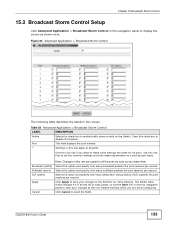
... failure (DLF) packets the port receives per second. Select this option and specify how many multicast packets the port receives per second. GS2200-8/24 User's Guide 133 Use this check box to the Switch's run-time memory. Select this screen. Click Apply to save your ... all ports. Table 38 Advanced Application > Broadcast Storm Control LABEL Active Port * DESCRIPTION Select this row only if you are copied to reset the fields. Clear this feature. This field displays the port number. Figure 83 Advanced Application > Broadcast Storm Control The following table describes ...
... failure (DLF) packets the port receives per second. Select this option and specify how many multicast packets the port receives per second. GS2200-8/24 User's Guide 133 Use this check box to the Switch's run-time memory. Select this screen. Click Apply to save your ... all ports. Table 38 Advanced Application > Broadcast Storm Control LABEL Active Port * DESCRIPTION Select this row only if you are copied to reset the fields. Clear this feature. This field displays the port number. Figure 83 Advanced Application > Broadcast Storm Control The following table describes ...
User Guide
Page 136
The Switch loses these changes if it is turned off or loses power, so use the Save link on the top navigation panel to save your changes to the non-volatile memory when you are done configuring. Chapter 16 Mirroring Table 39 Advanced Application > Mirroring (continued) LABEL DESCRIPTION Apply Click Apply to save your changes to the Switch's run-time memory. Cancel Click Cancel to reset the fields. 136 GS2200-8/24 User's Guide
The Switch loses these changes if it is turned off or loses power, so use the Save link on the top navigation panel to save your changes to the non-volatile memory when you are done configuring. Chapter 16 Mirroring Table 39 Advanced Application > Mirroring (continued) LABEL DESCRIPTION Apply Click Apply to save your changes to the Switch's run-time memory. Cancel Click Cancel to reset the fields. 136 GS2200-8/24 User's Guide
User Guide
Page 156
... select the second option and enter a TCP/UDP protocol port number. Click Add to insert the entry in the Index field. 156 GS2200-8/24 User's Guide Click Cancel to reset the fields back to your changes to the non-volatile memory when you are sent to all MAC addresses. To specify a destination...
... select the second option and enter a TCP/UDP protocol port number. Click Add to insert the entry in the Index field. 156 GS2200-8/24 User's Guide Click Cancel to reset the fields back to your changes to the non-volatile memory when you are sent to all MAC addresses. To specify a destination...
User Guide
Page 162
... the traffic flow(s). Let's say you set in the Priority field. Priority Select Discard the packet to edit the policy. Click Cancel to reset the fields back to your changes to the factory defaults. Click an index number to drop the packets. This field displays the name you... the egress port, Policy 2 applies to set two classifiers (Class 1 and Class 2) and both identify all traffic from the summary table. 162 GS2200-8/24 User's Guide Select No change to replace the VLAN ID of the classifier to enable bandwidth limitation, the Switch will discard the packets immediately...
... the traffic flow(s). Let's say you set in the Priority field. Priority Select Discard the packet to edit the policy. Click Cancel to reset the fields back to your changes to the factory defaults. Click an index number to drop the packets. This field displays the name you... the egress port, Policy 2 applies to set two classifiers (Class 1 and Class 2) and both identify all traffic from the summary table. 162 GS2200-8/24 User's Guide Select No change to replace the VLAN ID of the classifier to enable bandwidth limitation, the Switch will discard the packets immediately...
User Guide
Page 175
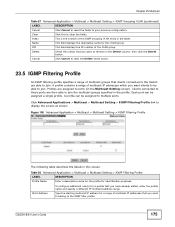
...Chapter 23 Multicast Table 57 Advanced Application > Multicast > Multicast Setting > IGMP Snooping VLAN (continued) LABEL DESCRIPTION Cancel Click Cancel to reset the fields to ports (in the Multicast Setting screen). Clear Click this VLAN group. Cancel Click Cancel to clear the Delete check... in the table. Index This is the number of the VLAN group. Type the starting multicast IP address for identification purposes. GS2200-8/24 User's Guide 175 Clients connected to those ports are assigned to your previous configuration. Table 58 Advanced Application > Multicast >...
...Chapter 23 Multicast Table 57 Advanced Application > Multicast > Multicast Setting > IGMP Snooping VLAN (continued) LABEL DESCRIPTION Cancel Click Cancel to reset the fields to ports (in the Multicast Setting screen). Clear Click this VLAN group. Cancel Click Cancel to clear the Delete check... in the table. Index This is the number of the VLAN group. Type the starting multicast IP address for identification purposes. GS2200-8/24 User's Guide 175 Clients connected to those ports are assigned to your previous configuration. Table 58 Advanced Application > Multicast >...

User Guide
Page 196
...previously learned ARP entries which match the criteria you specified. Select this screen, click Advanced Application > IP Source Guard > DHCP Snooping. 196 GS2200-8/24 User's Guide Select Port List and enter the number of the port(s) to the MAC address in the binding. You can enter individual... learned ARP entries which contain the specified VLAN ID and add them in the binding. Click this field is valid. If this to reset the values above based on the last selected static binding or, if not applicable, to create static bindings from information provided manually by...
...previously learned ARP entries which match the criteria you specified. Select this screen, click Advanced Application > IP Source Guard > DHCP Snooping. 196 GS2200-8/24 User's Guide Select Port List and enter the number of the port(s) to the MAC address in the binding. You can enter individual... learned ARP entries which contain the specified VLAN ID and add them in the binding. Click this field is valid. If this to reset the values above based on the last selected static binding or, if not applicable, to create static bindings from information provided manually by...
User Guide
Page 201
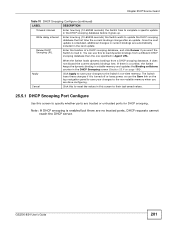
...loads dynamic bindings from a different DHCP snooping database than the one specified in Agent URL. The Switch loses these changes if it gives up. GS2200-8/24 User's Guide 201 Enter how long (10-65535 seconds) the Switch waits to the Switch's run-time memory. If there is scheduled,... additional changes in current bindings are done configuring. Click this to reset the values in this screen to their last-saved values. 25.5.1 DHCP Snooping Port Configure Use this to load dynamic bindings from a DHCP ...
...loads dynamic bindings from a different DHCP snooping database than the one specified in Agent URL. The Switch loses these changes if it gives up. GS2200-8/24 User's Guide 201 Enter how long (10-65535 seconds) the Switch waits to the Switch's run-time memory. If there is scheduled,... additional changes in current bindings are done configuring. Click this to reset the values in this screen to their last-saved values. 25.5.1 DHCP Snooping Port Configure Use this to load dynamic bindings from a DHCP ...
User Guide
Page 203
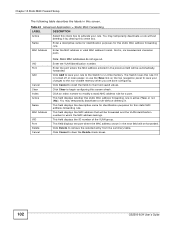
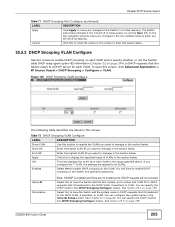
... in the General Setup screen. You can specify the DHCP VLAN in the section below. See Chapter 8 on page 199. Cancel Click this to reset the values in this screen to their last-saved values. 25.5.2 DHCP Snooping VLAN Configure Use this screen to enable DHCP snooping on each VLAN...displays the VLAN ID of VLANs in the range specified above. If you want to enable DHCP snooping on the Switch and specify trusted ports. GS2200-8/24 User's Guide 203 Chapter 25 IP Source Guard Table 71 DHCP Snooping Port Configure (continued) LABEL DESCRIPTION Apply Click Apply to save your ...
... in the General Setup screen. You can specify the DHCP VLAN in the section below. See Chapter 8 on page 199. Cancel Click this to reset the values in this screen to their last-saved values. 25.5.2 DHCP Snooping VLAN Configure Use this screen to enable DHCP snooping on each VLAN...displays the VLAN ID of VLANs in the range specified above. If you want to enable DHCP snooping on the Switch and specify trusted ports. GS2200-8/24 User's Guide 203 Chapter 25 IP Source Guard Table 71 DHCP Snooping Port Configure (continued) LABEL DESCRIPTION Apply Click Apply to save your ...
User Guide
Page 204
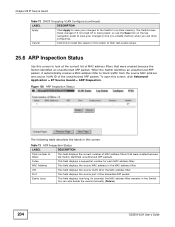
... address filter. VID This field displays the source VLAN ID in the MAC address filter. You can also delete the record manually (Delete). 204 GS2200-8/24 User's Guide Expiry (sec) This field displays how long (in seconds) the MAC address filter remains in this screen to their last-saved... to save your changes to block traffic from the source MAC address and source VLAN ID of the discarded ARP packet. Cancel Click this to reset the values in the Switch. To open this screen, click Advanced Application > IP Source Guard > ARP Inspection. Port This field displays the ...
... address filter. VID This field displays the source VLAN ID in the MAC address filter. You can also delete the record manually (Delete). 204 GS2200-8/24 User's Guide Expiry (sec) This field displays how long (in seconds) the MAC address filter remains in this screen to their last-saved... to save your changes to block traffic from the source MAC address and source VLAN ID of the discarded ARP packet. Cancel Click this to reset the values in the Switch. To open this screen, click Advanced Application > IP Source Guard > ARP Inspection. Port This field displays the ...


