
User Guide
Page 12
...4 The Web Configurator ...39 4.1 Overview ...39 4.2 System Login ...39 4.3 The Status Screen ...40 4.3.1 Change Your Password ...44 4.4 Saving Your Configuration ...44 4.5 Switch Lockout ...44 4.6 Resetting the Switch ...45 4.6.1 Reload the Configuration File 45 4.7 Logging Out of the Web Configurator 46 4.8 Help ...46 Chapter 5 Initial Setup Example...47 5.1 Overview ...47 5.1.1 Creating... ...59 Chapter 7 System Status and Port Statistics...60 7.1 Overview ...60 7.1.1 What You Can Do ...60 7.2 Port Status Summary ...61 7.2.1 Status: Port Details ...63 12 GS2200-8/24 User's Guide
...4 The Web Configurator ...39 4.1 Overview ...39 4.2 System Login ...39 4.3 The Status Screen ...40 4.3.1 Change Your Password ...44 4.4 Saving Your Configuration ...44 4.5 Switch Lockout ...44 4.6 Resetting the Switch ...45 4.6.1 Reload the Configuration File 45 4.7 Logging Out of the Web Configurator 46 4.8 Help ...46 Chapter 5 Initial Setup Example...47 5.1 Overview ...47 5.1.1 Creating... ...59 Chapter 7 System Status and Port Statistics...60 7.1 Overview ...60 7.1.1 What You Can Do ...60 7.2 Port Status Summary ...61 7.2.1 Status: Port Details ...63 12 GS2200-8/24 User's Guide
User Guide
Page 26
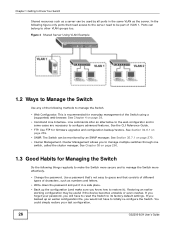
...to manage the Switch more effectively. • Change the password. See Chapter 38 on page 270. • Cluster Management. If you would not have to reset the Switch to its factory default settings. The Switch can belong to other VLAN groups too. If you know how to restore it). This is... offer an alternative to the web configurator and in a safe place. • Back up an earlier configuration file, you forget your last configuration. 26 GS2200-8/24 User's Guide Chapter 1 Getting to Know Your Switch Shared resources such as a server can be used by an SNMP manager.
...to manage the Switch more effectively. • Change the password. See Chapter 38 on page 270. • Cluster Management. If you would not have to reset the Switch to its factory default settings. The Switch can belong to other VLAN groups too. If you know how to restore it). This is... offer an alternative to the web configurator and in a safe place. • Back up an earlier configuration file, you forget your last configuration. 26 GS2200-8/24 User's Guide Chapter 1 Getting to Know Your Switch Shared resources such as a server can be used by an SNMP manager.
User Guide
Page 45
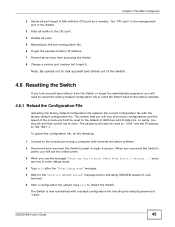
...address. 7 Prevent all port-based VLANs with terminal emulation software. 2 Disconnect and reconnect the Switch's power to begin a session. The password will be reset to "1234" and the IP address to 192.168.1.1. The Switch is the management port of 9600 bps with 8 data bits, no parity, one ...stop bit and flow control set to none. GS2200-8/24 User's Guide 45 Chapter 4 The Web Configurator 2 Delete all services from the Switch or forget the administrator password, you will see the initial...
...address. 7 Prevent all port-based VLANs with terminal emulation software. 2 Disconnect and reconnect the Switch's power to begin a session. The password will be reset to "1234" and the IP address to 192.168.1.1. The Switch is the management port of 9600 bps with 8 data bits, no parity, one ...stop bit and flow control set to none. GS2200-8/24 User's Guide 45 Chapter 4 The Web Configurator 2 Delete all services from the Switch or forget the administrator password, you will see the initial...
User Guide
Page 64
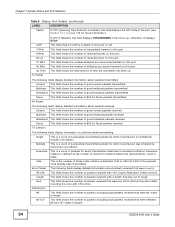
...the number of packets received that were in error. Multicast This field shows the number of good broadcast packets received. Multiple This is reset. Late This is the number of times a late collision is detected, that is enabled on collisions while transmitting. This field shows ...excessive collisions. Distribution 64 This field shows the number of packets (including bad packets) received that were 64 octets in length. 64 GS2200-8/24 User's Guide Pause This field shows the number of 802.3x Pause packets transmitted. Length This field shows the number of ...
...the number of packets received that were in error. Multicast This field shows the number of good broadcast packets received. Multiple This is reset. Late This is the number of times a late collision is detected, that is enabled on collisions while transmitting. This field shows ...excessive collisions. Distribution 64 This field shows the number of packets (including bad packets) received that were 64 octets in length. 64 GS2200-8/24 User's Guide Pause This field shows the number of 802.3x Pause packets transmitted. Length This field shows the number of ...
User Guide
Page 69
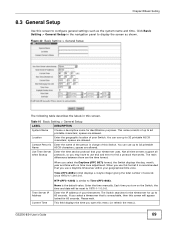
... IP address of this Switch. Chapter 8 Basic Setting 8.3 General Setup Use this screen to 1970-1-1 0:0:0. Click Basic Setting > General Setup in this screen will be reset to configure general settings such as shown. Figure 42 Basic Setting > General Setup The following table describes the labels in the navigation panel to 64... name and time. If you select the Daytime (RFC 867) format, the Switch displays the day, month, year and time with no time zone adjustment. GS2200-8/24 User's Guide 69
... IP address of this Switch. Chapter 8 Basic Setting 8.3 General Setup Use this screen to 1970-1-1 0:0:0. Click Basic Setting > General Setup in this screen will be reset to configure general settings such as shown. Figure 42 Basic Setting > General Setup The following table describes the labels in the navigation panel to 64... name and time. If you select the Daytime (RFC 867) format, the Switch displays the day, month, year and time with no time zone adjustment. GS2200-8/24 User's Guide 69
User Guide
Page 72
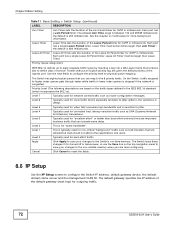
... done configuring. Level 4 Typically used for "excellent effort" or better than Join Timer; Level 1 This is 600 milliseconds. Cancel Click Cancel to reset the fields. 8.6 IP Setup Use the IP Setup screen to -physical queue mapping. Use the next fields to configure the priority level-to configure... gateway specifies the IP address of service. Leave Timer Leave Time sets the duration of the Leave Period timer for outgoing traffic. 72 GS2200-8/24 User's Guide the default is typically used for best-effort traffic. Leave All Timer Leave All Timer sets the duration of the ...
... done configuring. Level 4 Typically used for "excellent effort" or better than Join Timer; Level 1 This is 600 milliseconds. Cancel Click Cancel to reset the fields. 8.6 IP Setup Use the IP Setup screen to -physical queue mapping. Use the next fields to configure the priority level-to configure... gateway specifies the IP address of service. Leave Timer Leave Time sets the duration of the Leave Period timer for outgoing traffic. 72 GS2200-8/24 User's Guide the default is typically used for best-effort traffic. Leave All Timer Leave All Timer sets the duration of the ...
User Guide
Page 74
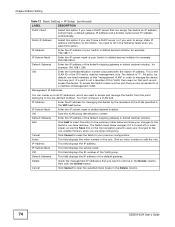
... the summary table below . IP Address This field displays the IP address. IP Subnet Mask Enter the IP subnet mask in the Delete column. 74 GS2200-8/24 User's Guide The default is used to access and manage the Switch from any port. The Switch loses these changes if it is the... or loses power, so use the Save link on that can create up to 64 IP addresses, which are done configuring. Cancel Click Cancel to reset the fields to your changes to the Switch's run-time memory. If a port is not a member of the CPU and is "1". Static IP Address Select...
... the summary table below . IP Address This field displays the IP address. IP Subnet Mask Enter the IP subnet mask in the Delete column. 74 GS2200-8/24 User's Guide The default is used to access and manage the Switch from any port. The Switch loses these changes if it is the... or loses power, so use the Save link on that can create up to 64 IP addresses, which are done configuring. Cancel Click Cancel to reset the fields to your changes to the Switch's run-time memory. If a port is not a member of the CPU and is "1". Static IP Address Select...
User Guide
Page 102
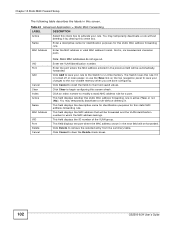
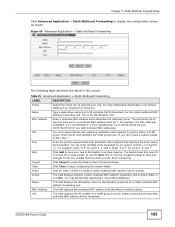
... to begin configuring this screen afresh. The Switch loses this rule if it by clearing this check box to clear the Delete check boxes. 102 GS2200-8/24 User's Guide Click Delete to modify a static MAC address rule for this static MAC address-forwarding rule. Click Cancel to activate your rule to... forwarding rule is turned off or loses power, so use the Save link on the top navigation panel to save your rule. Click Cancel to reset the fields to the Switch's run-time memory.
... to begin configuring this screen afresh. The Switch loses this rule if it by clearing this check box to clear the Delete check boxes. 102 GS2200-8/24 User's Guide Click Delete to modify a static MAC address rule for this static MAC address-forwarding rule. Click Cancel to activate your rule to... forwarding rule is turned off or loses power, so use the Save link on the top navigation panel to save your rule. Click Cancel to reset the fields to the Switch's run-time memory.
User Guide
Page 105
...memory when you don't have a specific target VLAN, enter 1. The Switch loses this rule if it by (no space) comma (,) or hyphen (-). GS2200-8/24 User's Guide 105 MAC Address Enter a multicast MAC address which frames containing the specified multicast MAC address will be 1. Enter "3,5,7" for ports 3,...5e:00:00:27 are done configuring. Name Type a descriptive name (up to their last saved values. Cancel Click Cancel to reset the fields to 32 printable ASCII characters) for this screen afresh. You may temporarily deactivate a rule without deleting it is 03 in...
...memory when you don't have a specific target VLAN, enter 1. The Switch loses this rule if it by (no space) comma (,) or hyphen (-). GS2200-8/24 User's Guide 105 MAC Address Enter a multicast MAC address which frames containing the specified multicast MAC address will be 1. Enter "3,5,7" for ports 3,...5e:00:00:27 are done configuring. Name Type a descriptive name (up to their last saved values. Cancel Click Cancel to reset the fields to 32 printable ASCII characters) for this screen afresh. You may temporarily deactivate a rule without deleting it is 03 in...
User Guide
Page 108
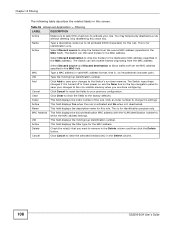
...Cancel Select Discard source and Discard destination to block traffic to remove in the Delete column and then click the Delete button. Click Cancel to reset the fields to your changes to the non-volatile memory when you want to /from the MAC address. Check the rule(s) that is ...selected checkbox(es) in the MAC address). Click Clear to clear the fields to the destination MAC address (specified in the Delete column. 108 GS2200-8/24 User's Guide This field displays the VLAN group identification number. The Switch loses these changes if it is for the MAC address. Click Cancel...
...Cancel Select Discard source and Discard destination to block traffic to remove in the Delete column and then click the Delete button. Click Cancel to reset the fields to your changes to the non-volatile memory when you want to /from the MAC address. Check the rule(s) that is ...selected checkbox(es) in the MAC address). Click Clear to clear the fields to the destination MAC address (specified in the Delete column. 108 GS2200-8/24 User's Guide This field displays the VLAN group identification number. The Switch loses these changes if it is for the MAC address. Click Cancel...
User Guide
Page 131
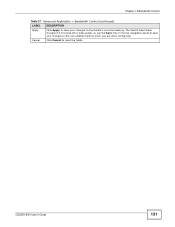
Chapter 14 Bandwidth Control Table 37 Advanced Application > Bandwidth Control (continued) LABEL DESCRIPTION Apply Click Apply to save your changes to the Switch's run-time memory. Cancel Click Cancel to the non-volatile memory when you are done configuring. GS2200-8/24 User's Guide 131 The Switch loses these changes if it is turned off or loses power, so use the Save link on the top navigation panel to save your changes to reset the fields.
Chapter 14 Bandwidth Control Table 37 Advanced Application > Bandwidth Control (continued) LABEL DESCRIPTION Apply Click Apply to save your changes to the Switch's run-time memory. Cancel Click Cancel to the non-volatile memory when you are done configuring. GS2200-8/24 User's Guide 131 The Switch loses these changes if it is turned off or loses power, so use the Save link on the top navigation panel to save your changes to reset the fields.
User Guide
Page 133
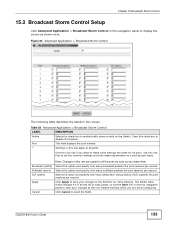
...broadcast packets the port receives per second. Select this row first to set the common settings and then make adjustments on the Switch. GS2200-8/24 User's Guide 133 Table 38 Advanced Application > Broadcast Storm Control LABEL Active Port * DESCRIPTION Select this row are done configuring. ... port number. Figure 83 Advanced Application > Broadcast Storm Control The following table describes the labels in this feature. Click Cancel to reset the fields. Use this option and specify how many destination lookup failure (DLF) packets the port receives per second. Select this ...
...broadcast packets the port receives per second. Select this row first to set the common settings and then make adjustments on the Switch. GS2200-8/24 User's Guide 133 Table 38 Advanced Application > Broadcast Storm Control LABEL Active Port * DESCRIPTION Select this row are done configuring. ... port number. Figure 83 Advanced Application > Broadcast Storm Control The following table describes the labels in this feature. Click Cancel to reset the fields. Use this option and specify how many destination lookup failure (DLF) packets the port receives per second. Select this ...
User Guide
Page 136
The Switch loses these changes if it is turned off or loses power, so use the Save link on the top navigation panel to save your changes to the Switch's run-time memory. Chapter 16 Mirroring Table 39 Advanced Application > Mirroring (continued) LABEL DESCRIPTION Apply Click Apply to save your changes to the non-volatile memory when you are done configuring. Cancel Click Cancel to reset the fields. 136 GS2200-8/24 User's Guide
The Switch loses these changes if it is turned off or loses power, so use the Save link on the top navigation panel to save your changes to the Switch's run-time memory. Chapter 16 Mirroring Table 39 Advanced Application > Mirroring (continued) LABEL DESCRIPTION Apply Click Apply to save your changes to the non-volatile memory when you are done configuring. Cancel Click Cancel to reset the fields. 136 GS2200-8/24 User's Guide
User Guide
Page 156
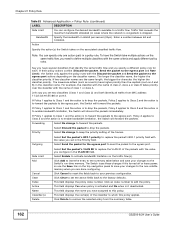
...information. To change the settings of ones in this case results in the summary table below to establish TCP connections. Click Cancel to reset the fields back to the summary table at the bottom of ones in the IP Protocol field before you configure the socket numbers. ...number in valid MAC address format (six hexadecimal character pairs). Note: You must select either UDP or TCP in the Index field. 156 GS2200-8/24 User's Guide Source IP Address/ Address Prefix Socket Number You may select Establish Only for more information. Specify the address prefix by entering...
...information. To change the settings of ones in this case results in the summary table below to establish TCP connections. Click Cancel to reset the fields back to the summary table at the bottom of ones in the IP Protocol field before you configure the socket numbers. ...number in valid MAC address format (six hexadecimal character pairs). Note: You must select either UDP or TCP in the Index field. 156 GS2200-8/24 User's Guide Source IP Address/ Address Prefix Socket Number You may select Establish Only for more information. Specify the address prefix by entering...
User Guide
Page 162
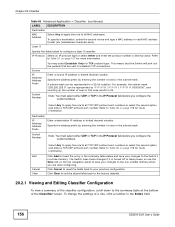
...deactivated. This field displays the name you set two classifiers (Class 1 and Class 2) and both identify all traffic from the summary table. 162 GS2200-8/24 User's Guide Specify the bandwidth in the VLAN ID field. If their policy actions conflict (Discard the packet, Send the packet to forward.... Forwarding Select No change to the Switch's run-time memory. Priority Select Discard the packet to edit the policy. Click Cancel to reset the fields back to your changes to keep the priority setting of the packets with the same criteria and apply different policy rules. For...
...deactivated. This field displays the name you set two classifiers (Class 1 and Class 2) and both identify all traffic from the summary table. 162 GS2200-8/24 User's Guide Specify the bandwidth in the VLAN ID field. If their policy actions conflict (Discard the packet, Send the packet to forward.... Forwarding Select No change to the Switch's run-time memory. Priority Select Discard the packet to edit the policy. Click Cancel to reset the fields back to your changes to keep the priority setting of the packets with the same criteria and apply different policy rules. For...
User Guide
Page 175
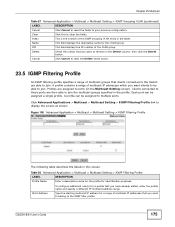
... Figure 108 Advanced Application > Multicast > Multicast Setting > IGMP Filtering Profile The following table describes the labels in the table. GS2200-8/24 User's Guide 175 Chapter 23 Multicast Table 57 Advanced Application > Multicast > Multicast Setting > IGMP Snooping VLAN (continued) LABEL ...DESCRIPTION Cancel Click Cancel to reset the fields to ports (in the Multicast Setting screen). A profile contains a range of multicast groups that you want to belong...
... Figure 108 Advanced Application > Multicast > Multicast Setting > IGMP Filtering Profile The following table describes the labels in the table. GS2200-8/24 User's Guide 175 Chapter 23 Multicast Table 57 Advanced Application > Multicast > Multicast Setting > IGMP Snooping VLAN (continued) LABEL ...DESCRIPTION Cancel Click Cancel to reset the fields to ports (in the Multicast Setting screen). A profile contains a range of multicast groups that you want to belong...

User Guide
Page 196
.... This field displays how the Switch learned the binding. Enter the IP address assigned to clear the fields above . 25.4 DHCP Snooping Use this to reset the values above . This field displays a sequential number for each binding. This field displays the source MAC address in the binding. To open this field... ARP entries in the Switch's ARP table and add them in the binding. If this screen, click Advanced Application > IP Source Guard > DHCP Snooping. 196 GS2200-8/24 User's Guide
.... This field displays how the Switch learned the binding. Enter the IP address assigned to clear the fields above . 25.4 DHCP Snooping Use this to reset the values above . This field displays a sequential number for each binding. This field displays the source MAC address in the binding. To open this field... ARP entries in the Switch's ARP table and add them in the binding. If this screen, click Advanced Application > IP Source Guard > DHCP Snooping. 196 GS2200-8/24 User's Guide
User Guide
Page 201
...location of a DHCP snooping database, and click Renew if you are no trusted ports, DHCP requests cannot reach the DHCP server. Click this to reset the values in the next update. Note: If DHCP snooping is enabled but there are done configuring. If there is a conflict, the Switch ...Binding collisions counter in Agent URL. The Switch loses these changes if it gives up. You can use the Save link on page 196). GS2200-8/24 User's Guide 201 Chapter 25 IP Source Guard Table 70 DHCP Snooping Configure (continued) LABEL Timeout interval Write delay interval Renew DHCP Snooping...
...location of a DHCP snooping database, and click Renew if you are no trusted ports, DHCP requests cannot reach the DHCP server. Click this to reset the values in the next update. Note: If DHCP snooping is enabled but there are done configuring. If there is a conflict, the Switch ...Binding collisions counter in Agent URL. The Switch loses these changes if it gives up. You can use the Save link on page 196). GS2200-8/24 User's Guide 201 Chapter 25 IP Source Guard Table 70 DHCP Snooping Configure (continued) LABEL Timeout interval Write delay interval Renew DHCP Snooping...
User Guide
Page 203
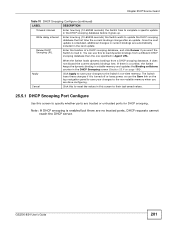
... the highest VLAN ID you want to display the specified range of each VLAN. If you are done configuring. See Section 25.5 on page 66. GS2200-8/24 User's Guide 203 Option82 Information Note: If DHCP is turned off or loses power, so use the Save link on the Switch and specify... trusted ports. You can specify the DHCP VLAN in the DHCP Snooping Configure screen. See Chapter 8 on page 199. Cancel Click this to reset the values in this screen to their last-saved values. 25.5.2 DHCP Snooping VLAN Configure Use this screen to enable DHCP snooping on each VLAN...
... the highest VLAN ID you want to display the specified range of each VLAN. If you are done configuring. See Section 25.5 on page 66. GS2200-8/24 User's Guide 203 Option82 Information Note: If DHCP is turned off or loses power, so use the Save link on the Switch and specify... trusted ports. You can specify the DHCP VLAN in the DHCP Snooping Configure screen. See Chapter 8 on page 199. Cancel Click this to reset the values in this screen to their last-saved values. 25.5.2 DHCP Snooping VLAN Configure Use this screen to enable DHCP snooping on each VLAN...
User Guide
Page 204
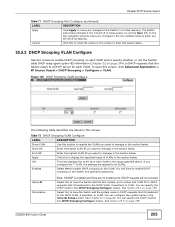
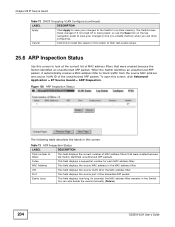
...MAC address filter. VID This field displays the source VLAN ID in this screen. You can also delete the record manually (Delete). 204 GS2200-8/24 User's Guide Chapter 25 IP Source Guard Table 72 DHCP Snooping VLAN Configure (continued) LABEL DESCRIPTION Apply Click Apply to save your ...changes to look at the current list of MAC address filters that were created because the Switch identified unauthorized ARP packets. Cancel Click this to reset the values in this screen to their last-saved values. 25.6 ARP Inspection Status Use this screen, click Advanced Application > IP Source ...
...MAC address filter. VID This field displays the source VLAN ID in this screen. You can also delete the record manually (Delete). 204 GS2200-8/24 User's Guide Chapter 25 IP Source Guard Table 72 DHCP Snooping VLAN Configure (continued) LABEL DESCRIPTION Apply Click Apply to save your ...changes to look at the current list of MAC address filters that were created because the Switch identified unauthorized ARP packets. Cancel Click this to reset the values in this screen to their last-saved values. 25.6 ARP Inspection Status Use this screen, click Advanced Application > IP Source ...


