
User Guide
Page 3
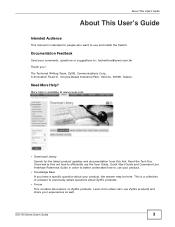
... www.zyxel.com. • Download Library Search for people who use the User Guide, Quick Start Guide and Command Line Interface Reference Guide in order to better understand how to previously asked questions about your experiences as well. ES1100 Series User's Guide 3 Documentation Feedback Send your comments, questions or suggestions to use your product. • Knowledge Base If you ! Need More Help? About This User's Guide About This User's Guide Intended Audience This manual is...
... www.zyxel.com. • Download Library Search for people who use the User Guide, Quick Start Guide and Command Line Interface Reference Guide in order to better understand how to previously asked questions about your experiences as well. ES1100 Series User's Guide 3 Documentation Feedback Send your comments, questions or suggestions to use your product. • Knowledge Base If you ! Need More Help? About This User's Guide About This User's Guide Intended Audience This manual is...
User Guide
Page 5
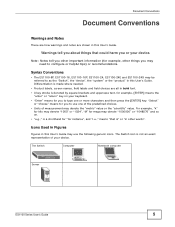
... User's Guide may be referred to type one of the predefined choices. • Units of your device. Icons Used in Figures Figures in this User's Guide. For example, "k" for kilo may denote "1000" or "1024", "M" for you or your keyboard. • "Enter" means for mega may denote the "metric" value or the "scientific" value. The Switch Computer Notebook computer Server ES1100 Series User's Guide...
... User's Guide may be referred to type one of the predefined choices. • Units of your device. Icons Used in Figures Figures in this User's Guide. For example, "k" for kilo may denote "1000" or "1024", "M" for you or your keyboard. • "Enter" means for mega may denote the "metric" value or the "scientific" value. The Switch Computer Notebook computer Server ES1100 Series User's Guide...
User Guide
Page 6
... to the device. • Do NOT open the device or unit. ONLY qualified service personnel should not be treated separately. 6 ES1100 Series User's Guide Connect it to the right supply voltage (for example, 110V AC in North America or 230V AC in a wet basement or near water, for example, in Europe). • Use ONLY power wires of the correct voltage. • Do NOT allow anything...
... to the device. • Do NOT open the device or unit. ONLY qualified service personnel should not be treated separately. 6 ES1100 Series User's Guide Connect it to the right supply voltage (for example, 110V AC in North America or 230V AC in a wet basement or near water, for example, in Europe). • Use ONLY power wires of the correct voltage. • Do NOT allow anything...
User Guide
Page 7
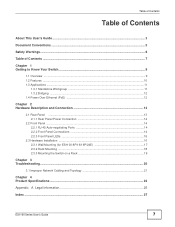
... and Connection 13 2.1 Rear Panel ...13 2.1.1 Rear Panel Power Connection 14 2.2 Front Panel ...14 2.2.1 RJ-45 Auto-negotiating Ports 14 2.2.2 Front Panel Connections 14 2.2.3 Front Panel LEDs ...15 2.3 Hardware Installation ...16 2.3.1 Wall Mounting (for ES1100-8P/16/16P/24E 17 2.3.2 Rack Mounting ...18 2.3.3 Mounting the Switch on a Rack 19 Chapter 3 Troubleshooting...20 3.1 Improper Network Cabling and Topology 21 Chapter 4 Product Specifications ...23 Appendix A Legal Information 25 Index ...27 ES1100 Series User's Guide 7
... and Connection 13 2.1 Rear Panel ...13 2.1.1 Rear Panel Power Connection 14 2.2 Front Panel ...14 2.2.1 RJ-45 Auto-negotiating Ports 14 2.2.2 Front Panel Connections 14 2.2.3 Front Panel LEDs ...15 2.3 Hardware Installation ...16 2.3.1 Wall Mounting (for ES1100-8P/16/16P/24E 17 2.3.2 Rack Mounting ...18 2.3.3 Mounting the Switch on a Rack 19 Chapter 3 Troubleshooting...20 3.1 Improper Network Cabling and Topology 21 Chapter 4 Product Specifications ...23 Appendix A Legal Information 25 Index ...27 ES1100 Series User's Guide 7
User Guide
Page 9
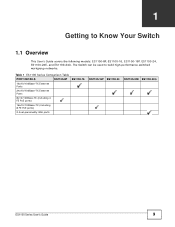
Table 1 ES1100 Series Comparison Table PORT DETAILS ES1100-8P ES1100-16 16x10/100Base-TX Ethernet Ports 24x10/100Base-TX Ethernet Ports 8x10/100Base-TX (including 4 FE PoE ports) 16x10/100Base-TX (including 8 FE PoE ports) 2 dual-personality GbE ports ES1100-16P ES1100-24 ES1100-24E ES1100-24G ES1100 Series User's Guide 9 The Switch can be used to Know Your Switch 1.1 Overview This User's Guide covers the following models: ES1100-8P, ES1100-16, ES1100-16P, ES1100-24, ES1100-24E, and ES1100-24G. CHAPTER 1 Getting to build high-performance switched workgroup networks.
Table 1 ES1100 Series Comparison Table PORT DETAILS ES1100-8P ES1100-16 16x10/100Base-TX Ethernet Ports 24x10/100Base-TX Ethernet Ports 8x10/100Base-TX (including 4 FE PoE ports) 16x10/100Base-TX (including 8 FE PoE ports) 2 dual-personality GbE ports ES1100-16P ES1100-24 ES1100-24E ES1100-24G ES1100 Series User's Guide 9 The Switch can be used to Know Your Switch 1.1 Overview This User's Guide covers the following models: ES1100-8P, ES1100-16, ES1100-16P, ES1100-24, ES1100-24E, and ES1100-24G. CHAPTER 1 Getting to build high-performance switched workgroup networks.
User Guide
Page 10
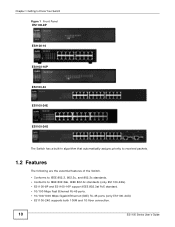
...1 Getting to Know Your Switch Figure 1 Front Panel ES1100-8P ES1100-16 ES1100-16P ES1100-24 ES1100-24E ES1100-24G The Switch has a built-in algorithm that automatically assigns priority to received packets. 1.2 Features The following are the essential features of the Switch. • Conforms to ...ES1100-24G). • ES1100-8P and ES1100-16P support IEEE 802.3af PoE standard. • 10/100 Mbps Fast Ethernet RJ-45 ports. • 10/100/1000 Mbps Gigabit Ethernet (GbE) RJ-45 ports (only ES1100-24G) • ES1100-24G supports both 100M and 1G fiber connection. 10 ES1100 Series User's Guide
...1 Getting to Know Your Switch Figure 1 Front Panel ES1100-8P ES1100-16 ES1100-16P ES1100-24 ES1100-24E ES1100-24G The Switch has a built-in algorithm that automatically assigns priority to received packets. 1.2 Features The following are the essential features of the Switch. • Conforms to ...ES1100-24G). • ES1100-8P and ES1100-16P support IEEE 802.3af PoE standard. • 10/100 Mbps Fast Ethernet RJ-45 ports. • 10/100/1000 Mbps Gigabit Ethernet (GbE) RJ-45 ports (only ES1100-24G) • ES1100-24G supports both 100M and 1G fiber connection. 10 ES1100 Series User's Guide
User Guide
Page 11
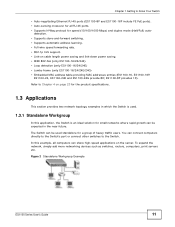
... networks where rapid growth can connect computers directly to the Switch's port or connect other switches to the Switch. To expand the network, simply add more networking devices such as switches, routers, computers, print servers etc. ES1100-8P provides 1K). Figure 2 Standalone Workgroup Example ES1100 Series User's Guide 11 detection. • Supports store-and-forward switching. • Supports automatic address learning. • Full wire speed forwarding rate. • 802.1p CoS support. • Link-on cable length power saving and link-down power...
... networks where rapid growth can connect computers directly to the Switch's port or connect other switches to the Switch. To expand the network, simply add more networking devices such as switches, routers, computers, print servers etc. ES1100-8P provides 1K). Figure 2 Standalone Workgroup Example ES1100 Series User's Guide 11 detection. • Supports store-and-forward switching. • Supports automatic address learning. • Full wire speed forwarding rate. • 802.1p CoS support. • Link-on cable length power saving and link-down power...
User Guide
Page 12
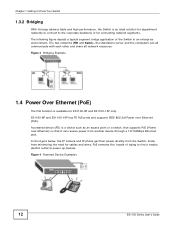
... networks to connect to power up devices. ES1100-8P and ES1100-16P has FE PoE ports and supports IEEE 802.3af Power over Ethernet) so that it can all communicate with each other and share all network resources. Figure 4 Powered Device Examples 12 ES1100 Series User's Guide Figure 3 Bridging Example 1.4 Power Over Ethernet (PoE) The PoE function is a device such as an access point or a switch, that supports PoE (Power over Ethernet (PoE). In the figure below, the IP camera and IP phone...
... networks to connect to power up devices. ES1100-8P and ES1100-16P has FE PoE ports and supports IEEE 802.3af Power over Ethernet) so that it can all communicate with each other and share all network resources. Figure 4 Powered Device Examples 12 ES1100 Series User's Guide Figure 3 Bridging Example 1.4 Power Over Ethernet (PoE) The PoE function is a device such as an access point or a switch, that supports PoE (Power over Ethernet (PoE). In the figure below, the IP camera and IP phone...

User Guide
Page 13
CHAPTER 2 Hardware Description and Connection 2.1 Rear Panel The three-pronged power receptacle is located on page 23 for power specification. Figure 5 Rear Panel ES1100-8P ES1100-16 ES1100-16P ES1100-24 ES1100-24E ES1100-24G ES1100 Series User's Guide 13 Refer to the Product Specifications on the rear panel of the Switch.
CHAPTER 2 Hardware Description and Connection 2.1 Rear Panel The three-pronged power receptacle is located on page 23 for power specification. Figure 5 Rear Panel ES1100-8P ES1100-16 ES1100-16P ES1100-24 ES1100-24E ES1100-24G ES1100 Series User's Guide 13 Refer to the Product Specifications on the rear panel of the Switch.

User Guide
Page 14
... mini-GBIC open slots. 2.2.1 RJ-45 Auto-negotiating Ports All the RJ-45 ports in the ES1100 series are auto-negotiating and auto-crossover. An auto-negotiating port can use either crossover or straight-through or crossover Ethernet cable. 2.2.2 Front Panel Connections You can use the ON/OFF switch to have the Switch power on the back of network cable used for the different connection speeds. Table 2 Network Cable Types SPEED NETWORK CABLE TYPE 10 Mbps...
... mini-GBIC open slots. 2.2.1 RJ-45 Auto-negotiating Ports All the RJ-45 ports in the ES1100 series are auto-negotiating and auto-crossover. An auto-negotiating port can use either crossover or straight-through or crossover Ethernet cable. 2.2.2 Front Panel Connections You can use the ON/OFF switch to have the Switch power on the back of network cable used for the different connection speeds. Table 2 Network Cable Types SPEED NETWORK CABLE TYPE 10 Mbps...
User Guide
Page 15
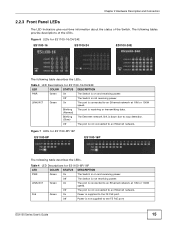
... ES1100-16/24/24E LED COLOR STATUS DESCRIPTION PWR Green On The Switch is on and receiving power. PoE Green On Power is connected to the FE PoE port. Figure 6 LEDs for ES1100-8P/16P ES1100-8P ES1100-16P The following table describes the LEDs. LINK/ACT Green On The port is supplied to an Ethernet network at 10M or 100M speed. Off The Switch is connected to the FE PoE port. ES1100 Series User's Guide 15 LINK...
... ES1100-16/24/24E LED COLOR STATUS DESCRIPTION PWR Green On The Switch is on and receiving power. PoE Green On Power is connected to the FE PoE port. Figure 6 LEDs for ES1100-8P/16P ES1100-8P ES1100-16P The following table describes the LEDs. LINK/ACT Green On The port is supplied to an Ethernet network at 10M or 100M speed. Off The Switch is connected to the FE PoE port. ES1100 Series User's Guide 15 LINK...
User Guide
Page 16
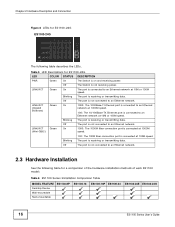
... receiving power. Table 5 LED Descriptions for a comparison of the hardware installation methods of each ES1100 model: Table 6 ES1100 Series Installation Comparison Table MODEL FEATURE Desktop Device Wall-mountable Rack-mountable ES1100-8P ES1100-16 ES1100-16P ES1100-24 ES1100-24E ES1100-24G 16 ES1100 Series User's Guide The port is not connected to an Ethernet network. 1000: The 1000Base-T Ethernet port is connected to an Ethernet network at 1000M speed. 100: The 10/100Base-TX Ethernet port is connected to an Ethernet network at 1000M speed. The Switch is...
... receiving power. Table 5 LED Descriptions for a comparison of the hardware installation methods of each ES1100 model: Table 6 ES1100 Series Installation Comparison Table MODEL FEATURE Desktop Device Wall-mountable Rack-mountable ES1100-8P ES1100-16 ES1100-16P ES1100-24 ES1100-24E ES1100-24G 16 ES1100 Series User's Guide The port is not connected to an Ethernet network. 1000: The 1000Base-T Ethernet port is connected to an Ethernet network at 1000M speed. 100: The 10/100Base-TX Ethernet port is connected to an Ethernet network at 1000M speed. The Switch is...
User Guide
Page 17
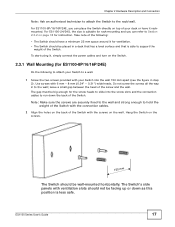
...using it, simply connect the power cables and turn on the Switch. 2.3.1 Wall Mounting (for ES1100-8P/16/16P/24E) Do the following : • The Switch should have it for ventilation. • The Switch should be big enough for instruction. The gap must be placed in a desk that has a level surface and that is able to the wall; For ES1100-24.../24G, the size is less safe. Do not screw the screws all the way in step 2). Note: Make sure the screws are securely fixed to the wall and strong enough to hold the weight of the Switch with the connection cables. 2 ...
...using it, simply connect the power cables and turn on the Switch. 2.3.1 Wall Mounting (for ES1100-8P/16/16P/24E) Do the following : • The Switch should have it for ventilation. • The Switch should be big enough for instruction. The gap must be placed in a desk that has a level surface and that is able to the wall; For ES1100-24.../24G, the size is less safe. Do not screw the screws all the way in step 2). Note: Make sure the screws are securely fixed to the wall and strong enough to hold the weight of the Switch with the connection cables. 2 ...
User Guide
Page 18
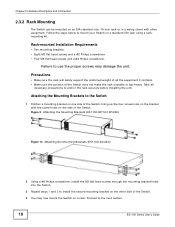
Precautions • Make sure the rack will safely support the combined weight of all necessary precautions to use the proper screws may now mount the Switch on a rack. Attaching the Mounting Brackets to the next section. 18 ES1100 Series User's Guide Proceed to the Switch 1 Position a mounting bracket on one side of the Switch, lining up the four screw holes on the bracket with other...
Precautions • Make sure the rack will safely support the combined weight of all necessary precautions to use the proper screws may now mount the Switch on a rack. Attaching the Mounting Brackets to the next section. 18 ES1100 Series User's Guide Proceed to the Switch 1 Position a mounting bracket on one side of the Switch, lining up the four screw holes on the bracket with other...

User Guide
Page 19
Chapter 2 Hardware Description and Connection 2.3.3 Mounting the Switch on a Rack 1 Position a mounting bracket (that is already attached to attach the second mounting bracket on the side of the rack. ES1100 Series User's Guide 19 Figure 11 Mounting the Switch on a Rack (ES1100-8P/16/16P/24E) Figure 12 Mounting the Switch on a Rack (ES1100-24/24G) 2 Using a #2 Philips screwdriver, install the M5 flat head screws through the mounting bracket holes into...
Chapter 2 Hardware Description and Connection 2.3.3 Mounting the Switch on a Rack 1 Position a mounting bracket (that is already attached to attach the second mounting bracket on the side of the rack. ES1100 Series User's Guide 19 Figure 11 Mounting the Switch on a Rack (ES1100-8P/16/16P/24E) Figure 12 Mounting the Switch on a Rack (ES1100-24/24G) 2 Using a #2 Philips screwdriver, install the M5 flat head screws through the mounting bracket holes into...
User Guide
Page 20
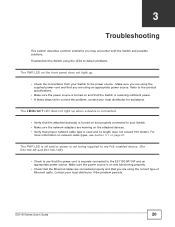
.... • Check that the Ethernet cables are using the correct type of Ethernet cable. Refer to the product specifications. • Make sure the power source is turned on the attached devices. • Verify that the Switch is securely connected to correct the problem, contact your Switch to detect problems. The PWR LED on page 21. The LINK/ACT LED does not light up . • Check the connections from your local distributor for assistance. ES1100 Series User's Guide 20 CHAPTER 3 Troubleshooting This...
.... • Check that the Ethernet cables are using the correct type of Ethernet cable. Refer to the product specifications. • Make sure the power source is turned on the attached devices. • Verify that the Switch is securely connected to correct the problem, contact your Switch to detect problems. The PWR LED on page 21. The LINK/ACT LED does not light up . • Check the connections from your local distributor for assistance. ES1100 Series User's Guide 20 CHAPTER 3 Troubleshooting This...

User Guide
Page 21
... 13 Troubleshooting Improper Network Cabling and Topology PROBLEM CORRECTIVE ACTION Faulty cables Using faulty network cables may increase the number of 100 meters. Make sure there are needed, transmission quality may increase the number of poor network performance or even network failure. Too many hubs (or repeaters) between two networked computers. Chapter 3 Troubleshooting 3.1 Improper Network Cabling and Topology Improper network cabling or topology setup is more information on network cable types. Replace with new standard network cables. This...
... 13 Troubleshooting Improper Network Cabling and Topology PROBLEM CORRECTIVE ACTION Faulty cables Using faulty network cables may increase the number of 100 meters. Make sure there are needed, transmission quality may increase the number of poor network performance or even network failure. Too many hubs (or repeaters) between two networked computers. Chapter 3 Troubleshooting 3.1 Improper Network Cabling and Topology Improper network cabling or topology setup is more information on network cable types. Replace with new standard network cables. This...
User Guide
Page 23
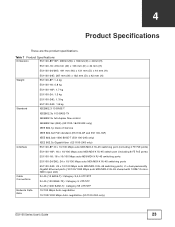
...-45 switch port (including 8 FE PoE ports) ES1100-16: 16 x 10/100 Mbps auto MDI/MDI-X RJ-45 switching ports ES1100-24/24E: 24 x 10/100 Mbps auto MDI/MDI-X RJ-45 switching ports Cable Connections ES1100-24G: 24 x 10/100 Mbps auto MDI/MDI-X RJ-45 switching ports; 2 x dual-personality Gigabit Ethernet ports (10/100/1000 Mbps auto MDI/MDI-X RJ-45 shared with 100M/1G miniGBIC open slot...
...-45 switch port (including 8 FE PoE ports) ES1100-16: 16 x 10/100 Mbps auto MDI/MDI-X RJ-45 switching ports ES1100-24/24E: 24 x 10/100 Mbps auto MDI/MDI-X RJ-45 switching ports Cable Connections ES1100-24G: 24 x 10/100 Mbps auto MDI/MDI-X RJ-45 switching ports; 2 x dual-personality Gigabit Ethernet ports (10/100/1000 Mbps auto MDI/MDI-X RJ-45 shared with 100M/1G miniGBIC open slot...
User Guide
Page 25
... products described herein without notice. ES1100 Series User's Guide 25 Disclaimer ZyXEL does not assume any liability arising out of the application or use of any license under its patent rights nor the patent rights of the FCC Rules. In a domestic environment this device in a residential area is subject to Part 15 of others. ZyXEL further reserves the right to make changes...
... products described herein without notice. ES1100 Series User's Guide 25 Disclaimer ZyXEL does not assume any liability arising out of the application or use of any license under its patent rights nor the patent rights of the FCC Rules. In a domestic environment this device in a residential area is subject to Part 15 of others. ZyXEL further reserves the right to make changes...
User Guide
Page 26
... North American products. 26 ES1100 Series User's Guide Registration Register your product online to the purchaser. During the warranty period, and upon proof of purchase, should the product have indications of failure due to faulty workmanship and/or materials, ZyXEL will be held liable for indirect or consequential damages of any kind to receive e-mail notices of firmware upgrades and information...
... North American products. 26 ES1100 Series User's Guide Registration Register your product online to the purchaser. During the warranty period, and upon proof of purchase, should the product have indications of failure due to faulty workmanship and/or materials, ZyXEL will be held liable for indirect or consequential damages of any kind to receive e-mail notices of firmware upgrades and information...


