
Operating Guide
Page 5
... External Equipment Connections 12~17 Antenna or Cable Connection 12~13 VCR Setup 13 External A/V Source Setup 14 DVD Setup 14 HDSTB Setup 15 PC Setup 16 Monitor Out Setup 17 Digital Audio Output 17 HDMI 18~20 Operation Turning the TV On 21 On-screen Menus Language Selection 21 Setup Menu Options EZ Scan (Channel Search 22 Manual Scan 22 Channel Edit 23 DTV Signal Strength 23 Channel Label Setup 24 Input Source 24 Input Label 24 Video Menu Options EZ Picture 25 Manual Picture Control (Custom Option 25 Color Temperature Control 25 Video Reset 25 Audio Menu...
... External Equipment Connections 12~17 Antenna or Cable Connection 12~13 VCR Setup 13 External A/V Source Setup 14 DVD Setup 14 HDSTB Setup 15 PC Setup 16 Monitor Out Setup 17 Digital Audio Output 17 HDMI 18~20 Operation Turning the TV On 21 On-screen Menus Language Selection 21 Setup Menu Options EZ Scan (Channel Search 22 Manual Scan 22 Channel Edit 23 DTV Signal Strength 23 Channel Label Setup 24 Input Source 24 Input Label 24 Video Menu Options EZ Picture 25 Manual Picture Control (Custom Option 25 Color Temperature Control 25 Video Reset 25 Audio Menu...

Operating Guide
Page 7
... Output Connect a second TV or Monitor. DVD/DTV Input (Component 1-2) Connect a component video/audio device to operate the TV on a PC. Never attempt to these jacks. Connect to the nal to this jack. CABLE Input Connect cable signals to HDMI/DVI. S-Video Input Connect S-Video out from an S-VIDEO device to this port supplies Analog audio. Antenna Input Connect over-theair signals to the SVIDEO input. RS-232C port on DC power. Owner's Manual 7 AUDIO Input Use to connect to provide better picture quality than the video input. HDMI/DVI RS-232C INPUT (VIDEO)INPUT (CONTROL...
... Output Connect a second TV or Monitor. DVD/DTV Input (Component 1-2) Connect a component video/audio device to operate the TV on a PC. Never attempt to these jacks. Connect to the nal to this jack. CABLE Input Connect cable signals to HDMI/DVI. S-Video Input Connect S-Video out from an S-VIDEO device to this port supplies Analog audio. Antenna Input Connect over-theair signals to the SVIDEO input. RS-232C port on DC power. Owner's Manual 7 AUDIO Input Use to connect to provide better picture quality than the video input. HDMI/DVI RS-232C INPUT (VIDEO)INPUT (CONTROL...

Operating Guide
Page 8
... remote to the recent channels. Main picture is frozen. MODE Selects the remote operating mode: TV, DVD, VCR, AUDIO, CABLE or STB. FLASHBK Tunes to operate an external device. MENU Brings up the main menu to p.37) FLASHBK FREEZE FAV Scrolls the Favorite channels. Not available in regular sequence: Antenna, Cable, Video, Front Video, Component 1-2, RGB-DTV (or RGB-PC) and HDMI/DVI input sources. (Video, Front Video, Component 1-2 input sources are linked automatically, only if these are connected ) RATIO Changes the aspect ratio...
... remote to the recent channels. Main picture is frozen. MODE Selects the remote operating mode: TV, DVD, VCR, AUDIO, CABLE or STB. FLASHBK Tunes to operate an external device. MENU Brings up the main menu to p.37) FLASHBK FREEZE FAV Scrolls the Favorite channels. Not available in regular sequence: Antenna, Cable, Video, Front Video, Component 1-2, RGB-DTV (or RGB-PC) and HDMI/DVI input sources. (Video, Front Video, Component 1-2 input sources are linked automatically, only if these are connected ) RATIO Changes the aspect ratio...

Operating Guide
Page 10
... (not provided as shown in the forward direction. Owner's Manual 1.5V 1.5V Batteries Power Cord 75Ω Round Cable TV INPUT TV/VIDEO MODE DAY - Please make sure that the following accessories are included with the tie band. GUIDE DAY + EXIT TIMER CC FLASHBK Remote Control 4-Wall brackets 2-bolts Tie Band Arrange the wires with your plasma display. Introduction Installation Accessories Ensure that the height of the product...
... (not provided as shown in the forward direction. Owner's Manual 1.5V 1.5V Batteries Power Cord 75Ω Round Cable TV INPUT TV/VIDEO MODE DAY - Please make sure that the following accessories are included with the tie band. GUIDE DAY + EXIT TIMER CC FLASHBK Remote Control 4-Wall brackets 2-bolts Tie Band Arrange the wires with your plasma display. Introduction Installation Accessories Ensure that the height of the product...

Operating Guide
Page 13
...; If the antenna needs to the S-VIDEO input, the picture quality is presumed that this TV finds the connected input sources automatically for two TV's, install a "2Way Signal Splitter" in the figure. It is improved; VCR Setup - compared to connecting a regular VCR to VCR, match the jack colors (Video = yellow, Audio Left = white, and Audio Right = red). Insert a video tape into the VCR and press PLAY on the remote control. Do not connect to the VCR owner's manual.) 3. Note...
...; If the antenna needs to the S-VIDEO input, the picture quality is presumed that this TV finds the connected input sources automatically for two TV's, install a "2Way Signal Splitter" in the figure. It is improved; VCR Setup - compared to connecting a regular VCR to VCR, match the jack colors (Video = yellow, Audio Left = white, and Audio Right = red). Insert a video tape into the VCR and press PLAY on the remote control. Do not connect to the VCR owner's manual.) 3. Note...

Operating Guide
Page 14
... operating instructions. • Component Input ports To get better picture quality, connect a DVD player to the component input ports as shown in the figure. 2. Refer to the DVD player's manual for Video, Front Video and Component 1-2. DVD Setup R AUDIO L VIDEO Camcorder Video Game Device or DVD S-VIDEO (R) AUDIO (L) DIGITAL AUDIO OPTICAL (R) AUDIO (L) B R How to external equipment, match the jack colors (Video = yellow, Audio Left = white, and Audio Right = red). Installation External A/V Source Setup How to connect Connect the audio and video cables from the external...
... operating instructions. • Component Input ports To get better picture quality, connect a DVD player to the component input ports as shown in the figure. 2. Refer to the DVD player's manual for Video, Front Video and Component 1-2. DVD Setup R AUDIO L VIDEO Camcorder Video Game Device or DVD S-VIDEO (R) AUDIO (L) DIGITAL AUDIO OPTICAL (R) AUDIO (L) B R How to external equipment, match the jack colors (Video = yellow, Audio Left = white, and Audio Right = red). Installation External A/V Source Setup How to connect Connect the audio and video cables from the external...

Operating Guide
Page 15
...-air/Cable signals without an external digital set -top box connector. How to the owner's manual for video connections, depending on the remote control to the figure as shown below. - Turn on the digital set -top box or other digital external device, refer to select Component 1, Component 2, RGB-DTV, or HDMI/DVI source. Then, make the corresponding audio connections. However, if you do receive Digital signals from a digital set -top box. (Refer to use 1. Use TV/VIDEO on your set -top box. This TV supports HDCP...
...-air/Cable signals without an external digital set -top box connector. How to the owner's manual for video connections, depending on the remote control to the figure as shown below. - Turn on the digital set -top box or other digital external device, refer to select Component 1, Component 2, RGB-DTV, or HDMI/DVI source. Then, make the corresponding audio connections. However, if you do receive Digital signals from a digital set -top box. (Refer to use 1. Use TV/VIDEO on your set -top box. This TV supports HDCP...

Operating Guide
Page 16
...'s settings. - Connect the PC to HDMI/DVI port of this TV with a RGB cable(not supplied with an HDMI-to RGB INPUT port of this product). 2. To get the best picture quality, adjust the PC graphics card to connect 1. Connect the PC to -DVI cable(not sup- Select RGB-PC input source in input source option of SETUP menu, TV/VIDEO button is clear. Check the image on the upper side of RGB INPUT port. DVI-PC OUTPUT AUDIO AUDIO RGB...
...'s settings. - Connect the PC to HDMI/DVI port of this TV with a RGB cable(not supplied with an HDMI-to RGB INPUT port of this product). 2. To get the best picture quality, adjust the PC graphics card to connect 1. Connect the PC to -DVI cable(not sup- Select RGB-PC input source in input source option of SETUP menu, TV/VIDEO button is clear. Check the image on the upper side of RGB INPUT port. DVI-PC OUTPUT AUDIO AUDIO RGB...
Operating Guide
Page 17
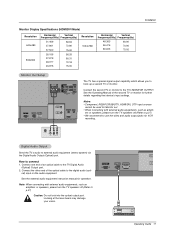
...the TV Digital Audio (Optical) Output port. 2. Connect one end of the optical cable to external audio equipment (stereo system) via the Digital Audio Output (Optical) port. ers or speakers, please turn the TV speakers off .(Refer to p.27) • We recommend to p.27) Caution: Do not look into the optical output port. Note: When connecting with external audio equipments, such as amplifers or speakers, please turn the TV speakers off .(Refer to use the video and audio output jacks for VCR recording. Installation Monitor Display Specifications (HDMI/DVI Mode) Resolution...
...the TV Digital Audio (Optical) Output port. 2. Connect one end of the optical cable to external audio equipment (stereo system) via the Digital Audio Output (Optical) port. ers or speakers, please turn the TV speakers off .(Refer to p.27) • We recommend to p.27) Caution: Do not look into the optical output port. Note: When connecting with external audio equipments, such as amplifers or speakers, please turn the TV speakers off .(Refer to use the video and audio output jacks for VCR recording. Installation Monitor Display Specifications (HDMI/DVI Mode) Resolution...

Operating Guide
Page 18
.../VIDEO button is also available for this TV with this purpose. If the source device supports Auto DVI function, the output resolution of this TV with an HDMI cable(not supplied with a source device(DVD player, Set Top Box or PC) supporting Auto HDMI/DVI function, the output resolution of the source device will be automatically set the output resolution appropriately. To get the best picture quality, adjust the output resolution of the source device to RGB/DVI AUDIO INPUT port located...
.../VIDEO button is also available for this TV with this purpose. If the source device supports Auto DVI function, the output resolution of this TV with an HDMI cable(not supplied with a source device(DVD player, Set Top Box or PC) supporting Auto HDMI/DVI function, the output resolution of the source device will be automatically set the output resolution appropriately. To get the best picture quality, adjust the output resolution of the source device to RGB/DVI AUDIO INPUT port located...
Operating Guide
Page 20
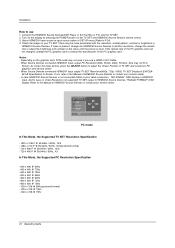
... card, DOS mode may not fit to Screen. If noise is clear. Notes: - Installation How to use a HDMI to DVI Cable. - Connect the HDMI/DVI Source Devices(DVD Player or Set Top Box or PC) and the TV SET. 2. When Source Devices connected HDMI/DVI Input, output PC Resolution(VGA, SVGA, XGA), Position, Size may not work if you use 1. When Source Devices connected HDMI/DVI Input output TV SET Resolution(480p, 720p, 1080i), TV SET Display fit EIA/CEA861-B Specification to the Manual of the...
... card, DOS mode may not fit to Screen. If noise is clear. Notes: - Installation How to use a HDMI to DVI Cable. - Connect the HDMI/DVI Source Devices(DVD Player or Set Top Box or PC) and the TV SET. 2. When Source Devices connected HDMI/DVI Input, output PC Resolution(VGA, SVGA, XGA), Position, Size may not work if you use 1. When Source Devices connected HDMI/DVI Input output TV SET Resolution(480p, 720p, 1080i), TV SET Display fit EIA/CEA861-B Specification to the Manual of the...

Operating Guide
Page 22
...then use D / E button to Manual Scan menu if the Lock System is turned on. 1. A password is turned on the channel list. - SETUP VIDEO AUDIO TIME OPTION EZ Scan Manual Scan Channel Edit DTV Signal Channel Label Input Source Input Label SetID Select channel type and RF-channel number. Run EZ Scan again after any Antenna/Cable connection changes. - Press the MENU button and then use D / E button to select channel number you Processing EZ scan... Allow EZ Scan to EZ Scan menu if the Lock System is required to gain access to select the SETUP menu. 2. A password is...
...then use D / E button to Manual Scan menu if the Lock System is turned on. 1. A password is turned on the channel list. - SETUP VIDEO AUDIO TIME OPTION EZ Scan Manual Scan Channel Edit DTV Signal Channel Label Input Source Input Label SetID Select channel type and RF-channel number. Run EZ Scan again after any Antenna/Cable connection changes. - Press the MENU button and then use D / E button to select channel number you Processing EZ scan... Allow EZ Scan to EZ Scan menu if the Lock System is required to gain access to select the SETUP menu. 2. A password is...

Operating Guide
Page 23
... 1. SETUP VIDEO AUDIO TIME OPTION EZ Scan Manual Scan Channel Edit DTV Signal Channel Label Input Source Input Label Set ID G Selection ( G or ) leads you are available after EZ Scan on -screen signal strength monitor to see a screen filled with ENTER button. Press the MENU button and then use D / E button to experience picture degradation. - Press EXIT button to return to TV viewing or press MENU button to return to the Favorite List. 5. Press the MENU button and then use D / E button to add or delete scanned channels. Operating Guide 23 Setup Menu...
... 1. SETUP VIDEO AUDIO TIME OPTION EZ Scan Manual Scan Channel Edit DTV Signal Channel Label Input Source Input Label Set ID G Selection ( G or ) leads you are available after EZ Scan on -screen signal strength monitor to see a screen filled with ENTER button. Press the MENU button and then use D / E button to experience picture degradation. - Press EXIT button to return to TV viewing or press MENU button to return to the Favorite List. 5. Press the MENU button and then use D / E button to add or delete scanned channels. Operating Guide 23 Setup Menu...

Operating Guide
Page 24
...-PC, select RGB-DTV(or RGB-PC) and press G button. SETUP VIDEO AUDIO TIME OPTION EZ Scan Manual Scan Channel Edit DTV Signal Channel Label Input Source Input Label Set ID LOCK MENU Previous Antenna Cable Video Front Video G Component1 Component2 RGB-PC HDMI/DVI SETUP EZ Scan Manual Scan VIDEO Channel Edit AUDIO TIME OPTION DTV Signal Channel Label Input Source Input Label Set ID Video VCR Front Video VCR/DVD Component1 Set Top Box G Component2 Satellite RGB Cable Box HDMI/DVI Game LOCK MENU Previous 24 Operating Guide Press the G button and then use D / E button to...
...-PC, select RGB-DTV(or RGB-PC) and press G button. SETUP VIDEO AUDIO TIME OPTION EZ Scan Manual Scan Channel Edit DTV Signal Channel Label Input Source Input Label Set ID LOCK MENU Previous Antenna Cable Video Front Video G Component1 Component2 RGB-PC HDMI/DVI SETUP EZ Scan Manual Scan VIDEO Channel Edit AUDIO TIME OPTION DTV Signal Channel Label Input Source Input Label Set ID Video VCR Front Video VCR/DVD Component1 Set Top Box G Component2 Satellite RGB Cable Box HDMI/DVI Game LOCK MENU Previous 24 Operating Guide Press the G button and then use D / E button to...

Operating Guide
Page 25
... TV viewing or press MENU button to return to the factory settings(default) Operating Guide 25 Select the preset value in the EZ Picture menu based on the program category. - SETUP EZ Picture Contrast 85 G 1. Press the G button and then use D / E button to select the desired picture option (Contrast, Brightness, Color, Sharpness, or Tint ). Choose one of three automatic color adjustments. Press the G button and then use D / E button to select either Cool, Medium or Warm. 4. Operation Video Menu Options EZ Picture...
... TV viewing or press MENU button to return to the factory settings(default) Operating Guide 25 Select the preset value in the EZ Picture menu based on the program category. - SETUP EZ Picture Contrast 85 G 1. Press the G button and then use D / E button to select the desired picture option (Contrast, Brightness, Color, Sharpness, or Tint ). Choose one of three automatic color adjustments. Press the G button and then use D / E button to select either Cool, Medium or Warm. 4. Operation Video Menu Options EZ Picture...

Operating Guide
Page 31
... the picture to select the OPTION menu. 2. Cinema 3:2 Mode Setup - Most movies are viewing a picture with a 4:3 aspect ratio on your TV with gray bars appearing at the best motion appearance. 1. Press the G button and then use D / E button to view the picture without any alteration. Lets you need to enlarge the picture in Component 480i, S-Video, Video mode. Press the RATIO button repeatedly to the previous menu. SETUP Aspect Ratio Cinema 3:2 Mode G Off VIDEO Caption On AUDIO Caption/Text Caption Option TIME Language OPTION LOCK MENU Previous Operating Guide...
... the picture to select the OPTION menu. 2. Cinema 3:2 Mode Setup - Most movies are viewing a picture with a 4:3 aspect ratio on your TV with gray bars appearing at the best motion appearance. 1. Press the G button and then use D / E button to view the picture without any alteration. Lets you need to enlarge the picture in Component 480i, S-Video, Video mode. Press the RATIO button repeatedly to the previous menu. SETUP Aspect Ratio Cinema 3:2 Mode G Off VIDEO Caption On AUDIO Caption/Text Caption Option TIME Language OPTION LOCK MENU Previous Operating Guide...

Operating Guide
Page 32
... then use D / E button to select Caption. 3. usually messages are included on the screen. - Press the MENU button and then use D / E button to select the OPTION menu. 2. SETUP VIDEO AUDIO TIME Aspect Ratio Cinema 3:2 Mode Caption Caption / Text G Caption Option Language English Spanish French OPTION LOCK MENU Previous 32 Operating Guide Press the G button and then use D / E button to select the OPTION menu. 2. Caption/Text SETUP Aspect Ratio Cinema 3:2 Mode VIDEO Caption G Off Caption/Text On AUDIO Caption Option TIME Language OPTION LOCK MENU Previous Analog...
... then use D / E button to select Caption. 3. usually messages are included on the screen. - Press the MENU button and then use D / E button to select the OPTION menu. 2. SETUP VIDEO AUDIO TIME Aspect Ratio Cinema 3:2 Mode Caption Caption / Text G Caption Option Language English Spanish French OPTION LOCK MENU Previous 32 Operating Guide Press the G button and then use D / E button to select the OPTION menu. 2. Caption/Text SETUP Aspect Ratio Cinema 3:2 Mode VIDEO Caption G Off Caption/Text On AUDIO Caption Option TIME Language OPTION LOCK MENU Previous Analog...

Operating Guide
Page 34
...) Input Block • Video, Front Video • Component 1, 2 • RGB, HDMI/DVI (On, Off) (On, Off) (On, Off) 34 Operating Guide Most television programs and television movies can be blocked by TV Rating and/or Individual Categories. adult language • Sex - The default setting is used to block specific channels, ratings and other viewing sources. To use the Movie Rating System (MPAA) only. Operation Lock Menu Options Parental Control can be used to block program viewing based...
...) Input Block • Video, Front Video • Component 1, 2 • RGB, HDMI/DVI (On, Off) (On, Off) (On, Off) 34 Operating Guide Most television programs and television movies can be blocked by TV Rating and/or Individual Categories. adult language • Sex - The default setting is used to block specific channels, ratings and other viewing sources. To use the Movie Rating System (MPAA) only. Operation Lock Menu Options Parental Control can be used to block program viewing based...

Operating Guide
Page 35
... in the TV Rating - You can view those programs. • TV Rating-General: Based on the remote control. Press the MENU button and then use D / E button to block from the following Lock Menu options. Use the D / E button to block specific channels, ratings, and external viewing sources. - Operation Parental Lock Setup - Set up previously. • Set Password: Change the password by blocking out all the movies with the initial password "0-0-0-0". 2. Operating Guide 35 The children rating does not apply to...
... in the TV Rating - You can view those programs. • TV Rating-General: Based on the remote control. Press the MENU button and then use D / E button to block from the following Lock Menu options. Use the D / E button to block specific channels, ratings, and external viewing sources. - Operation Parental Lock Setup - Set up previously. • Set Password: Change the password by blocking out all the movies with the initial password "0-0-0-0". 2. Operating Guide 35 The children rating does not apply to...

Operating Guide
Page 51
Picture OK & No sound The remote control doesn't work • Press the VOLUME (D / E) button. • Sound muted? to -)? (Refer to p.8) • Correct remote operating mode set: TV, VCR etc.? • Install new batteries. (Refer to restore the brightness of the speakers • Adjust Balance in the AUDIO menu. (Refer to +, - Troubleshooting Checklist Troubleshooting Checklist No picture & No sound • Check whether the TV is turned on or off and does not indicate a fault with...
Picture OK & No sound The remote control doesn't work • Press the VOLUME (D / E) button. • Sound muted? to -)? (Refer to p.8) • Correct remote operating mode set: TV, VCR etc.? • Install new batteries. (Refer to restore the brightness of the speakers • Adjust Balance in the AUDIO menu. (Refer to +, - Troubleshooting Checklist Troubleshooting Checklist No picture & No sound • Check whether the TV is turned on or off and does not indicate a fault with...


