Operation Guide
Page 4
... dropped. Check the specification page of fire or electric shock, do not drop onto the screen with an exact replacement part by an authorized servicer. The plug must remain readily operable. 3 Do not allow a impact shock or any way, such as power-supply cord or plug is used, use caution when moving the cart/apparatus combination to qualified service personnel. Servicing is required when the...
... dropped. Check the specification page of fire or electric shock, do not drop onto the screen with an exact replacement part by an authorized servicer. The plug must remain readily operable. 3 Do not allow a impact shock or any way, such as power-supply cord or plug is used, use caution when moving the cart/apparatus combination to qualified service personnel. Servicing is required when the...

Operation Guide
Page 5
... Broadcasts Setup 50 Audio Language 51 On-Screen Menus Language Selection 52 Caption Mode 53 - Add / Delete Channel (Manual Tuning) ...... 33 - Preset 39 Manual Picture Adjustment - Black (Darkness) Level 43 Back Light 44 Low-Power Picture Mode 45 Picture Reset 46 Preset Sound Setting (Sound Mode 47 Sound Setting Adjustment - Preset 38 - User Mode 41 Digital Booster 42 Advanced - Digital Broadcasting System Captions ........ 55 - Auto Scan (Auto Tuning 32 - Channel Editing 34 Key Lock 35 Picture Size (Aspect Ratio) Control 36 Preset Picture Settings...
... Broadcasts Setup 50 Audio Language 51 On-Screen Menus Language Selection 52 Caption Mode 53 - Add / Delete Channel (Manual Tuning) ...... 33 - Preset 39 Manual Picture Adjustment - Black (Darkness) Level 43 Back Light 44 Low-Power Picture Mode 45 Picture Reset 46 Preset Sound Setting (Sound Mode 47 Sound Setting Adjustment - Preset 38 - User Mode 41 Digital Booster 42 Advanced - Digital Broadcasting System Captions ........ 55 - Auto Scan (Auto Tuning 32 - Channel Editing 34 Key Lock 35 Picture Size (Aspect Ratio) Control 36 Preset Picture Settings...
Operation Guide
Page 8
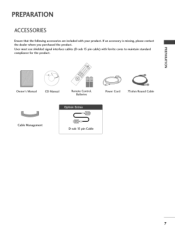
PREPA ACCESSORIES Ensure that the following accessories are included with ferrite cores to maintain standard _o compliance for the product. _o © z Owner's Manual CD Manual Remote Control, Batteries Power Cord 75ohm Round Cable Cable Management D-sub 15 pin Cable 7 If an accessory is missing, please contact the dealer where you purchased the product. -O User must use shielded signal interface cables (D-sub 15 pin cable) with your product.
PREPA ACCESSORIES Ensure that the following accessories are included with ferrite cores to maintain standard _o compliance for the product. _o © z Owner's Manual CD Manual Remote Control, Batteries Power Cord 75ohm Round Cable Cable Management D-sub 15 pin Cable 7 If an accessory is missing, please contact the dealer where you purchased the product. -O User must use shielded signal interface cables (D-sub 15 pin cable) with your product.

Operation Guide
Page 18
signals without an external digital set -top below. How to connect m _D Connect the video outputs (Y, PB, PR) of the digital set-top box to the COMPONENT IN AUDIO jacks on the digital set-top box. (Refer to the owner's manual for the digital set . 2. operation) Select Component input source by using the INPUT button on the set c top box to the COMPONENT IN VIDEO jacks on the remote control. m c Connect the audio output of the digital set . HD RECEIVERSETUP This TV can receive Digital Over-the-air/Cable do receive digital signals from a digital set -top...
signals without an external digital set -top below. How to connect m _D Connect the video outputs (Y, PB, PR) of the digital set-top box to the COMPONENT IN AUDIO jacks on the digital set-top box. (Refer to the owner's manual for the digital set . 2. operation) Select Component input source by using the INPUT button on the set c top box to the COMPONENT IN VIDEO jacks on the remote control. m c Connect the audio output of the digital set . HD RECEIVERSETUP This TV can receive Digital Over-the-air/Cable do receive digital signals from a digital set -top...
Operation Guide
Page 19
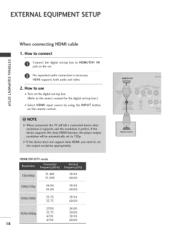
How to connect m x Connect the digital set-top box to HDMI/DVI IN m jack on the set -top box.) c -O Select HDMI input source by using the INPUT button on the digital set-top box. z m No separated audio connection is necessary. _D HDMI supports both audio and video. c 2. m (Refer to use m z Turn on the remote control. HDMI/DVI-DTV mode 51.469 51.500 45.00 33.72 33.75 27.00 33.75 67.43 67.50 18 59.94 60.00 60.00 59.94 60.00 24.00 30.00 59.94 60.00 How to the owner's manual for the digital set . EXTERNAL EQUIPMENT When connecting HDM[ cable 1.
How to connect m x Connect the digital set-top box to HDMI/DVI IN m jack on the set -top box.) c -O Select HDMI input source by using the INPUT button on the digital set-top box. z m No separated audio connection is necessary. _D HDMI supports both audio and video. c 2. m (Refer to use m z Turn on the remote control. HDMI/DVI-DTV mode 51.469 51.500 45.00 33.72 33.75 27.00 33.75 67.43 67.50 18 59.94 60.00 60.00 59.94 60.00 24.00 30.00 59.94 60.00 How to the owner's manual for the digital set . EXTERNAL EQUIPMENT When connecting HDM[ cable 1.

Operation Guide
Page 20
When connecting HDM[ to the AUDIO IN (RGB/DVI) jack on the remote control. 19 How to use 01T_urn on the digital set-top box. (Refer to the owner's manual for the digital set-top box.) 01S_elect HDMI input source by using the INPUT button on the set. 2. Connect the audio output of the digital set-top box to the HDMI/DVI IN jack on the set -top box to DVi cable m x m _o z m XZ) c m z m c 1. How to connect Connect the DVI output of the digital set .
When connecting HDM[ to the AUDIO IN (RGB/DVI) jack on the remote control. 19 How to use 01T_urn on the digital set-top box. (Refer to the owner's manual for the digital set-top box.) 01S_elect HDMI input source by using the INPUT button on the set. 2. Connect the audio output of the digital set-top box to the HDMI/DVI IN jack on the set -top box to DVi cable m x m _o z m XZ) c m z m c 1. How to connect Connect the DVI output of the digital set .

Operation Guide
Page 21
...!i!iiiiiiiiiiiiiiiiii_i!ii_!!!i!! z Match the jack colors (Y = green, PB = blue, and PR = red). How to use c -O 01_Turn on the DVD player, insert a DVD. 01_Select Component input source by using the INPUT button on the set . iiiiiiiiiiiiiiiiiiiiiiiiiiiiiiiiiiiiiiiiiiiiiiiiiiiiiiiiiiiiiii Component Input ports To get better picture quality, connect a DVD player to the DVD player's manual for operating instructions. m XD c Connect the audio outputs of the DVD to the COMPONENT IN AUDIO jacks on DVD player 20 Component ports on the TV Video output ports on the...
...!i!iiiiiiiiiiiiiiiiii_i!ii_!!!i!! z Match the jack colors (Y = green, PB = blue, and PR = red). How to use c -O 01_Turn on the DVD player, insert a DVD. 01_Select Component input source by using the INPUT button on the set . iiiiiiiiiiiiiiiiiiiiiiiiiiiiiiiiiiiiiiiiiiiiiiiiiiiiiiiiiiiiiii Component Input ports To get better picture quality, connect a DVD player to the DVD player's manual for operating instructions. m XD c Connect the audio outputs of the DVD to the COMPONENT IN AUDIO jacks on DVD player 20 Component ports on the TV Video output ports on the...
Operation Guide
Page 22
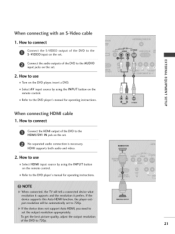
...Connect the audio outputs of the DVD to the HDMI/DVI IN jack on the DVD player, insert a DVD. r-r1 c "O When connecting HDM[ cable 1. HDMI supports both audio and video. 2. How to connect Connect the S-VIDEO output of the DVD to the AUDIO x input jacks on the remote control. z Refer to the DVD player's manual for operating instructions. immRel fer to the DVD player's manual for operating instructions. How to connect Connect the HDMI output of the DVD to use 01_Select HDMI input source by using the INPUT button on the set . c "O Select AV input source by using...
...Connect the audio outputs of the DVD to the HDMI/DVI IN jack on the DVD player, insert a DVD. r-r1 c "O When connecting HDM[ cable 1. HDMI supports both audio and video. 2. How to connect Connect the S-VIDEO output of the DVD to the AUDIO x input jacks on the remote control. z Refer to the DVD player's manual for operating instructions. immRel fer to the DVD player's manual for operating instructions. How to connect Connect the HDMI output of the DVD to use 01_Select HDMI input source by using the INPUT button on the set . c "O Select AV input source by using...
Operation Guide
Page 23
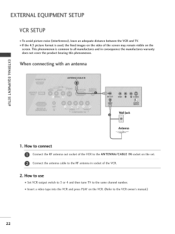
... antenna m z m JC) c m z .-t m c Wall Jack Antenna 1. IN socket on the screen. the fixed images on the sides of the VCR. How to use 01_Set VCR output switch to 3 or 4 and then tune TV to the same channel number. 01_Insert a video tape into the VCR and press PLAY on the VCR. (Refer to all manufactures and in socket of the screen may remain visible on the set. 2. This phenomenon is used; How to connect Connect...
... antenna m z m JC) c m z .-t m c Wall Jack Antenna 1. IN socket on the screen. the fixed images on the sides of the VCR. How to use 01_Set VCR output switch to 3 or 4 and then tune TV to the same channel number. 01_Insert a video tape into the VCR and press PLAY on the VCR. (Refer to all manufactures and in socket of the screen may remain visible on the set. 2. This phenomenon is used; How to connect Connect...
Operation Guide
Page 26
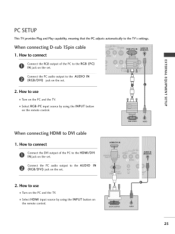
... provides Plug and Play capability, meaning that the PC adjusts automatically to the AUDIO IN (RGB/DVI) jack on the set. 2. How to connect m x Connect the RGB output of the PC to the HDMI/DVI I N jack on the set. _o z Connect the PC audio output to the AUDIO IN m (RGB/DVI) jack on the set. When connecting HDMI to use 01_Turn on the PC and the TV. 01_Select HDMI input source by using the INPUT button on the remote control. 2S Connect...
... provides Plug and Play capability, meaning that the PC adjusts automatically to the AUDIO IN (RGB/DVI) jack on the set. 2. How to connect m x Connect the RGB output of the PC to the HDMI/DVI I N jack on the set. _o z Connect the PC audio output to the AUDIO IN m (RGB/DVI) jack on the set. When connecting HDMI to use 01_Turn on the PC and the TV. 01_Select HDMI input source by using the INPUT button on the remote control. 2S Connect...
Operation Guide
Page 28
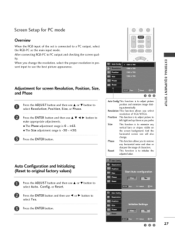
... the adjusted value. x sent input to select Yes. Position Size This function is to adjust picture c position and minimizes image shak- Press the ENTER button. @@@ 27 This function is connected to a PC output, select the RGB-PC as the main input mode. Screen Setup for screen Resolution, Position, Size, and Phase rT1 z @@0 Press the ADJUST button and then use • or • button to select Resolution, Position, Size, or Phase. Phase Reset change the resolution, select the proper resolution in...
... the adjusted value. x sent input to select Yes. Position Size This function is to adjust picture c position and minimizes image shak- Press the ENTER button. @@@ 27 This function is connected to a PC output, select the RGB-PC as the main input mode. Screen Setup for screen Resolution, Position, Size, and Phase rT1 z @@0 Press the ADJUST button and then use • or • button to select Resolution, Position, Size, or Phase. Phase Reset change the resolution, select the proper resolution in...

Operation Guide
Page 29
...-screen displays and return to the last channel viewed. PICTURE Selects the factory preset picture depend on the TV. Return to your TV turns off . _ p.30 © CC Select a closed caption. _ p.53 CHANNEL Select available channels. SAP o Analog mode: Selects MTS sound (Mono, Stereo, or a SAP) _ p.50 DTV mode: Changes the audio language. N I VOLUME UP Increase/decrease the sound level. > z /DOWN z fT1 ADJUST Adjust the screen Auto config., Resolution, Position, Size Phase and Reset. _ p.27 N © Z MUTE Switch the sound on -screen menus and adjust the system settings...
...-screen displays and return to the last channel viewed. PICTURE Selects the factory preset picture depend on the TV. Return to your TV turns off . _ p.30 © CC Select a closed caption. _ p.53 CHANNEL Select available channels. SAP o Analog mode: Selects MTS sound (Mono, Stereo, or a SAP) _ p.50 DTV mode: Changes the audio language. N I VOLUME UP Increase/decrease the sound level. > z /DOWN z fT1 ADJUST Adjust the screen Auto config., Resolution, Position, Size Phase and Reset. _ p.27 N © Z MUTE Switch the sound on -screen menus and adjust the system settings...

Operation Guide
Page 31
... POWER button on the remote control. z When finished using the INPUT button on the remote control. N I , INPUT, CH (& or V) button on the TV or press the POWER, INPUT, TV, CH (+ or -), Number (0~9) button on the remote < control. The TV reverts to select a channel number. Select the viewing source by pressing the MUTE or VOL (+ or -) button. 30 POWER WATCHING TV / CHANNEL CONTROL TURNING ON TV First, connect power cord correctly. At this moment, the TV switches to standby mode. 01I_n standby mode to turn...
... POWER button on the remote control. z When finished using the INPUT button on the remote control. N I , INPUT, CH (& or V) button on the TV or press the POWER, INPUT, TV, CH (+ or -), Number (0~9) button on the remote < control. The TV reverts to select a channel number. Select the viewing source by pressing the MUTE or VOL (+ or -) button. 30 POWER WATCHING TV / CHANNEL CONTROL TURNING ON TV First, connect power cord correctly. At this moment, the TV switches to standby mode. 01I_n standby mode to turn...

Operation Guide
Page 37
... button and then use A or T button to select the desired picture option (Set By Program, 4:3, 1 6:9, or Zoom). Press the I_ button and then use A or T button to select Aspect Ratio. When you need to specify how the picture is displayed on your TV. Press the EXIT button to return to TV viewing or press the BACK button to return to the previous menu. @ @@ 36 PICTURE CONT PICTURE SIZE (ASPECT RATIO) CONTROL This feature allows an analog picture with a 4:5 aspect ratio...
... button and then use A or T button to select the desired picture option (Set By Program, 4:3, 1 6:9, or Zoom). Press the I_ button and then use A or T button to select Aspect Ratio. When you need to specify how the picture is displayed on your TV. Press the EXIT button to return to TV viewing or press the BACK button to return to the previous menu. @ @@ 36 PICTURE CONT PICTURE SIZE (ASPECT RATIO) CONTROL This feature allows an analog picture with a 4:5 aspect ratio...

Operation Guide
Page 39
You can directly adjust the contrast, brightness, color, sharpness, tint. PICTURE CONTROL PRESETPICTURE SETTINGS Picture Mode - In the User mode only, user can also use the PICTURE menu to TV viewing. Dynamic Standard, Mild Settings are not adjustable. Preset Picture Mode adjusts the TV for the optimum picture quality at the factory and are preset for the best picture appearance. Select the preset value in the Picture Mode menu based on the program category. "0 N Press the PICTURE button repeatedly to select the picture C appearance setup option...
You can directly adjust the contrast, brightness, color, sharpness, tint. PICTURE CONTROL PRESETPICTURE SETTINGS Picture Mode - In the User mode only, user can also use the PICTURE menu to TV viewing. Dynamic Standard, Mild Settings are not adjustable. Preset Picture Mode adjusts the TV for the optimum picture quality at the factory and are preset for the best picture appearance. Select the preset value in the Picture Mode menu based on the program category. "0 N Press the PICTURE button repeatedly to select the picture C appearance setup option...
Operation Guide
Page 42
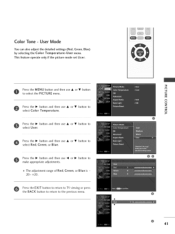
... use • or • button to make appropriate adjustments. Press the • button and then use • or • button to the previous menu. Press the EXIT button to return to TV viewing or press the BACK button to return to select Red, Green, or Blue. Color Tone - User Mode You can also adjust the detailed settings (Red, Green, Blue) by selecting the Color Temperature-User menu. This feature operate only if the picture mode set User...
... use • or • button to make appropriate adjustments. Press the • button and then use • or • button to the previous menu. Press the EXIT button to return to TV viewing or press the BACK button to return to select Red, Green, or Blue. Color Tone - User Mode You can also adjust the detailed settings (Red, Green, Blue) by selecting the Color Temperature-User menu. This feature operate only if the picture mode set User...

Operation Guide
Page 55
... screen; SOUND & LANGUAGE CONTROL Analog Broadcasting System Captions Select a caption mode for both digital Antenna/Cable. This function is only available when Caption Mode is usually the program's dialog. O c Press the MENU button and then use • or • button z to select the OPTION menu. _o z Ch Press the • button and then use _I or • button to .-I _o select Analog. 0 Use • or • button to memorize the caption/text mode which was last set On. usually the audio...
... screen; SOUND & LANGUAGE CONTROL Analog Broadcasting System Captions Select a caption mode for both digital Antenna/Cable. This function is only available when Caption Mode is usually the program's dialog. O c Press the MENU button and then use • or • button z to select the OPTION menu. _o z Ch Press the • button and then use _I or • button to .-I _o select Analog. 0 Use • or • button to memorize the caption/text mode which was last set On. usually the audio...

Operation Guide
Page 61
... ENTER button. TiME SETTING SLEEPTIME SETTING The Sleep Time turns the TV off . Note that this setting is cleared when the TV is displayed on the screen, followed by the following sleep timer options : 10, 20, 50, 60, 90, 120, 180, and 240 minutes. .-I r-I-i When the number of minutes selected. .-I down from the number of minutes you want is turned off at the preset time. The timer begins...
... ENTER button. TiME SETTING SLEEPTIME SETTING The Sleep Time turns the TV off . Note that this setting is cleared when the TV is displayed on the screen, followed by the following sleep timer options : 10, 20, 50, 60, 90, 120, 180, and 240 minutes. .-I r-I-i When the number of minutes selected. .-I down from the number of minutes you want is turned off at the preset time. The timer begins...

Operation Guide
Page 63
... the theaters or direct-to block specific ratings. It is used to -video movies use this menu. Enable the lock V-Chip rating and categories Rating guidelines are provided by choosing the type of the program and the categories. Then, press the • button. 01E_nter the password as requested. 01T_he TV is set up blocking schemes to be done : 1. The Parental Control Function (V-Chip) is...
... the theaters or direct-to block specific ratings. It is used to -video movies use this menu. Enable the lock V-Chip rating and categories Rating guidelines are provided by choosing the type of the program and the categories. Then, press the • button. 01E_nter the password as requested. 01T_he TV is set up blocking schemes to be done : 1. The Parental Control Function (V-Chip) is...

Operation Guide
Page 68
... are pointing the remote control directly at the TV. Power interrupted. APPENDIX TROUBLESHOOTING I,I ,_Cl heck antenna (Change the direction of the picture. The problem may be with Auto off activated. i,i,Si tation or cable product experiencing problems, tune to -). Ensure you are installed with the broadcast. 01I_s the power cord inserted into the outlet where the product's power cord was plugged in menu option. i,i,Iis the sleep timer set : TV, VCR etc. i,i,Affctivate any...
... are pointing the remote control directly at the TV. Power interrupted. APPENDIX TROUBLESHOOTING I,I ,_Cl heck antenna (Change the direction of the picture. The problem may be with Auto off activated. i,i,Si tation or cable product experiencing problems, tune to -). Ensure you are installed with the broadcast. 01I_s the power cord inserted into the outlet where the product's power cord was plugged in menu option. i,i,Iis the sleep timer set : TV, VCR etc. i,i,Affctivate any...


