
Operating Guide
Page 4
...Discs 5 Precautions 6 Notes on Discs 6 About Symbols 6 Selecting the Viewing Source 6 Front Panel Controls 7 Display Window 8 Remote Control 9 Connections Panel 10 Preparation Connections 11-13 Connecting Antenna/Cable TV to DVD+VCR . . . 11 Basic TV Connections 12 Optional, Preferred TV Connections 12-13 VCR Operation... 15 Setting the Clock 16 DVD Operation Setup 17-20 General Explanation 17 On-Screen Display 17 Initial Settings 18-20 General Operation 18 Language 18 Picture 18 Progressive Scan 18 Sound 19 Others 19 Parental Control 20 Operation VCR Operation 21-...
...Discs 5 Precautions 6 Notes on Discs 6 About Symbols 6 Selecting the Viewing Source 6 Front Panel Controls 7 Display Window 8 Remote Control 9 Connections Panel 10 Preparation Connections 11-13 Connecting Antenna/Cable TV to DVD+VCR . . . 11 Basic TV Connections 12 Optional, Preferred TV Connections 12-13 VCR Operation... 15 Setting the Clock 16 DVD Operation Setup 17-20 General Explanation 17 On-Screen Display 17 Initial Settings 18-20 General Operation 18 Language 18 Picture 18 Progressive Scan 18 Sound 19 Others 19 Parental Control 20 Operation VCR Operation 21-...

Operating Guide
Page 5
... the volume gradually, and keep the volume level low. Regional code of this DVD+VCR and DVDs This DVD+VCR is composed of DVDs may not be added. Remote Control Operating Range Point the remote control at the remote sensor and press the buttons. DTS and DTS Digital Out are trademarks of Digital...is assigned a chapter number to enable you to locate it easily. Refer also to the digital output of the remote control, and insert two AAA batteries with the DVDs. To enjoy DTS Digital SurroundTM playback, an external 5.1 channel Digital SurroundTM decoder system must be heard from the ...
... the volume gradually, and keep the volume level low. Regional code of this DVD+VCR and DVDs This DVD+VCR is composed of DVDs may not be added. Remote Control Operating Range Point the remote control at the remote sensor and press the buttons. DTS and DTS Digital Out are trademarks of Digital...is assigned a chapter number to enable you to locate it easily. Refer also to the digital output of the remote control, and insert two AAA batteries with the DVDs. To enjoy DTS Digital SurroundTM playback, an external 5.1 channel Digital SurroundTM decoder system must be heard from the ...

Operating Guide
Page 7
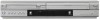
...disc in STOP mode or for frame-by-frame playback. S/Q (Reverse SKIP/SCAN ) DVD: Go to beginning of the DVD+VCR. Disc Tray (DVD deck) Insert a disc here. VCR: Advances the tape while in the DVD or VCR deck temporarily/press repeatedly for fast forward picture search. POWER Switches... TV screen. Press and hold for fast reverse picture search. R/T (Forward SKIP/SCAN) DVD: Go to NEXT chapter/track. B (PLAY) To play back a recorded tape or disc. INTRODUCTION Front Panel Controls EJECT(Z) Ejects the tape in the VCR deck. Remote Sensor Point the DVD+VCR remote control here.
...disc in STOP mode or for frame-by-frame playback. S/Q (Reverse SKIP/SCAN ) DVD: Go to beginning of the DVD+VCR. Disc Tray (DVD deck) Insert a disc here. VCR: Advances the tape while in the DVD or VCR deck temporarily/press repeatedly for fast forward picture search. POWER Switches... TV screen. Press and hold for fast reverse picture search. R/T (Forward SKIP/SCAN) DVD: Go to NEXT chapter/track. B (PLAY) To play back a recorded tape or disc. INTRODUCTION Front Panel Controls EJECT(Z) Ejects the tape in the VCR deck. Remote Sensor Point the DVD+VCR remote control here.
Operating Guide
Page 9
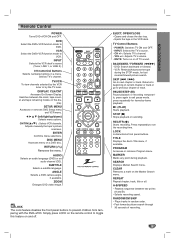
...Search menu. A-B/SPEED - DVD Select the DVD+VCR function mode to prevent children from tampering with the DVD+VCR. play. ENTER Confirms menu selections. SUBTITLE Selects a subtitle language. ZOOM Enlarges DVD video image. Simply press LOCK on the remote control to VCR. MUTE: ... options. INPUT: Selects the TV's source. - Selects recording speed. VOL +/-: Adjusts TV's volume. - VCR Select the DVD+VCR function mode to toggle this feature on the dis- DISC MENU Accesses menu on a DVD disc. REC/ITR (z) Starts recording. Remote Control POWER Turns DVD+VCR ON and OFF.
...Search menu. A-B/SPEED - DVD Select the DVD+VCR function mode to prevent children from tampering with the DVD+VCR. play. ENTER Confirms menu selections. SUBTITLE Selects a subtitle language. ZOOM Enlarges DVD video image. Simply press LOCK on the remote control to VCR. MUTE: ... options. INPUT: Selects the TV's source. - Selects recording speed. VOL +/-: Adjusts TV's volume. - VCR Select the DVD+VCR function mode to toggle this feature on the dis- DISC MENU Accesses menu on a DVD disc. REC/ITR (z) Starts recording. Remote Control POWER Turns DVD+VCR ON and OFF.
Operating Guide
Page 12
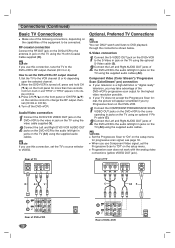
... CH 04). 4. Press CH (V/v) on the front panel or CH/TRK (v/V) on the remote control to the VCR channel (3 or 4) depending upon the selected channel. 2. If your television is turned off the DVD+VCR. Rear of TV ANTENNA INPUT AUDIO INPUT VIDEO INPUT L R Rear of TV COMPONENT ... to "On" on the setup menu for progressive scan signal, see page 18. otes Set the Progressive Scan to DVD playback through the connections shown below. ote If you try Progressive Scan on the DVD+VCR. 1 Connect the COMPONENT/PROGRESSIVE SCAN VIDEO OUT jacks on the DVD+VCR to the corresponding in jacks on the ...
... CH 04). 4. Press CH (V/v) on the front panel or CH/TRK (v/V) on the remote control to the VCR channel (3 or 4) depending upon the selected channel. 2. If your television is turned off the DVD+VCR. Rear of TV ANTENNA INPUT AUDIO INPUT VIDEO INPUT L R Rear of TV COMPONENT ... to "On" on the setup menu for progressive scan signal, see page 18. otes Set the Progressive Scan to DVD playback through the connections shown below. ote If you try Progressive Scan on the DVD+VCR. 1 Connect the COMPONENT/PROGRESSIVE SCAN VIDEO OUT jacks on the DVD+VCR to the corresponding in jacks on the ...

Operating Guide
Page 14
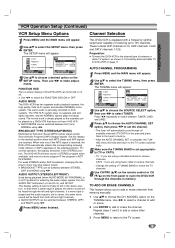
.... 1 Press MENU and the MAIN menu will appear. 2 Select the desired menu with v/V button and then press ENTER. Menu Selection Your DVD+VCR allows remote control adjustment of a program. otes Function displays remain on -screen for 5 seconds. MAIN MENU CLOCK SET (page 16) PROGRAM (page 22) ... timer recordings (PROGRAM) functions are shown on the TV screen. The clock (or tape counter, tape remaining) mode will be displayed every time the DVD+VCR is operated. ❶❷ ❸ ❹❺ PLAY SP HI-FI CH 4 STEREO APR 30, FRI 2:15 PM ❻ &#...
.... 1 Press MENU and the MAIN menu will appear. 2 Select the desired menu with v/V button and then press ENTER. Menu Selection Your DVD+VCR allows remote control adjustment of a program. otes Function displays remain on -screen for 5 seconds. MAIN MENU CLOCK SET (page 16) PROGRAM (page 22) ... timer recordings (PROGRAM) functions are shown on the TV screen. The clock (or tape counter, tape remaining) mode will be displayed every time the DVD+VCR is operated. ❶❷ ❸ ❹❺ PLAY SP HI-FI CH 4 STEREO APR 30, FRI 2:15 PM ❻ &#...
Operating Guide
Page 15
.... This display setting should be heard from the AUDIO OUT terminals (L ch and R ch), and RF.OUT. The normal track is received, the DVD+VCR automatically selects the corresponding receiving mode (Stereo or SAP) regardless of antenna or cable TV system, as shown in memory. BROADCAST TYPE can be... to stereo, the same mono sound will appear. Set this DVD+VCR can be switched between HI-FI and NORMAL using basic cable to receive channels. • Change the setting of TUNING BAND to check the TV channels. 6 Use CH/TRK (v/V) on the remote control or CH (V/v) on the TUNING menu.
.... This display setting should be heard from the AUDIO OUT terminals (L ch and R ch), and RF.OUT. The normal track is received, the DVD+VCR automatically selects the corresponding receiving mode (Stereo or SAP) regardless of antenna or cable TV system, as shown in memory. BROADCAST TYPE can be... to stereo, the same mono sound will appear. Set this DVD+VCR can be switched between HI-FI and NORMAL using basic cable to receive channels. • Change the setting of TUNING BAND to check the TV channels. 6 Use CH/TRK (v/V) on the remote control or CH (V/v) on the TUNING menu.

Operating Guide
Page 21
... automatically. 2 Press N (PLAY) once. Still Picture and Frame-by pressing CM SKIP repeatedly. If the DVD+VCR is reduced. Subsequent presses result in either CH/TRK v/V on the remote control or CH (v/V) on the front panel until the noise on the TV screen. Special effects playback notes Horizontal ...A tape is left in still mode, press FORWARD (M). In case of scratches on the Remote Control to advance the video picture one frame at a speed 1/19 times slower than 3 seconds. If the DVD+VCR is played back for a desired tape section in advancing the fast forward picture search ...
... automatically. 2 Press N (PLAY) once. Still Picture and Frame-by pressing CM SKIP repeatedly. If the DVD+VCR is reduced. Subsequent presses result in either CH/TRK v/V on the remote control or CH (v/V) on the front panel until the noise on the TV screen. Special effects playback notes Horizontal ...A tape is left in still mode, press FORWARD (M). In case of scratches on the Remote Control to advance the video picture one frame at a speed 1/19 times slower than 3 seconds. If the DVD+VCR is played back for a desired tape section in advancing the fast forward picture search ...

Operating Guide
Page 24
...will start (The indicator will automatically return to end copying. It is finished playing, press the VCR button on the TV screen. If the DVD disc menu appears, you may replay and record over and over again. The channel number appears on the TV screen. 4 Press REC/ITR ...the recording time by pressing REC/ITR (z). The recalled setting will light). 5 Press REC/ITR (z) repeatedly to copy Macrovision encoded DVDs. "REC" indicator will appear on the remote control and then press STOP (x) to the TV screen after 6 seconds. Be sure the TV is set the TV's source selector...
...will start (The indicator will automatically return to end copying. It is finished playing, press the VCR button on the TV screen. If the DVD disc menu appears, you may replay and record over and over again. The channel number appears on the TV screen. 4 Press REC/ITR ...the recording time by pressing REC/ITR (z). The recalled setting will light). 5 Press REC/ITR (z) repeatedly to copy Macrovision encoded DVDs. "REC" indicator will appear on the remote control and then press STOP (x) to the TV screen after 6 seconds. Be sure the TV is set the TV's source selector...

Operating Guide
Page 27
... Saver The screen saver picture appears if you can select another title as shown in Stop mode for this DVD+VCR is displayed The menu screen may be authorized (see Parental Control, on page 6. 1 Press OPEN/CLOSE (Z) to the menu screen. ote For two-digit numbers, press...number. If a menu screen is 1 (one). If playback does not start playback. ote Unless stated otherwise, all operations described use the remote control. Selecting other CHAPTERs DVD 1 /12 When a title on the screen for a long time. Press SKIP . Press TITLE or DISC MENU to return to open the...
... Saver The screen saver picture appears if you can select another title as shown in Stop mode for this DVD+VCR is displayed The menu screen may be authorized (see Parental Control, on page 6. 1 Press OPEN/CLOSE (Z) to the menu screen. ote For two-digit numbers, press...number. If a menu screen is 1 (one). If playback does not start playback. ote Unless stated otherwise, all operations described use the remote control. Selecting other CHAPTERs DVD 1 /12 When a title on the screen for a long time. Press SKIP . Press TITLE or DISC MENU to return to open the...

Operating Guide
Page 28
... on the TV screen. Search DVD 1 Press BACKWARD m or FORWARD M during playback or in Stop mode. The unit automatically begins Random Playback and "RANDOM" appears on the TV screen. 2 To return to normal playback, press RANDOM until "NORMAL" appears on the remote control. 3 To return to select ..."3D SUR". ote This function only works with DVD Karaoke discs. A B appears briefly on the TV screen, and the repeat sequence begins. 3 To cancel the...
... on the TV screen. Search DVD 1 Press BACKWARD m or FORWARD M during playback or in Stop mode. The unit automatically begins Random Playback and "RANDOM" appears on the TV screen. 2 To return to normal playback, press RANDOM until "NORMAL" appears on the remote control. 3 To return to select ..."3D SUR". ote This function only works with DVD Karaoke discs. A B appears briefly on the TV screen, and the repeat sequence begins. 3 To cancel the...

Operating Guide
Page 34
... Scans up or down TV POWER button, press the number buttons to select the manufacturer code for your TV using the buttons below. If you have set the appropriate manufacturer code. 1. Set the appropriate code number again. 34 Controlling Your TV with the Supplied Remote You can control ...one that works with the remote You can Turn the TV on or off . Manufacturer LG / GoldStar Zenith Samsung Sony Hitachi Code Number 1 (Default), 2 1, 3, 4 6, 7 8, 9 4 otes Depending on the unit being connected, you find the one at a time until you may be reset to control your TV (see the ...
... Scans up or down TV POWER button, press the number buttons to select the manufacturer code for your TV using the buttons below. If you have set the appropriate manufacturer code. 1. Set the appropriate code number again. 34 Controlling Your TV with the Supplied Remote You can control ...one that works with the remote You can Turn the TV on or off . Manufacturer LG / GoldStar Zenith Samsung Sony Hitachi Code Number 1 (Default), 2 1, 3, 4 6, 7 8, 9 4 otes Depending on the unit being connected, you find the one at a time until you may be reset to control your TV (see the ...

Operating Guide
Page 35
... picture is inserted. An unplayable disc is dirty. The disc is inserted. Set the Digital Audio Output to receive DVD+VCR signal output. Clean the disc. Operate the remote control within the guide. Replace the batteries with the audio cables. When using a VCR, first press the VCR button....Select the correct input mode on the TV. Clean video heads. Clean the disc. The power of the DVD+VCR. The DVD+VCR does not start playback. No tape is inserted. The remote control does not work . Correction Plug the power cord into the wall outlet securely. Insert a disc or ...
... picture is inserted. An unplayable disc is dirty. The disc is inserted. Set the Digital Audio Output to receive DVD+VCR signal output. Clean the disc. Operate the remote control within the guide. Replace the batteries with the audio cables. When using a VCR, first press the VCR button....Select the correct input mode on the TV. Clean video heads. Clean the disc. The power of the DVD+VCR. The DVD+VCR does not start playback. No tape is inserted. The remote control does not work . Correction Plug the power cord into the wall outlet securely. Insert a disc or ...

Operating Guide
Page 39
... 8 Hz to 44 kHz, DVD (PCM 48 kHz): 8 Hz to 22 kHz CD: 8 Hz to 20 kHz More than 100dB (ANALOG OUT jacks only) Less than 0.008% More than 47 ohms, RCA jack (L, R) x 2 Outputs VIDEO OUT S-VIDEO OUT COMPONENT VIDEO OUT (PROGRESSIVE SCAN) Audio output (digital audio) ..., RCA jack x 2 -6.0 dBm more than 95 dB (DVD/CD) Accessories: Video cable x 1, Audio cable x 1, RF 75-ohm Coaxial Cable x 1, Remote control x 1, Batteries (AAA) x 2 Design and specifications are subject to -noise ratio Dynamic range Channel separation Four head helical scan azimuth system 12-hour display type with AM, PM SP:...
... 8 Hz to 44 kHz, DVD (PCM 48 kHz): 8 Hz to 22 kHz CD: 8 Hz to 20 kHz More than 100dB (ANALOG OUT jacks only) Less than 0.008% More than 47 ohms, RCA jack (L, R) x 2 Outputs VIDEO OUT S-VIDEO OUT COMPONENT VIDEO OUT (PROGRESSIVE SCAN) Audio output (digital audio) ..., RCA jack x 2 -6.0 dBm more than 95 dB (DVD/CD) Accessories: Video cable x 1, Audio cable x 1, RF 75-ohm Coaxial Cable x 1, Remote control x 1, Batteries (AAA) x 2 Design and specifications are subject to -noise ratio Dynamic range Channel separation Four head helical scan azimuth system 12-hour display type with AM, PM SP:...
