
Operating Guide
Page 5
.... See your Zenith Electronics dealer. Customize the TV's Features Setup Menu (Start with the literature packet that the hospital provides to operate the TV. The installer remote has Menu, Select, and Adjust, and Channel Bank Keys. The LT2000 Quickset II Clone Programmer ...25 - 26 27 28 - 30 31 - 38 39 - 43 Patient Operation Section (Copy for HealthView Series TVs Back Cover Optional Installer and Patient Remote Controls: Shown herein are NOT included with VCR 9 External Speaker Connection (8-ohm output) 9 Pillow Speaker 10 Step 2. Safety Warnings 2 Important Safety ...
.... See your Zenith Electronics dealer. Customize the TV's Features Setup Menu (Start with the literature packet that the hospital provides to operate the TV. The installer remote has Menu, Select, and Adjust, and Channel Bank Keys. The LT2000 Quickset II Clone Programmer ...25 - 26 27 28 - 30 31 - 38 39 - 43 Patient Operation Section (Copy for HealthView Series TVs Back Cover Optional Installer and Patient Remote Controls: Shown herein are NOT included with VCR 9 External Speaker Connection (8-ohm output) 9 Pillow Speaker 10 Step 2. Safety Warnings 2 Important Safety ...
Operating Guide
Page 6
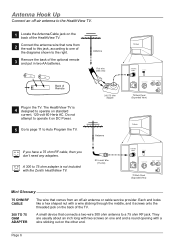
...the middle, and it on the other end. Do not attempt to operate on the back of the optional remote 3 and put in the TV. PILLOW SPEAKER VIDEO IN SPEAKER OUT AUDIO IN TV Back Panel (Expanded View)...two-wire 300 ohm antenna to the HealthView TV. 1 Locate the Antenna/Cable jack on the back of Remote Plug in two AA batteries. PILLOW SPEAKER VIDEO IN SPEAKER OUT AUDIO IN TV Back Panel (Expanded View...off -air antenna to a 75 ohm RF jack. Each end looks like a hex shaped nut with the Zenith HealthView TV. They are usually about an inch long with a wire sticking out on DC Power. 5 Go...
...the middle, and it on the other end. Do not attempt to operate on the back of the optional remote 3 and put in the TV. PILLOW SPEAKER VIDEO IN SPEAKER OUT AUDIO IN TV Back Panel (Expanded View)...two-wire 300 ohm antenna to the HealthView TV. 1 Locate the Antenna/Cable jack on the back of Remote Plug in two AA batteries. PILLOW SPEAKER VIDEO IN SPEAKER OUT AUDIO IN TV Back Panel (Expanded View...off -air antenna to a 75 ohm RF jack. Each end looks like a hex shaped nut with the Zenith HealthView TV. They are usually about an inch long with a wire sticking out on DC Power. 5 Go...

Operating Guide
Page 7
... Panel (Expanded View) Page 7 Do not attempt to operate it on DC power. 5 Go to page 11 to operate on the 1 back of the optional remote 3 and put in the TV. RF Coaxial Wire (75 ohm) ANTENNA CABLE TV SPEAKER M.P.I . Locate the Antenna/Cable jack on standard current, 120-volt 60... 're using a cable box, leave the TV on (usually channel 3 or 4). Connect the cable service wire that runs 2 from the wall, according to one of Remote RF Coaxial Wire (75 ohm) 4 Plug in two AA batteries. If you 're using a cable box, Auto Program might only find the channel the cable...
... Panel (Expanded View) Page 7 Do not attempt to operate it on DC power. 5 Go to page 11 to operate on the 1 back of the optional remote 3 and put in the TV. RF Coaxial Wire (75 ohm) ANTENNA CABLE TV SPEAKER M.P.I . Locate the Antenna/Cable jack on standard current, 120-volt 60... 're using a cable box, leave the TV on (usually channel 3 or 4). Connect the cable service wire that runs 2 from the wall, according to one of Remote RF Coaxial Wire (75 ohm) 4 Plug in two AA batteries. If you 're using a cable box, Auto Program might only find the channel the cable...
Operating Guide
Page 8
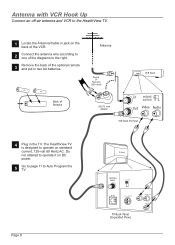
... Hook Up Connect an off-air antenna and VCR to the HealthView TV. 1 Locate the Antenna/Cable in jack on the back of the optional remote 3 and put in the TV. Page 8 TV Back ANTENNA CABLE TV SPEAKER M.P.I. PILLOW SPEAKER VIDEO IN SPEAKER OUT AUDIO IN TV Back Panel (Expanded View... to the right. Back of the diagrams to operate it on standard current, 120-volt 60 Hertz AC. Go to page 11 to 2 one of Remote Antenna Round Or Flat wire (300 ohm) VCR Back 300/75 ohm Adapter In output switch 3 4 Out Video Audio VCR Back AV Panel 4 Plug in...
... Hook Up Connect an off-air antenna and VCR to the HealthView TV. 1 Locate the Antenna/Cable in jack on the back of the optional remote 3 and put in the TV. Page 8 TV Back ANTENNA CABLE TV SPEAKER M.P.I. PILLOW SPEAKER VIDEO IN SPEAKER OUT AUDIO IN TV Back Panel (Expanded View... to the right. Back of the diagrams to operate it on standard current, 120-volt 60 Hertz AC. Go to page 11 to 2 one of Remote Antenna Round Or Flat wire (300 ohm) VCR Back 300/75 ohm Adapter In output switch 3 4 Out Video Audio VCR Back AV Panel 4 Plug in...

Operating Guide
Page 9
... Auto Program the TV. Cable Service (CATV) with VCR Hook Up Connect Cable service and a VCR to the right. 3 Remove the back of the optional remote and put in the TV. Connect the wire that runs from the cable 2 service wall jack, according to one of the diagrams to the HealthView... TV. Do not attempt to operate it on 1 the back of Remote In Out output switch 3 4 Cable Box 4 Plug in two AA batteries. PILLOW SPEAKER VIDEO IN SPEAKER OUT AUDIO IN TV Back Panel (Expanded View) Page...
... Auto Program the TV. Cable Service (CATV) with VCR Hook Up Connect Cable service and a VCR to the right. 3 Remove the back of the optional remote and put in the TV. Connect the wire that runs from the cable 2 service wall jack, according to one of the diagrams to the HealthView... TV. Do not attempt to operate it on 1 the back of Remote In Out output switch 3 4 Cable Box 4 Plug in two AA batteries. PILLOW SPEAKER VIDEO IN SPEAKER OUT AUDIO IN TV Back Panel (Expanded View) Page...
Operating Guide
Page 11
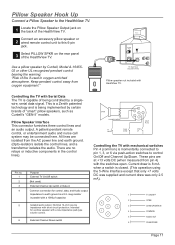
...such as Curbell's "GEN-II" models. Pillow Speaker Interface This connector furnishes three control lines and an audio output. A patient-pendant remote control, or entertainment audio and nurse call system may be connected here. Isolated audio output. Nominal 14-ohm source impedance with a 1000... pf capacitor. This is a Zenith patented technology and is a 8.2- Keep pendant control away from the AC power line and earth ground. (Opto-isolators isolate the control lines...
...such as Curbell's "GEN-II" models. Pillow Speaker Interface This connector furnishes three control lines and an audio output. A patient-pendant remote control, or entertainment audio and nurse call system may be connected here. Isolated audio output. Nominal 14-ohm source impedance with a 1000... pf capacitor. This is a Zenith patented technology and is a 8.2- Keep pendant control away from the AC power line and earth ground. (Opto-isolators isolate the control lines...
Operating Guide
Page 12
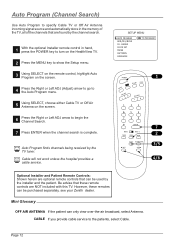
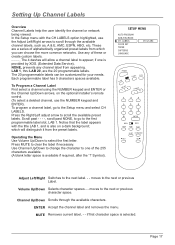
...the channels that can only view over-the-air broadcast, select Antenna. However, these remote controls are NOT included with this TV. Mini Glossary OFF AIR ANTENNA If the patient can be purchased separately, see your Zenith dealer. Cable will not work unless the hospital provides a cable service. Auto Program ... 1 press the POWER key to turn on the HealthView TV. 2 Press the MENU key to show the Setup menu. 3 Using SELECT on the remote control, highlight Auto Program on the screen. Page 12 LABELS CLOCK SET TIMER CAPTIONS LANGUAGE POWER TV/FM FLSHBK MUTE CC VOLUME + - Press the ...
...the channels that can only view over-the-air broadcast, select Antenna. However, these remote controls are NOT included with this TV. Mini Glossary OFF AIR ANTENNA If the patient can be purchased separately, see your Zenith dealer. Cable will not work unless the hospital provides a cable service. Auto Program ... 1 press the POWER key to turn on the HealthView TV. 2 Press the MENU key to show the Setup menu. 3 Using SELECT on the remote control, highlight Auto Program on the screen. Page 12 LABELS CLOCK SET TIMER CAPTIONS LANGUAGE POWER TV/FM FLSHBK MUTE CC VOLUME + - Press the ...
Operating Guide
Page 14
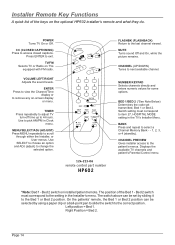
...Press MENU repeatedly to the last channel viewed. CHANNEL -+ 1 2 3 4 5 6 7 8 9 0 ENTER BED 1 BED 2 TIMER MENU BANK SELECT CH PREVIEW ADJ ADJ 124-213-06 remote control part number HP602 FLASHBK (FLASHBACK) Return to scroll through either the Installer, or User menus. MUTE Turns sound Off and On, while the picture...Adjusts the sound levels. ENTER Press to view the Channel/Time display or to item 27, HOSPITAL MODE setting in Clock menu. On the patients' remote, the Bed 1 or Bed 2 position can be selected by sliding it to the Bed 1 or Bed 2 position. Press ENTER to pick ...
...Press MENU repeatedly to the last channel viewed. CHANNEL -+ 1 2 3 4 5 6 7 8 9 0 ENTER BED 1 BED 2 TIMER MENU BANK SELECT CH PREVIEW ADJ ADJ 124-213-06 remote control part number HP602 FLASHBK (FLASHBACK) Return to scroll through either the Installer, or User menus. MUTE Turns sound Off and On, while the picture...Adjusts the sound levels. ENTER Press to view the Channel/Time display or to item 27, HOSPITAL MODE setting in Clock menu. On the patients' remote, the Bed 1 or Bed 2 position can be selected by sliding it to the Bed 1 or Bed 2 position. Press ENTER to pick ...
Operating Guide
Page 15
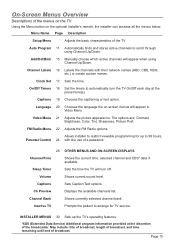
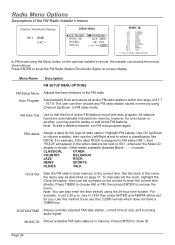
... Sets the time. Volume Shows current sound level. Ch Preview Displays the available channels list. Language 20 Chooses the language the on the optional installer's remote, the installer can accsess all the menus below. On-Screen Menus Overview Descriptions of broadcast. Captions 19 Chooses the captioning or text option. Video Menu...
... Sets the time. Volume Shows current sound level. Ch Preview Displays the available channels list. Language 20 Chooses the language the on the optional installer's remote, the installer can accsess all the menus below. On-Screen Menus Overview Descriptions of broadcast. Captions 19 Chooses the captioning or text option. Video Menu...
Operating Guide
Page 16
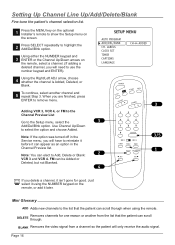
...Channel Preview list. Page 16 FM can elect to show the Setup menu on the remote, or add it can appear as an option in the Service menu, you will ...one reason or another channel and 5 repeat Step 3. Just select it using the remote. BLANK Removes the video signal from the list that the patient can scroll DELETE through. Press... the MENU key on the optional 1 Installer's remote to Add, Delete or Blank: VCR 3 and VCR 4. Use Channel Up/Down to highlight the 2 Add/Del/Blnk option....
...Channel Preview list. Page 16 FM can elect to show the Setup menu on the remote, or add it can appear as an option in the Service menu, you will ...one reason or another channel and 5 repeat Step 3. Just select it using the remote. BLANK Removes the video signal from the list that the patient can scroll DELETE through. Press... the MENU key on the optional 1 Installer's remote to Add, Delete or Blank: VCR 3 and VCR 4. Use Channel Up/Down to highlight the 2 Add/Del/Blnk option....
Operating Guide
Page 17
... using the NUMBER keypad and ENTER or the Channel Up/Down arrows, on a dark background; if first character space is also on the optional Installer's remote control. (To select a deleted channel, use the Adjust Left/Right arrows to the next or previous character space. Page 17 In the Setup menu with...
... using the NUMBER keypad and ENTER or the Channel Up/Down arrows, on a dark background; if first character space is also on the optional Installer's remote control. (To select a deleted channel, use the Adjust Left/Right arrows to the next or previous character space. Page 17 In the Setup menu with...
Operating Guide
Page 18
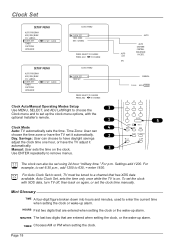
... 1200 to remove menus. Clock Set SETUP MENU AUTO PROGRAM ADD/DEL/BLNK CH. Settings add 1200. To set the clock with the optional Installer's remote. 1 Clock Mode 4 Auto: TV automatically sets the time.
... 1200 to remove menus. Clock Set SETUP MENU AUTO PROGRAM ADD/DEL/BLNK CH. Settings add 1200. To set the clock with the optional Installer's remote. 1 Clock Mode 4 Auto: TV automatically sets the time.
Operating Guide
Page 19
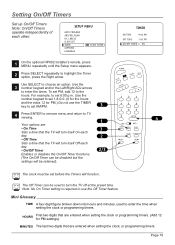
... SET TIMER CAPTIONS LANGUAGE TO SET TIMER TIMER ON TIME 9:00 AM OFF TIME 7:00 PM ON/OFF TIMER ON On the optional HP602 Installer's remote, press 1 MENU repeatedly until the Setup menu appears. To set PM, add 12 to enter the times. MINUTES The last two digits that are entered...
... SET TIMER CAPTIONS LANGUAGE TO SET TIMER TIMER ON TIME 9:00 AM OFF TIME 7:00 PM ON/OFF TIMER ON On the optional HP602 Installer's remote, press 1 MENU repeatedly until the Setup menu appears. To set PM, add 12 to enter the times. MINUTES The last two digits that are entered...
Operating Guide
Page 20
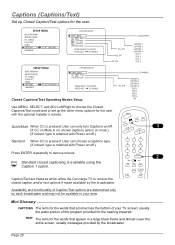
... for the hearing impaired. Page 20 SETUP MENU AUTO PROGRAM ADD/DEL/BLNK CH. MODE SEL. Standard closed captioning is retained with the optional Installer's remote. LABELS CLOCK SET TIMER CAPTIONS LANGUAGE TO SET CAPTIONS CAPTIONS SETUP OPER. usually messages provided by each broadcaster and may not be available in a large...
... for the hearing impaired. Page 20 SETUP MENU AUTO PROGRAM ADD/DEL/BLNK CH. MODE SEL. Standard closed captioning is retained with the optional Installer's remote. LABELS CLOCK SET TIMER CAPTIONS LANGUAGE TO SET CAPTIONS CAPTIONS SETUP OPER. usually messages provided by each broadcaster and may not be available in a large...

Operating Guide
Page 21
... the Right/Left ADJ arrow to choose one of 3 the following options: English, Spanish or French. 4 Press ENTER to return to 2 highlight Language on the remote control, to TV viewing. LABELS CLOCK SET TIMER CAPTIONS LANGUAGE ENGLISH 1 Press the MENU key on -screen menus. SETUP MENU AUTO PROGRAM ADD/DEL/BLNK... BANK SELECT CH PREVIEW 2 ADJ ADJ 3 Page 21 POWER TV/FM FLSHBK MUTE CC VOLUME + - Language Choose the language for the on the optional Installer's remote control so the Setup menu appears.
... the Right/Left ADJ arrow to choose one of 3 the following options: English, Spanish or French. 4 Press ENTER to return to 2 highlight Language on the remote control, to TV viewing. LABELS CLOCK SET TIMER CAPTIONS LANGUAGE ENGLISH 1 Press the MENU key on -screen menus. SETUP MENU AUTO PROGRAM ADD/DEL/BLNK... BANK SELECT CH PREVIEW 2 ADJ ADJ 3 Page 21 POWER TV/FM FLSHBK MUTE CC VOLUME + - Language Choose the language for the on the optional Installer's remote control so the Setup menu appears.

Operating Guide
Page 22
... CC TV/FM FLSHBK MUTE • Picture Preference: Choose either the B original settings with Custom. CHANNEL -+ 1 2 3 4 5 6 2 Using SELECT on the installer's remote control, choose Contrast on the optional Installer remote. The lower the level, the softer the images will appear. Your options are: • Contrast: Adjusts the level of difference between amounts...
... CC TV/FM FLSHBK MUTE • Picture Preference: Choose either the B original settings with Custom. CHANNEL -+ 1 2 3 4 5 6 2 Using SELECT on the installer's remote control, choose Contrast on the optional Installer remote. The lower the level, the softer the images will appear. Your options are: • Contrast: Adjusts the level of difference between amounts...
Operating Guide
Page 23
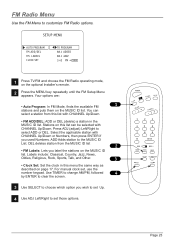
... if you used Numbers. Your options are: 1 • Auto Program: In FM Mode, finds the available FM stations and puts them on the optional Installer's remote. 2 Press the MENU key repeatedly until the FM Setup Menu appears. Select the applicable station with CHANNEL Up/Down. • FM ADD/DEL: ADD or...
... if you used Numbers. Your options are: 1 • Auto Program: In FM Mode, finds the available FM stations and puts them on the optional Installer's remote. 2 Press the MENU key repeatedly until the FM Setup Menu appears. Select the applicable station with CHANNEL Up/Down. • FM ADD/DEL: ADD or...
Operating Guide
Page 24
... TALK CH TO SELECT, ENTER TO QUIT In FM mode using the Menu button on the optional Installer's remote, the installer can also enter the time directly using Channel Up/Down, in 1430 then press ENTER and.../PM will appear in this method if you may want to choose a station, then use the LT2000 remote which does not have a TIMER key. The user can then choose any FM radio station stored in ... available FM radio stations in memory. Press ENTER to show the FM Radio Station/Time/Audio Signal on the remote to set for the type of 87.7 - 107.9. Note: To add a deleted channel, run FM auto...
... TALK CH TO SELECT, ENTER TO QUIT In FM mode using the Menu button on the optional Installer's remote, the installer can also enter the time directly using Channel Up/Down, in 1430 then press ENTER and.../PM will appear in this method if you may want to choose a station, then use the LT2000 remote which does not have a TIMER key. The user can then choose any FM radio station stored in ... available FM radio stations in memory. Press ENTER to show the FM Radio Station/Time/Audio Signal on the remote to set for the type of 87.7 - 107.9. Note: To add a deleted channel, run FM auto...
Operating Guide
Page 25
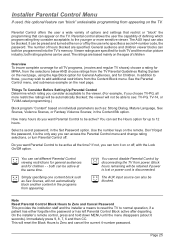
... page, using the Age Block option for General Audiences, and for up to add additional restrictions from the TV Parental Guidelines Rating System on the remote. Simply specifying one content block such as : Strong Dialog, Mature Language, Sex Scenes, Violence Scenes, or Fantasy Violence Scenes; Parental Control offers the user a wide... many hours do you choose TV-PG, all TV programs, (movies and regular TV shows) choose a rating for all more sensitive viewer. On the installer's remote control, press and hold down MENU until the menu disappears (about 6 seconds).
... page, using the Age Block option for General Audiences, and for up to add additional restrictions from the TV Parental Guidelines Rating System on the remote. Simply specifying one content block such as : Strong Dialog, Mature Language, Sex Scenes, Violence Scenes, or Fantasy Violence Scenes; Parental Control offers the user a wide... many hours do you choose TV-PG, all TV programs, (movies and regular TV shows) choose a rating for all more sensitive viewer. On the installer's remote control, press and hold down MENU until the menu disappears (about 6 seconds).
Operating Guide
Page 26
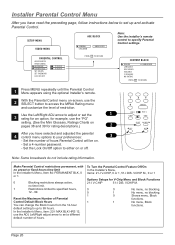
...SCENES VIOLENCE F VIOLENCE NO RATING UNBLOCKED PRESS CC TO RETURN Press MENU repeatedly until the Parental Control 1 Menu appears using the optional Installer's remote. VCHIP M., 0 or 1 Options Setups for rating descriptions.) 2 After you have selected and adjusted the parental 4 control menu options to your...the MPAA Rating menu and customize the level of restriction. SETUP MENU VIDEO MENU AGE BLOCK GENERAL CHILDREN UNBLOCKED Note: Use the installer's remote control to up and activate Parental Control. Set the number of hours Parental Control will be on or off. 7 8 9 0...
...SCENES VIOLENCE F VIOLENCE NO RATING UNBLOCKED PRESS CC TO RETURN Press MENU repeatedly until the Parental Control 1 Menu appears using the optional Installer's remote. VCHIP M., 0 or 1 Options Setups for rating descriptions.) 2 After you have selected and adjusted the parental 4 control menu options to your...the MPAA Rating menu and customize the level of restriction. SETUP MENU VIDEO MENU AGE BLOCK GENERAL CHILDREN UNBLOCKED Note: Use the installer's remote control to up and activate Parental Control. Set the number of hours Parental Control will be on or off. 7 8 9 0...


