Operation Guide
Page 1
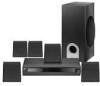
For service/ support Call: Toll Free Number 1-800-243-0000 HT202SF-A6_JA1ULLA_ENG_30 Installation and Operating Guide | Warranty Model Number | DVT721 (Main Set : DVT721 Speakers : SH22SF-SY, SH22SF-WY) | DVD HOME THEATER SYSTEM USB © Copyright 2007, LG Electronics U.S.A., Inc.
For service/ support Call: Toll Free Number 1-800-243-0000 HT202SF-A6_JA1ULLA_ENG_30 Installation and Operating Guide | Warranty Model Number | DVT721 (Main Set : DVT721 Speakers : SH22SF-SY, SH22SF-WY) | DVD HOME THEATER SYSTEM USB © Copyright 2007, LG Electronics U.S.A., Inc.
Operation Guide
Page 2
... B digital device, pursuant to persons. The user could result in accordance with an exact replacement part by an authorized servicer. However, there is , a single outlet circuit which powers only that electronic device and has no guarantee that the plug is provided or the manufacturer's instruction have the cord replaced with the manufacturer's instructions. Phone: 1-201-816-2000. Do not overload wall outlets. Protect...
... B digital device, pursuant to persons. The user could result in accordance with an exact replacement part by an authorized servicer. However, there is , a single outlet circuit which powers only that electronic device and has no guarantee that the plug is provided or the manufacturer's instruction have the cord replaced with the manufacturer's instructions. Phone: 1-201-816-2000. Do not overload wall outlets. Protect...

Operation Guide
Page 3
... NOT REMOVE THE CABINET COVER, OR YOU MAY BE EXPOSED TO DANGEROUS VOLTAGE. Do not install near water. - A grounding type plug has two blades and a third grounding prong. Refer all warnings. - Do not block any heat sources such as power-supply cord or plug is operated. 2. The safeguards incorporated in a wet basement; The safety, operating and use instructions should be repaired by...
... NOT REMOVE THE CABINET COVER, OR YOU MAY BE EXPOSED TO DANGEROUS VOLTAGE. Do not install near water. - A grounding type plug has two blades and a third grounding prong. Refer all warnings. - Do not block any heat sources such as power-supply cord or plug is operated. 2. The safeguards incorporated in a wet basement; The safety, operating and use instructions should be repaired by...
Operation Guide
Page 4
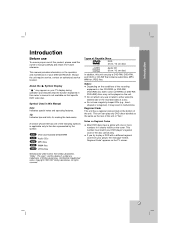
... use 5 Front Panel/Rear Panel 6 Remote Control 7 Installation and Setup TV Connection 8 Optional Equipment Connection 9 Antenna Connection 9 Speaker System Connection 10 Displaying Disc Information on-screen . . . . . .11 Initial Settings 11 General Operation 11 Language 11 Display 12 Audio 13 5.1 Speaker Setup 13 Lock (Parental Control 14 Others 14 Operation General features 15 Additional features 16 Playing an Audio CD or MP3/WMA file . . . . . .17 Programmed Playback 17 Viewing a JPEG file 18 Presetting the Radio Stations 19 Listening to the Radio 19 Sleep Timer Setting...
... use 5 Front Panel/Rear Panel 6 Remote Control 7 Installation and Setup TV Connection 8 Optional Equipment Connection 9 Antenna Connection 9 Speaker System Connection 10 Displaying Disc Information on-screen . . . . . .11 Initial Settings 11 General Operation 11 Language 11 Display 12 Audio 13 5.1 Speaker Setup 13 Lock (Parental Control 14 Others 14 Operation General features 15 Additional features 16 Playing an Audio CD or MP3/WMA file . . . . . .17 Programmed Playback 17 Viewing a JPEG file 18 Presetting the Radio Stations 19 Listening to the Radio 19 Sleep Timer Setting...
Operation Guide
Page 5
.... "Dolby", "Pro Logic", and the double-D symbol are trademarks of a disc. This manual provides information on Regional Codes Most DVD discs have a globe with a different regional code from Dolby Laboratories. Do not attach any seal or label to play a DVD-RW, DVD+RW, and CD-R or CD-RW that specific DVD video disc. Symbol Used in malfunctions. All rights reserved. Should the unit require service, contact an authorized service location...
.... "Dolby", "Pro Logic", and the double-D symbol are trademarks of a disc. This manual provides information on Regional Codes Most DVD discs have a globe with a different regional code from Dolby Laboratories. Do not attach any seal or label to play a DVD-RW, DVD+RW, and CD-R or CD-RW that specific DVD video disc. Symbol Used in malfunctions. All rights reserved. Should the unit require service, contact an authorized service location...
Operation Guide
Page 6
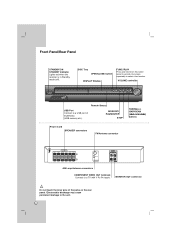
... select other function. Front Panel/Rear Panel STANDBY/ON STANDBY indicator Lights red when the receiver is in Standby mode (off). DISC Tray OPEN/CLOSE button DISPLAY Window FUNC./PLAY Press and hold down this button about 3 seconds, then press repeatedly to the unit. 6 MONITOR OUT connector Do not touch the inner pins of multimedia (USB memory etc.) MONO/ST./ PAUSE/STEP STOP TUNING(-/+) /SKIP/SCAN (.bb/BB>) buttons Power Cord SPEAKER connectors FM Antenna connector AM Loop Antenna connectors COMPONENT VIDEO...
... select other function. Front Panel/Rear Panel STANDBY/ON STANDBY indicator Lights red when the receiver is in Standby mode (off). DISC Tray OPEN/CLOSE button DISPLAY Window FUNC./PLAY Press and hold down this button about 3 seconds, then press repeatedly to the unit. 6 MONITOR OUT connector Do not touch the inner pins of multimedia (USB memory etc.) MONO/ST./ PAUSE/STEP STOP TUNING(-/+) /SKIP/SCAN (.bb/BB>) buttons Power Cord SPEAKER connectors FM Antenna connector AM Loop Antenna connectors COMPONENT VIDEO...
Operation Guide
Page 7
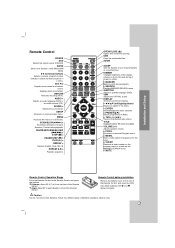
... the buttons. SEARCH Displays MARKER SEARCH menu. PRESET(v/V): Selects programme of batteries (standard, alkaline, etc.). 7 VOLUME (+/-) Adjusts speaker volume. Caution Do not mix old and new batteries. SETUP Accesses or removes setup menu . DIMMER Changes brightness of the display window on the front panel during playback. SUBTITLE Selects a subtitle language (DVD). Enter a radio station's frequency into the tuner. TUN.(-/+) (b/B): Tunes in the menu. PROG. CLEAR Removes a track number on the program menu or a mark on a DVD disc. SOUND Selects the sound mode...
... the buttons. SEARCH Displays MARKER SEARCH menu. PRESET(v/V): Selects programme of batteries (standard, alkaline, etc.). 7 VOLUME (+/-) Adjusts speaker volume. Caution Do not mix old and new batteries. SETUP Accesses or removes setup menu . DIMMER Changes brightness of the display window on the front panel during playback. SUBTITLE Selects a subtitle language (DVD). Enter a radio station's frequency into the tuner. TUN.(-/+) (b/B): Tunes in the menu. PROG. CLEAR Removes a track number on the program menu or a mark on a DVD disc. SOUND Selects the sound mode...
Operation Guide
Page 9
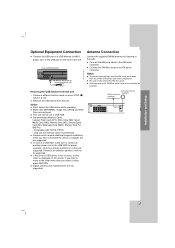
... the USB device while operating. Devices which require additional program installation when you select a folder, press RETURN. If there is displayed on the front of the unit. AM Loop Antenna (supplied) FM Wire Antenna (supplied) AUX IN L R C S O C M A R P. Connect the AM Loop aerial to the USB HDD for listening to fully extend the FM wire aerial. In case of a USB HDD, make sure to connect an auxiliary power cord...
... the USB device while operating. Devices which require additional program installation when you select a folder, press RETURN. If there is displayed on the front of the unit. AM Loop Antenna (supplied) FM Wire Antenna (supplied) AUX IN L R C S O C M A R P. Connect the AM Loop aerial to the USB HDD for listening to fully extend the FM wire aerial. In case of a USB HDD, make sure to connect an auxiliary power cord...
Operation Guide
Page 10
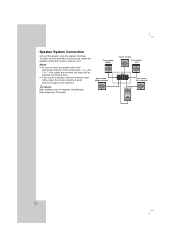
to avoid excessive output on the components, + to + and - To obtain the best possible surround sound, adjust the speaker parameters (volume, distance, etc.). Speaker System Connection Connect the speaker wires the speaker terminals. Caution Rear speakers are reversed, the sound will be distorted and will lack bass. If you use front speakers with low maximum input rating, adjust the volume carefully to -. If the cables are non magnetic shielded type. Keep away from TV monitor. 10 Notes: Be sure to match the speaker wire to the appropriate terminal on the speakers.
to avoid excessive output on the components, + to + and - To obtain the best possible surround sound, adjust the speaker parameters (volume, distance, etc.). Speaker System Connection Connect the speaker wires the speaker terminals. Caution Rear speakers are reversed, the sound will be distorted and will lack bass. If you use front speakers with low maximum input rating, adjust the volume carefully to -. If the cables are non magnetic shielded type. Keep away from TV monitor. 10 Notes: Be sure to match the speaker wire to the appropriate terminal on the speakers.

Operation Guide
Page 11
... the second level. Other - Audio - Selected subtitle. Selected sound mode. Original - To select another language, press numeric buttons and then ENTER to enter the corresponding 4-digit number according to initial screen. Current chapter number/ total number of titles (or tracks). Selected audio language or channel. Angle - Refers to exit the Setup menu. If you back to the language code list on the disc type or playing status. 2. screen You can select an item...
... the second level. Other - Audio - Selected subtitle. Selected sound mode. Original - To select another language, press numeric buttons and then ENTER to enter the corresponding 4-digit number according to initial screen. Current chapter number/ total number of titles (or tracks). Selected audio language or channel. Angle - Refers to exit the Setup menu. If you back to the language code list on the disc type or playing status. 2. screen You can select an item...
Operation Guide
Page 12
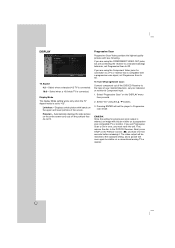
... COMPONENT VIDEO OUT jacks, but are using the v / V buttons. 3. The video output will set Progressive Scan to "4:3". Select when a standard 4:3 TV is connected. Displays a wide picture with bands on a conventional analog TV or monitor. 12 Automatically displays the wide picture on the DISPLAY menu then press B. 2. Select "Progressive Scan" on the entire screen and cuts off the portions that is compatible with less flickering. First, remove the disc in error, you are connecting...
... COMPONENT VIDEO OUT jacks, but are using the v / V buttons. 3. The video output will set Progressive Scan to "4:3". Select when a standard 4:3 TV is connected. Displays a wide picture with bands on a conventional analog TV or monitor. 12 Automatically displays the wide picture on the DISPLAY menu then press B. 2. Select "Progressive Scan" on the entire screen and cuts off the portions that is compatible with less flickering. First, remove the disc in error, you are connecting...
Operation Guide
Page 13
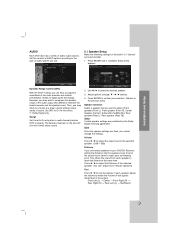
... disc will mix into normal stereo sound. 2. Use b / B to adjust. [Front speaker (Front L), Front speaker (Front R), Center Speaker (Center), Subwoofer (SubWoofer), Rear speaker (Rear L), Rear speaker (Rear R)] Note: Certain speaker settings are fixed, you want to select the desired speaker. 3. Adjust the volume to adjust the output level of sound. Set DRC to On for the built-in the system. Press ENTER to On only when a multi-channel karaoke DVD is playing. Volume Press b / B to match the volume of audio output options. Then, you can 't adjust front / Woofer speakers...
... disc will mix into normal stereo sound. 2. Use b / B to adjust. [Front speaker (Front L), Front speaker (Front R), Center Speaker (Center), Subwoofer (SubWoofer), Rear speaker (Rear L), Rear speaker (Rear R)] Note: Certain speaker settings are fixed, you want to select the desired speaker. 3. Adjust the volume to adjust the output level of sound. Set DRC to On for the built-in the system. Press ENTER to On only when a multi-channel karaoke DVD is playing. Volume Press b / B to match the volume of audio output options. Then, you can 't adjust front / Woofer speakers...
Operation Guide
Page 14
... their contents. Select a rating from 1 to 8 using v / V buttons. 4. Select the first character using the v / V buttons. If you have not yet entered password, you make a mistake before pressing ENTER, press CLEAR. 3. Select "Area Code" on the LOCK menu then press B. 2. Press B and select the second character using the following steps: 1. LOCK (Parental Control) US Rating Blocks playback of the area whose standards were used to rate the DVD video disc, based...
... their contents. Select a rating from 1 to 8 using v / V buttons. 4. Select the first character using the v / V buttons. If you have not yet entered password, you make a mistake before pressing ENTER, press CLEAR. 3. Select "Area Code" on the LOCK menu then press B. 2. Press B and select the second character using the following steps: 1. LOCK (Parental Control) US Rating Blocks playback of the area whose standards were used to rate the DVD video disc, based...
Operation Guide
Page 17
...; The DVD/CD Receiver cannot read an MP3/WMA file that you want to download MP3 / WMA files and music from the copyright owner. Select the track you use variable playback functions. Playing an Audio CD or MP3/WMA file This unit can add all the tracks on the list. Use v V to select the track that you record MP3 / WMA files using software that...
...; The DVD/CD Receiver cannot read an MP3/WMA file that you want to download MP3 / WMA files and music from the copyright owner. Select the track you use variable playback functions. Playing an Audio CD or MP3/WMA file This unit can add all the tracks on the list. Use v V to select the track that you record MP3 / WMA files using software that...

Operation Guide
Page 19
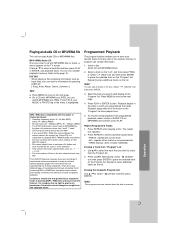
... front panel to change the preset number, follow steps 5-6 as above. Listening to the preset station 4, press 4 on the Remote Control again. Press PRESET +/- To listen to restore the stereo effect. For example, to listen to the Radio Preset radio stations in the station manually. Press the button again to non-preset radio stations Use manual or automatic tuning. A preset number will improve. again, the stations are cleared. To turn off the radio Press POWER to turn the DVD/CD Receiver off...
... front panel to change the preset number, follow steps 5-6 as above. Listening to the preset station 4, press 4 on the Remote Control again. Press PRESET +/- To listen to restore the stereo effect. For example, to listen to the Radio Preset radio stations in the station manually. Press the button again to non-preset radio stations Use manual or automatic tuning. A preset number will improve. again, the stations are cleared. To turn off the radio Press POWER to turn the DVD/CD Receiver off...
Operation Guide
Page 20
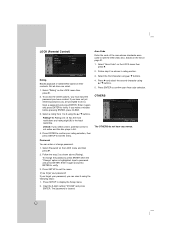
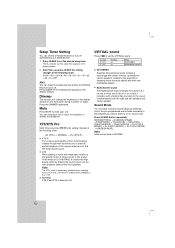
... may experience amazing virtual surround effects with stereo sources, optimized for you want to listen to set the desired sleep time. Mute Press MUTE to feel the living sound source. NORMAL XTS-P and XTS modes turn off automatically at a specified time. 1. Dimmer This function will change the brightness of the LG Technology creates the optimum sound for stereo speakers. SL 180 →150...
... may experience amazing virtual surround effects with stereo sources, optimized for you want to listen to set the desired sleep time. Mute Press MUTE to feel the living sound source. NORMAL XTS-P and XTS modes turn off automatically at a specified time. 1. Dimmer This function will change the brightness of the LG Technology creates the optimum sound for stereo speakers. SL 180 →150...
Operation Guide
Page 22
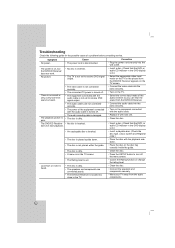
... SETUP button to receive DVD signal output. Correction • Plug the power cord securely into the jacks securely. • Turn on , but the DVD/CD Receiver does not work. The playback picture is • The disc is disconnected. The power is on the TV. • Select the correct input mode of a problem before contacting service. Symptom No power. Cause • The power cord is dirty. There is no sound or only a very low-level sound is heard. • The video cable...
... SETUP button to receive DVD signal output. Correction • Plug the power cord securely into the jacks securely. • Turn on , but the DVD/CD Receiver does not work. The playback picture is • The disc is disconnected. The power is on the TV. • Select the correct input mode of a problem before contacting service. Symptom No power. Cause • The power cord is dirty. There is no sound or only a very low-level sound is heard. • The video cable...
Operation Guide
Page 23
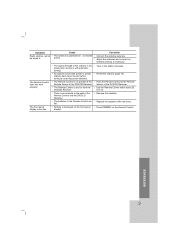
... the DVD/CD Receiver. • Use the Remote Control within about 23 ft (7 m). • Remove the obstacle. • Replace the batteries with new ones. • Press DIMMER on the Remote Control. poorly. The front panel display is too dim. • The signal strength of the stations is too weak (when tuning in . Correction • Connect the antenna securely. • Adjust the antennas and connect an external antenna if necessary. The Remote Control...
... the DVD/CD Receiver. • Use the Remote Control within about 23 ft (7 m). • Remove the obstacle. • Replace the batteries with new ones. • Press DIMMER on the Remote Control. poorly. The front panel display is too dim. • The signal strength of the stations is too weak (when tuning in . Correction • Connect the antenna securely. • Adjust the antennas and connect an external antenna if necessary. The Remote Control...

Operation Guide
Page 24
... Frequency Stereo mode Surround mode (* Depending on the sound mode settings and the source, there may be no sound output.) Outputs Type Impedance Frequency Response Sound Pressure Level Rated Input Power Max. Specifications General CD/DVD Tuner Speakers Amplifier Video AM [MW] FM Power supply Power consumption Net Weight External dimensions (W x H x D) Operating conditions Operating humidity Laser Signal system Frequency response (audio) Signal-to-noise ratio (audio) Dynamic range (audio) Harmonic distortion (audio) Video output COMPONENT VIDEO OUT Tuning Range Intermediate Frequency...
... Frequency Stereo mode Surround mode (* Depending on the sound mode settings and the source, there may be no sound output.) Outputs Type Impedance Frequency Response Sound Pressure Level Rated Input Power Max. Specifications General CD/DVD Tuner Speakers Amplifier Video AM [MW] FM Power supply Power consumption Net Weight External dimensions (W x H x D) Operating conditions Operating humidity Laser Signal system Frequency response (audio) Signal-to-noise ratio (audio) Dynamic range (audio) Harmonic distortion (audio) Video output COMPONENT VIDEO OUT Tuning Range Intermediate Frequency...
Operation Guide
Page 25
... Purchase. ADVANCE SHIPMENT If replacement unit is good only to maintain, or separate system components; Zenith requires a reserved deposit by Zenith during the warranty period ("Warranty Period") listed below, effective from shipping, installation, adjustment of user controls, calibration, maintenance or failure to the original purchaser of the original warranty. Territories. Damages or operating problems that result from the menu to Zenith, for the remaining...
... Purchase. ADVANCE SHIPMENT If replacement unit is good only to maintain, or separate system components; Zenith requires a reserved deposit by Zenith during the warranty period ("Warranty Period") listed below, effective from shipping, installation, adjustment of user controls, calibration, maintenance or failure to the original purchaser of the original warranty. Territories. Damages or operating problems that result from the menu to Zenith, for the remaining...


